Successful propagation of wisteria often relies on understanding a few key elements. Rooting hormone, a readily available compound, significantly increases the success rate of cuttings. The International Plant Propagators’ Society (IPPS) offers invaluable resources for both amateur and professional horticulturists interested in mastering advanced techniques. Using the right garden tools, like sharp pruning shears, ensures clean cuts, crucial for successful rooting. Various wisteria varieties differ in their propagation requirements, making careful selection essential for achieving optimal results.
Wisteria Propagation: The Ultimate, Fail-Proof Guide! – Article Layout
This guide is designed to walk you through everything you need to know to successfully propagate your wisteria. We’ll cover different methods, troubleshoot common issues, and equip you with the knowledge to expand your wisteria collection.
Introduction: Why Propagate Wisteria?
- Briefly explain the appeal of wisteria – its beauty, fragrance, and value.
- Highlight the benefits of propagation:
- Creating new plants from existing ones.
- Cost-effectiveness compared to buying new wisteria.
- Cloning desirable traits from a specific wisteria vine.
- Mention that wisteria can be propagated through several methods, and this guide will cover the most reliable.
Understanding the Basics: What is Propagation of Wisteria?
This section will be important to define the keyword "propagation of wisteria".
- Define propagation in simple terms: creating new plants from a parent plant.
- Explain that wisteria propagation involves taking a part of the existing plant (e.g., stem, root) and encouraging it to grow into a new, independent plant.
- Briefly introduce the three main propagation methods we’ll discuss in detail:
- Layering
- Stem Cuttings
- Seed Propagation (with a strong caution about the variable results).
Method 1: Layering – The Easiest Start!
Layering is often the most successful method for propagating wisteria because the new plant continues to receive nutrients from the parent plant while establishing its own roots.
Step-by-Step Guide to Layering Wisteria
- Timing: The best time for layering is in the spring or early summer when the plant is actively growing.
- Choosing a Branch: Select a long, flexible, healthy branch that is low to the ground. It should ideally be about a year old.
- Preparing the Branch: Remove leaves from the middle portion of the branch (the part that will be buried).
- Creating the Rooting Point:
- Gently wound the branch at the point where it will contact the soil. You can do this by making a shallow cut or scraping the bark. This encourages root formation.
- Optionally, apply rooting hormone to the wounded area to speed up the process.
- Burying the Branch: Bend the prepared section of the branch and bury it in the ground or in a pot filled with well-draining soil.
- Securing the Branch: Use a U-shaped garden staple or rock to hold the buried section of the branch in place, ensuring it remains in contact with the soil.
- Supporting the Tip: Stake the tip of the branch that is still above ground, so it grows upright.
- Watering: Keep the soil consistently moist, but not waterlogged.
- Patience is Key!: It can take several months (often until the following spring) for roots to develop. Gently tug on the buried section to check for resistance, indicating root growth.
- Separating the New Plant: Once roots have formed, carefully sever the layered branch from the parent plant. Dig up the newly rooted plant and transplant it to its permanent location or a larger pot.
Troubleshooting Layering
- No Root Development:
- Ensure the wounded area is in direct contact with the soil.
- Check soil moisture levels.
- Reapply rooting hormone if necessary.
- Branch Rotting:
- Improve drainage of the soil.
- Ensure the branch is not damaged or diseased.
Method 2: Stem Cuttings – A Bit More Challenging
Stem cuttings involve taking cuttings from the wisteria vine and encouraging them to root. This method requires more careful attention to environmental conditions.
Types of Stem Cuttings
- Hardwood Cuttings: Taken in late fall or winter after the leaves have fallen. These cuttings are thicker and more mature.
- Softwood Cuttings: Taken in spring or early summer from new, green growth. These cuttings are more delicate and require higher humidity.
Taking the Cuttings
- Timing: Follow the appropriate timing for hardwood or softwood cuttings.
- Selecting the Cutting:
- Hardwood: Choose a healthy, dormant stem about 6-8 inches long.
- Softwood: Choose a healthy stem about 4-6 inches long.
- Preparing the Cutting:
- Make a clean cut at a 45-degree angle just below a node (where a leaf or branch grows).
- Remove the lower leaves from the cutting, leaving only a few at the top.
- Applying Rooting Hormone: Dip the cut end of the cutting in rooting hormone.
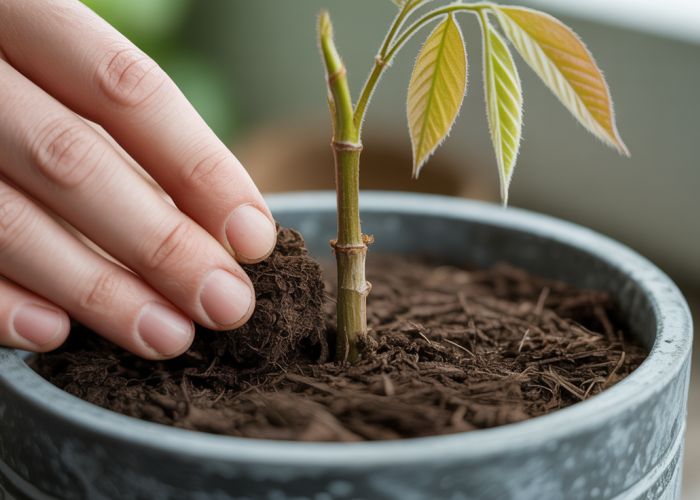
Planting the Cuttings
- Potting Mix: Use a well-draining potting mix, such as a mix of perlite, vermiculite, and peat moss.
- Planting Depth: Insert the cutting into the potting mix, burying about 1/3 to 1/2 of its length.
- Watering: Water the cutting thoroughly.
- Humidity: Create a humid environment by covering the cutting with a plastic bag or humidity dome. Ensure the bag doesn’t touch the leaves.
- Location: Place the cutting in a warm, bright location, but avoid direct sunlight.
- Monitoring: Check the cutting regularly for moisture and signs of root development.
- Root Development: It can take several weeks or even months for roots to develop.
- Transplanting: Once roots have formed, gradually acclimate the new plant to less humid conditions before transplanting it to a larger pot or its permanent location.
Troubleshooting Stem Cuttings
- Cutting Rotting:
- Reduce humidity.
- Ensure proper drainage.
- Use a sterile potting mix.
- Cutting Drying Out:
- Increase humidity.
- Water more frequently.
- No Root Development:
- Ensure the cutting is healthy.
- Reapply rooting hormone.
- Adjust temperature and humidity.
Method 3: Seed Propagation – The Least Predictable Approach
Propagating wisteria from seed is possible, but it’s important to understand that the resulting plant may not have the same characteristics as the parent plant. Wisteria seeds often produce plants that take many years to flower, or may not flower at all, and the flower color can be unpredictable. This is due to hybrid nature of most Wisteria.
Collecting Wisteria Seeds
- Wait until the seed pods are fully mature and dry.
- Harvest the pods and extract the seeds.
- Store the seeds in a cool, dry place until you are ready to plant them.
Scarification and Stratification
- Scarification: Gently scratch or nick the seed coat to allow water to penetrate.
- Stratification: Cold stratify the seeds by placing them in a moist paper towel inside a plastic bag and refrigerating them for several weeks (typically 4-8 weeks).
Planting the Seeds
- Plant the seeds in a well-draining potting mix.
- Cover them lightly with soil.
- Water gently.
- Keep the soil moist and place the pot in a warm, bright location.
Germination and Seedling Care
- Germination can take several weeks or even months.
- Once the seedlings emerge, provide them with adequate light and water.
- Transplant the seedlings to larger pots as they grow.
Important Considerations for Seed Propagation
- Be aware that seed-grown wisteria may not bloom for many years.
- The flower color and other characteristics may differ from the parent plant.
- Grafted wisteria is usually the better option if you want a specific cultivar or color.
General Tips for Successful Propagation of Wisteria
- Hygiene: Always use clean tools to prevent the spread of diseases.
- Patience: Propagation takes time and effort. Don’t be discouraged if your first attempt is unsuccessful.
- Observation: Regularly monitor your cuttings or layers for signs of growth or problems.
- Environment: Provide the right environmental conditions (temperature, humidity, light) for successful propagation.
- Soil: Always use well-draining soil to prevent root rot.
Q&A: Common Questions About Propagating Wisteria
- "When is the best time to propagate wisteria?" (Answer: Spring or early summer for layering and softwood cuttings, late fall or winter for hardwood cuttings.)
- "Which method is the easiest?" (Answer: Layering is often the most successful for beginners.)
- "How long does it take for wisteria to bloom when propagated from seed?" (Answer: It can take many years, and there’s no guarantee of flowering.)
- "Can I propagate wisteria in water?" (Answer: While possible, success rates are generally lower than with soil-based methods.)
- "Why is my wisteria cutting turning black?" (Answer: Likely due to root rot caused by overwatering or poor drainage. Adjust watering and improve drainage.)
This structured layout aims to guide readers through the wisteria propagation process clearly and encouragingly, addressing potential issues and ensuring a higher chance of success.
FAQs About Wisteria Propagation
Here are some frequently asked questions about propagating wisteria, to help ensure your success!
What is the best time of year to propagate wisteria?
The best time for wisteria propagation via cuttings is late spring to early summer, after the plant has finished flowering. This is when the new growth is semi-ripe and roots most easily. Layering can be done in spring or fall.
Can I propagate wisteria from seed?
While you can grow wisteria from seed, it’s generally not recommended. Wisteria grown from seed can take many years to flower, and the resulting plant may not be true to the parent plant. Vegetative methods, like cuttings or layering, are preferred for more predictable results in the propagation of wisteria.
How long does it take for wisteria cuttings to root?
Typically, wisteria cuttings take 4-8 weeks to root. Keep the cuttings consistently moist and in a humid environment during this time to encourage root development. Be patient, as rooting can sometimes be slow.
What kind of soil should I use for wisteria propagation?
Use a well-draining potting mix for wisteria propagation. A mix of perlite and peat moss works well. Avoid heavy soils that retain too much water, as this can lead to root rot. A light and airy mix encourages healthy root growth in the propagation of wisteria.
Well, that’s it! Now you’re armed with everything you need to give propagation of wisteria a go. Get out there, get your hands dirty, and let’s see those beautiful wisteria blossoms thrive!