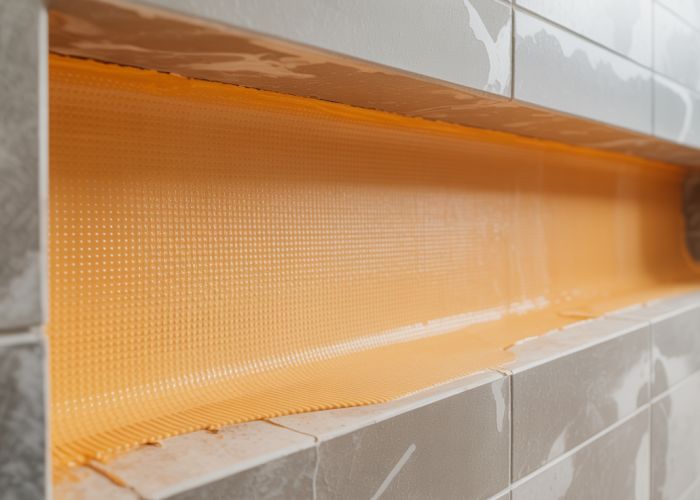
Proper shower tile installation significantly affects the long-term success of your bathroom. Ensuring a completely waterproof barrier within your shower niche demands careful attention. Overlooking the recommended thin-set mortar application for tiles inevitably leads to potential water damage. Furthermore, without proper attention to the installation of waterproof membranes, your waterproofing shower niche is prone to leakage and costly repairs down the line; avoid these common mistakes and build right the first time!
Waterproofing Shower Niche: Article Layout for Maximum Impact
The key to a successful article about "Waterproofing Shower Niche? 7 Mistakes to AVOID!" lies in providing clear, actionable advice that’s easy to follow. The layout should emphasize problem identification followed by practical solutions, keeping the reader engaged and confident in their ability to properly waterproof their shower niche.
Introduction: Setting the Stage
The introduction should immediately grab the reader’s attention. It needs to:
- Highlight the Importance: Briefly explain why waterproofing a shower niche is crucial, emphasizing the potential for costly damage and health hazards (mold).
- Tease the Core Content: Mention that the article will cover seven common mistakes people make when waterproofing a shower niche and, more importantly, how to avoid them.
- Set Expectations: Clearly state the article’s objective: to provide readers with the knowledge and understanding needed to successfully waterproof their shower niche.
Main Body: Unveiling the 7 Mistakes
This is the heart of the article. Each mistake should be presented in its own dedicated section, following a consistent structure:
Mistake #1: [Specific Mistake, e.g., Skipping the Waterproofing Membrane]
- Problem Explanation: Clearly define the mistake. Explain exactly what the problem is and why it compromises the waterproofing of the shower niche.
- Consequences: Detail the potential consequences of this mistake, focusing on the negative impacts (water damage, mold growth, structural issues, costly repairs). Provide visual examples where possible (e.g., a picture of mold damage).
-
Solution: How to Avoid It: Provide a step-by-step guide on how to properly execute this step to avoid the mistake. Use clear, concise language and consider including images or short video snippets demonstrating the correct technique.
-
Example: Instead of simply applying tile directly to the backer board, always use a high-quality waterproofing membrane specifically designed for wet environments. Follow with detailed instructions on membrane application.
-
Pro-Tip: Include helpful hints and insider tips to further improve the outcome. Example: When applying a liquid waterproofing membrane, apply at least two coats, ensuring each coat is applied in a different direction for maximum coverage.
-
Mistake #2: [Specific Mistake, e.g., Using the Wrong Type of Sealant]
- Problem Explanation: Clearly define the mistake. Explain what makes the sealant incorrect for this application.
- Consequences: Detail the impact of using the wrong sealant (cracking, leaking, allowing water penetration).
-
Solution: How to Avoid It: Describe the correct type of sealant (e.g., 100% silicone caulk) and how to apply it properly.
- Visual Aid: Include pictures of different sealant types, highlighting the properties that make each suitable or unsuitable.
- Numbered List: Use numbered lists to provide step-by-step instructions for applying the sealant correctly.
- Clean and dry the area.
- Apply a bead of sealant.
- Smooth the sealant with a caulking tool.
- Remove excess sealant.
Mistake #3: [Specific Mistake, e.g., Neglecting the Corners and Seams]
- Problem Explanation: Emphasize the vulnerability of corners and seams in shower niches to water intrusion.
- Consequences: Describe how leaks in these areas can lead to significant water damage behind the tile.
- Solution: How to Avoid It: Detail the importance of using waterproofing tape, sealant, or pre-formed niche corners to properly waterproof these areas.
Mistake #4: [Specific Mistake, e.g., Improperly Installing the Niche Itself]
- Problem Explanation: Discuss the importance of a properly installed niche base and how misalignment can create problems.
- Consequences: Explain how an unlevel or poorly attached niche can trap water and contribute to leaks.
- Solution: How to Avoid It: Provide detailed steps for ensuring the niche is level, securely attached, and properly integrated with the surrounding wall.
Mistake #5: [Specific Mistake, e.g., Using Incompatible Materials]
- Problem Explanation: Explain how using materials that aren’t designed to work together can lead to failures.
- Consequences: Detail how incompatible materials might expand or contract at different rates, causing cracks and leaks.
- Solution: How to Avoid It: Emphasize the importance of reading manufacturer guidelines and choosing products that are designed to be used together as a system.
Mistake #6: [Specific Mistake, e.g., Rushing the Drying Time]
- Problem Explanation: Explain why allowing sufficient drying time between coats of waterproofing membrane or sealant is crucial.
- Consequences: Detail how trapped moisture can compromise the waterproofing and lead to mold growth.
- Solution: How to Avoid It: Clearly state the recommended drying times for each product and emphasize the importance of patience.
Mistake #7: [Specific Mistake, e.g., Failing to Test for Leaks After Installation]
- Problem Explanation: Explain that even with careful installation, leaks can still occur.
- Consequences: Describe how failing to test for leaks can allow water damage to occur undetected for an extended period.
-
Solution: How to Avoid It: Provide instructions for performing a flood test to identify any potential leaks before tiling. Explain what to look for and how to address any issues found.
-
Table Example: Outline the flood testing procedure in a table:
Step Action Duration Observation 1 Plug the drain. N/A Ensure a watertight seal. 2 Fill the shower pan with water to 2 inches below niche’s lower edge N/A Slowly fill, avoiding splashing. 3 Observe for leaks. 24 hours Check for leaks around the drain, niche, and walls. 4 Drain the water and inspect again. N/A Look for signs of water intrusion.
-
Visual Aids
Throughout the article, use a variety of visual aids to enhance understanding and engagement:
- High-Quality Images: Use clear, well-lit photos to illustrate each step of the process, both correct and incorrect techniques.
- Diagrams: Use diagrams to show cross-sections of the shower niche, highlighting the layers of waterproofing.
- Videos: Embed short videos demonstrating specific techniques.
- Infographics: Use infographics to summarize key points and provide a visual overview of the waterproofing process.
Waterproofing Shower Niche FAQs
Here are some frequently asked questions about waterproofing shower niches and how to avoid common mistakes during the process.
What happens if I skip waterproofing my shower niche?
Skipping waterproofing in your shower niche can lead to significant water damage behind the tile. Moisture can penetrate the grout and tile, causing mold growth, wood rot, and structural damage to your walls. Proper waterproofing is essential to prevent these problems.
What’s the best material to use for waterproofing a shower niche?
Several excellent waterproofing materials are available for shower niches. Popular options include liquid membranes like RedGard or Kerdi-DS membrane. Ensure the chosen material is specifically designed for wet areas and follow the manufacturer’s instructions for proper application to ensure effective waterproofing of your shower niche.
Can I use regular caulk to waterproof my shower niche?
No, regular caulk is not sufficient for waterproofing a shower niche. While caulk can provide a water-resistant seal, it’s not designed to withstand constant water exposure and can degrade over time. Use a dedicated waterproofing membrane for a reliable and long-lasting solution.
How do I ensure proper slope for drainage in my shower niche?
Creating a slight slope towards the shower floor is crucial for proper drainage within your shower niche. This prevents water from pooling and potentially damaging the waterproofing shower niche system. Use shims or thin-set mortar to achieve the desired slope before tiling.
So, there you have it – a rundown of some pretty important things to keep in mind when you’re waterproofing a shower niche. Hopefully, now you can tackle your project knowing what to avoid!