Vinyl flooring problems are a common headache for homeowners, especially when dealing with issues like unsightly bubbles. A crucial aspect of resolving these issues is proper subfloor preparation, which directly impacts the longevity of your floor. For reliable solutions, consider consulting flooring professionals; their expertise can save you time and money. Ignoring telltale signs like gaps early on can lead to bigger, more costly repairs, so proactive intervention is key.
Crafting the Perfect "Vinyl Flooring Problems? 7 Fixes That’ll Save Your Floor!" Article
This guide outlines an effective layout for an article addressing "vinyl flooring problems," focusing on delivering practical fixes in a clear and helpful way. We’ll emphasize readability and actionability for the reader.
Introduction: Hook and Problem Identification
The introduction is crucial for grabbing attention and establishing the article’s purpose.
- Start with a relatable hook: Begin with a sentence or two that acknowledges common frustrations with vinyl flooring. Example: "Vinyl flooring: it’s durable, stylish, and budget-friendly… until it isn’t."
- Identify common vinyl flooring problems: Briefly list some common issues to reassure the reader they’re in the right place. Examples:
- Scratches and scuffs
- Loose tiles or planks
- Bubbles or bumps
- Fading or discoloration
- State the article’s purpose: Clearly state that the article will provide actionable solutions to these problems. Example: "This article will guide you through 7 common vinyl flooring problems and provide simple fixes to restore your floor’s beauty."
- Set expectations: Briefly mention the types of fixes that will be covered (e.g., cleaning techniques, adhesive solutions, DIY repairs).
Main Section: 7 Vinyl Flooring Problems and Their Fixes
This section is the heart of the article. Each problem should have its own dedicated section.
Problem 1: Scratches and Scuffs
- Explanation: Briefly describe what causes scratches and scuffs on vinyl flooring. Distinguish between minor surface scratches and deeper gouges.
- Fix 1: Cleaning and Polishing:
- Step-by-step instructions:
- "Start by thoroughly cleaning the affected area with a mild detergent and warm water."
- "Dry the area completely with a soft cloth."
- "Apply a vinyl floor polish according to the product instructions."
- "Buff the floor with a clean, dry cloth."
- Include before-and-after photos if possible.
- Mention suitable products (without being overly promotional).
- Step-by-step instructions:
- Fix 2: Scratch Repair Kits (For Deeper Scratches):
- Explain when a repair kit is necessary (for deeper scratches that polishing won’t fix).
- Outline the general process of using a scratch repair kit (cleaning, filling, sanding, polishing).
- Suggest reputable brands or types of scratch repair kits.
- Cautionary notes: "Always test the repair kit in an inconspicuous area first."
Problem 2: Loose Tiles or Planks
- Explanation: Describe the common causes of loose vinyl flooring, such as adhesive failure or improper installation.
-
Fix: Re-Adhering Loose Tiles/Planks:
- Step-by-step instructions:
- "Carefully lift the loose tile or plank."
- "Clean the subfloor and the back of the tile/plank to remove any debris or old adhesive."
- "Apply a suitable vinyl flooring adhesive to the subfloor (following manufacturer instructions)."
- "Carefully reposition the tile/plank and press firmly."
- "Wipe away any excess adhesive."
- "Place a heavy object on top of the tile/plank for several hours to ensure proper adhesion."
-
Include a table outlining types of adhesive, their properties, and recommended uses:
Adhesive Type Properties Recommended Use Pressure-Sensitive Adhesive Easy to apply, good for small repairs Loose tiles in low-traffic areas Multi-Purpose Adhesive Stronger bond, suitable for larger areas Loose planks in high-traffic areas, entire rooms
- Step-by-step instructions:
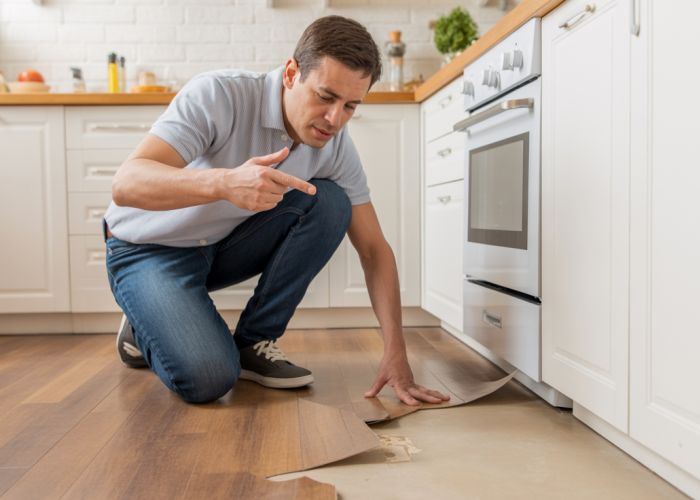
Problem 3: Bubbles or Bumps
- Explanation: Explain what causes bubbles or bumps in vinyl flooring (trapped air, moisture, uneven subfloor).
- Fix 1: Releasing Trapped Air (Small Bubbles):
- Step-by-step instructions:
- "Using a utility knife, carefully make a small slit in the bubble."
- "Press down on the bubble to release the trapped air."
- "Apply a small amount of vinyl flooring adhesive under the slit."
- "Place a heavy object on top of the area for several hours."
- Step-by-step instructions:
- Fix 2: Addressing Uneven Subfloor (Larger Bumps):
- Explain that this requires more extensive work and may involve removing and re-laying the flooring.
- Suggest consulting a professional if the problem is severe.
- Briefly describe the process of leveling a subfloor.
Problem 4: Fading or Discoloration
- Explanation: Describe the causes of fading (sunlight, UV exposure, harsh cleaning products).
- Fix 1: UV Protection:
- "Use curtains or blinds to block direct sunlight."
- "Apply window film to reduce UV exposure."
- Fix 2: Using the Right Cleaning Products:
- "Avoid harsh chemicals or abrasive cleaners."
- "Use a pH-neutral cleaner specifically designed for vinyl flooring."
- "Regularly sweep or vacuum to remove dirt and debris."
Problem 5: Stains
- Explanation: Mention common types of stains that affect vinyl flooring (food spills, pet accidents, ink).
- Fix: Stain Removal Techniques:
- Different stains require different approaches. Use a bulleted list to address common stain types:
- Food Stains: "Wipe up spills immediately. For dried-on food, use a mild detergent and warm water."
- Pet Stains: "Clean with an enzymatic cleaner to neutralize odors and prevent re-marking."
- Ink Stains: "Try rubbing alcohol or nail polish remover (test in an inconspicuous area first)."
- Different stains require different approaches. Use a bulleted list to address common stain types:
Problem 6: Gaps Between Planks
- Explanation: Describe why gaps form between planks (expansion/contraction due to temperature changes, improper installation).
- Fix: Using Wood Putty or Filler:
- Step-by-step instructions:
- "Clean the gap thoroughly."
- "Apply a wood putty or filler that matches the color of your flooring."
- "Smooth the filler with a putty knife."
- "Allow the filler to dry completely."
- "Sand the area lightly to blend it with the surrounding flooring."
- "Apply a sealant or finish to protect the filler."
- Step-by-step instructions:
Problem 7: Mold and Mildew
- Explanation: Highlight the causes of mold and mildew (moisture, humidity).
- Fix: Cleaning and Prevention:
- Step-by-step instructions:
- "Clean the affected area with a solution of bleach and water (follow product instructions carefully)."
- "Dry the area thoroughly."
- "Improve ventilation in the room to reduce humidity."
- "Consider using a dehumidifier."
- Warning: "Mold can be harmful. If you have extensive mold growth, consult a professional."
- Step-by-step instructions:
Additional Considerations
- Visuals: Use high-quality images and videos to illustrate each problem and its solution.
- Internal Linking: Link to other relevant articles on your website.
- Call to Action: Encourage readers to leave comments or ask questions.
- Mobile-Friendly: Ensure the article is easy to read on mobile devices.
Vinyl Flooring Problems: Your Questions Answered
Here are some frequently asked questions regarding vinyl flooring problems and their solutions, expanding on the fixes discussed in our article.
How can I prevent scratches on my vinyl floor?
Preventing scratches on vinyl flooring involves several steps. Use furniture pads under all furniture legs. Avoid dragging heavy items across the floor. Regularly sweep or vacuum to remove abrasive dirt and debris. Also consider using mats at entryways to trap dirt before it reaches your vinyl floor.
My vinyl floor has bubbles. Can I fix this myself?
Small bubbles in vinyl flooring can sometimes be repaired by carefully slicing the bubble with a utility knife, applying vinyl adhesive, and weighting it down until dry. However, large or numerous bubbles often indicate a moisture problem underneath, requiring professional assessment and repair to address the underlying cause of the vinyl flooring problems.
What’s the best way to clean a sticky residue off my vinyl floor?
For sticky residue on vinyl floors, try a mixture of warm water and a mild dish soap. Avoid harsh chemicals or abrasive cleaners, as they can damage the vinyl. For tougher residue, consider using a specialized vinyl floor cleaner. Always test any cleaning solution in an inconspicuous area first. Many vinyl flooring problems result from improper cleaning.
Is it possible to replace a single damaged vinyl plank or tile?
Yes, replacing a single damaged vinyl plank or tile is often possible, especially with click-lock or loose-lay vinyl. Carefully remove the damaged piece, ensuring not to damage the surrounding flooring. Clean the subfloor and install the new plank or tile, following the manufacturer’s instructions. This is a common fix for minor vinyl flooring problems.
So, there you have it! Armed with these fixes, you can tackle those pesky vinyl flooring problems and keep your floors looking great. Good luck!