DuPont, the manufacturer, designed Tyvek vapor barrier to regulate moisture within building envelopes. This product’s air infiltration control enhances the performance of house wrap when properly installed. A correct tyvek vapor barrier installation, often involving specialized seam tape, contributes significantly to a building’s energy efficiency. This guide focuses on installing a tyvek vapor barrier correctly, helping even novice DIYers achieve professional results quickly.
Unleashing the Power of Tyvek: Your 60-Second Pro Install Guide
Tyvek, a seemingly simple material, stands as a crucial line of defense for any structure. It acts as both a vapor barrier and house wrap, working diligently to protect your building from the relentless assault of the elements. Understanding its function is one thing, but mastering its installation is where the real value lies.
The Silent Guardian: Tyvek’s Dual Role
Tyvek’s primary purpose is twofold: to prevent water intrusion from the outside while allowing moisture vapor from inside the house to escape. This breathability is critical in preventing the buildup of condensation within the walls, which can lead to a host of problems. As a house wrap, it also serves as an air barrier, reducing drafts and improving energy efficiency.
The Peril of Poor Installation: A Recipe for Disaster
But what happens when this silent guardian is compromised by improper installation? Can a seemingly minor oversight truly lead to significant consequences? The answer, unfortunately, is a resounding yes. Incorrectly installed Tyvek can trap moisture, creating the perfect breeding ground for mold, mildew, and wood rot. These issues not only compromise the structural integrity of your building but also pose serious health risks to its occupants.
Moisture: The Insidious Enemy
Moisture damage can manifest in various forms, from unsightly stains and peeling paint to more severe structural problems. Mold growth, in particular, can trigger allergic reactions, respiratory problems, and other health issues. The cost of remediating moisture damage can be substantial, often involving extensive repairs and replacements.
Your Fast Track to Flawless Installation
Fortunately, preventing these disasters is within your reach. This guide offers a concise and easy-to-follow roadmap for proper Tyvek installation. We’ll distill the essential steps into a practical approach, empowering you to protect your investment and ensure a healthy living environment. Consider this your 60-second pro guide to doing it right the first time.
The cost of remediating moisture damage can be substantial, not to mention the inconvenience and disruption it causes. Therefore, understanding how Tyvek functions and why it’s a critical component of your building envelope is essential.
What is Tyvek and Why Should You Use It?
At its core, Tyvek functions as a vapor barrier, a crucial element in protecting the entire wall assembly of a building. Think of your walls as a complex system, each component working together.
Tyvek stands guard on the outside, preventing external moisture from infiltrating and causing havoc within the wall cavities.
The Science of Moisture Management
So, how does Tyvek actually manage moisture? It’s not just about blocking water; it’s about breathability.
Tyvek’s unique structure allows water vapor from inside the building to escape. This is vital because everyday activities like cooking, showering, and even breathing generate moisture.
If this internal moisture becomes trapped, it can condense within the walls, leading to mold growth, wood rot, and reduced insulation effectiveness.
Tyvek allows water vapor to pass through it, preventing condensation buildup and maintaining a dry, healthy wall assembly.
DuPont: A Name You Can Trust
When it comes to building materials, choosing reputable brands is paramount. DuPont, the manufacturer of Tyvek, has a long-standing reputation for innovation and quality.
Their commitment to research and development ensures that Tyvek meets rigorous performance standards. Choosing Tyvek means choosing a product backed by decades of expertise and a company dedicated to building science.
The Significance of Water Resistance
One of Tyvek’s key properties is its water resistance. It’s designed to repel liquid water, preventing rain and other external sources of moisture from penetrating the building envelope.
This resistance is essential in protecting the underlying structure from water damage, which can compromise its integrity and longevity.
Tyvek effectively shields the wall assembly from the elements, ensuring a dry and durable building.
One of the most impressive attributes of Tyvek is its ability to safeguard our walls from outside elements. But to truly appreciate its function, you need to understand its place within the broader context of vapor barriers, how different climates influence building practices, and the regulations that govern its use.
Vapor Barriers, Building Codes, and Your Climate: Understanding the Essentials
A vapor barrier isn’t just a standalone sheet; it’s an integral part of the entire building envelope. The building envelope is the physical separator between the conditioned and unconditioned environment of a building, including resistance to air, water, heat, light, and noise. The vapor barrier works within this system to control moisture flow, preventing water vapor from infiltrating the wall assembly and causing condensation problems.
The Building Envelope’s Moisture Control
Think of the building envelope as the skin of your home. It’s a layered defense against the elements. Vapor barriers play a crucial role in this defense, specifically in regulating the movement of water vapor. Without adequate control, moisture can accumulate within the walls, leading to a host of problems.
Climate Considerations: A Region-Specific Approach
The ideal approach to vapor barrier installation isn’t one-size-fits-all. Different climates present different challenges.
In colder climates, the primary concern is preventing interior moisture from migrating into the walls and condensing during the winter.
In warmer, humid climates, the focus shifts to preventing exterior moisture from entering the wall assembly. Building codes often dictate specific requirements for vapor barrier placement and permeability based on local climate conditions.
Building Codes and Tyvek: Ensuring Compliance
Building codes are sets of regulations that govern the design and construction of buildings. They aim to ensure public health, safety, and welfare.
These codes often specify requirements for vapor barriers, including the types of materials that can be used and how they must be installed.
Tyvek is frequently mentioned or approved within these codes, but it’s crucial to understand the specific requirements in your region. Always consult local building codes and authorities to ensure compliance.
Perm Rating: Quantifying Vapor Permeability
The perm rating is a measure of a material’s water vapor permeability. It indicates how easily water vapor can pass through a material.
Materials with a low perm rating are considered vapor barriers, while those with a high perm rating are considered vapor permeable.
Tyvek has a specific perm rating that allows it to act as a vapor barrier while still allowing some moisture to escape, preventing condensation buildup. This balance is crucial for maintaining a healthy and durable wall assembly.
One of the most impressive attributes of Tyvek is its ability to safeguard our walls from outside elements. But to truly appreciate its function, you need to understand its place within the broader context of vapor barriers, how different climates influence building practices, and the regulations that govern its use. Now that we’ve considered the theoretical underpinnings, let’s get practical.
60-Second Pro Guide: Tyvek Installation Simplified
Installing Tyvek correctly is paramount to its performance. A rushed or careless installation can negate its benefits. This guide provides a streamlined approach to ensure a proper application. While not a substitute for professional expertise, it equips you with the essential steps.
Preparation: Setting the Stage for Success
The groundwork is crucial for a lasting and effective Tyvek application. Taking the time to properly prepare the surface and gather the right tools will pay dividends in the long run.
Cleanliness and Dryness of Sheathing
Before you even unroll the Tyvek, ensure the sheathing is clean, dry, and free from any debris. Dirt, dust, or moisture can compromise the adhesion of the Tyvek. This can lead to potential issues down the line.
Gathering the Right Tools
Having the right tools on hand makes the installation process smooth and efficient. Essential tools include:
- A stapler (preferably a cap stapler)
- Tyvek tape (specifically designed for sealing seams)
- A utility knife (for trimming and cutting)
- A measuring tape
- Safety glasses and gloves
Application: Laying the Foundation
Applying Tyvek involves more than just rolling it out and stapling it to the wall. Precision and attention to detail are key to achieving a weathertight seal.
Horizontal Rolling and Alignment
Start at the bottom of the wall and roll out the Tyvek horizontally. Proper alignment with the wall’s edges is critical. This ensures consistent coverage and a professional finish.
Securing with Fasteners
Use staples or recommended fasteners to secure the Tyvek to the sheathing. The frequency of fasteners will depend on local building codes and manufacturer recommendations. However, don’t skimp on the fasteners. Use an adequate amount to prevent the Tyvek from billowing or tearing in high winds.
Seams and Overlaps: Creating a Continuous Barrier
The effectiveness of Tyvek hinges on its ability to create a continuous, uninterrupted barrier against moisture and air infiltration. Proper seam and overlap management is paramount to achieving this goal.
The Importance of Overlap
Overlapping the Tyvek at seams is essential to prevent water from penetrating the wall assembly. A minimum overlap of 6 inches is generally recommended, but always refer to the manufacturer’s specifications for the most accurate guidance.
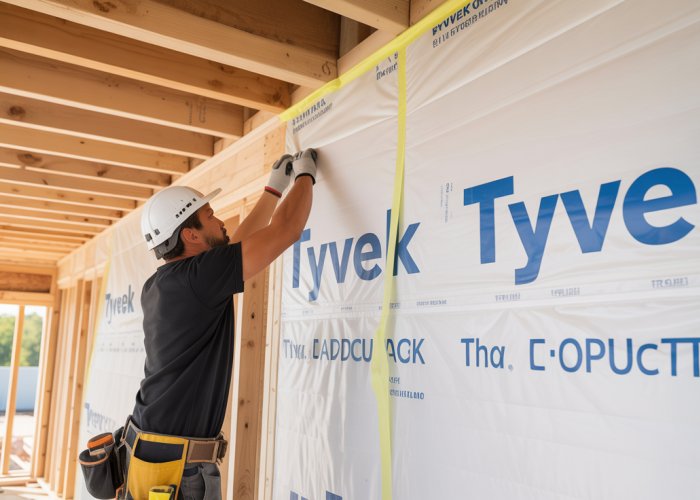
Taping for Enhanced Sealing
Use Tyvek tape to seal all seams and penetrations (windows, doors, pipes, etc.). This creates a tight, waterproof seal. Don’t underestimate the importance of proper taping. This is where many installations fall short, leading to potential moisture problems. Apply firm pressure when taping to ensure a strong bond.
Addressing Potential Problems
Even with careful planning and execution, problems can arise during Tyvek installation. Being aware of these potential issues can help you address them proactively.
Wrinkles
Wrinkles can create pathways for air and water to infiltrate the wall assembly, compromising the Tyvek’s effectiveness. Minimize wrinkles by:
- Ensuring the sheathing is smooth and free of imperfections.
- Pulling the Tyvek taut during installation.
- Using a roller to smooth out any wrinkles that do occur.
Tears or Damage
Tears or damage to the Tyvek can compromise its ability to function as a vapor barrier. Repair any tears or damage immediately using Tyvek tape. For larger tears, consider patching the area with a new piece of Tyvek, ensuring proper overlap and taping.
One of the most impressive attributes of Tyvek is its ability to safeguard our walls from outside elements. But to truly appreciate its function, you need to understand its place within the broader context of vapor barriers, how different climates influence building practices, and the regulations that govern its use. Now that we’ve considered the theoretical underpinnings, let’s get practical.
Pro Tips for a Flawless Tyvek Installation
Achieving a truly effective Tyvek installation requires more than just following the basic steps. It’s about understanding the nuances and anticipating potential problems. This section dives into the details, offering pro-level advice to ensure your Tyvek application is not just adequate, but exceptional.
Combatting Wrinkles: A Smooth Application is Key
Wrinkles in your Tyvek application aren’t merely an aesthetic issue; they directly impact performance. Wrinkles create air pockets, reducing the effectiveness of the vapor barrier and potentially leading to condensation buildup.
The goal is a smooth, taut surface.
Here’s how to achieve it:
-
Proper Unrolling: Unroll the Tyvek carefully, avoiding sudden jerks or snags. If possible, work with a helper to keep the material taut as you go.
-
Tension is Your Friend: Apply slight tension as you staple or fasten the Tyvek to the sheathing. This will help eliminate minor wrinkles as you progress.
-
Backtracking for Corrections: If you notice a significant wrinkle forming, don’t ignore it. Remove the staples in the affected area, smooth out the wrinkle, and re-fasten.
-
Consider the Temperature: Extreme temperatures can affect Tyvek’s pliability. Avoid installing on extremely hot days, as the material may stretch excessively and be more prone to wrinkling.
Sealing Around Penetrations: The Devil is in the Details
Windows, doors, pipes, and electrical boxes: these are all potential weak points in your vapor barrier. Ignoring these penetrations is a recipe for disaster, allowing air and moisture to bypass the Tyvek.
-
The Wrap Technique: Carefully cut the Tyvek around the penetration, leaving enough material to wrap around the frame or box.
-
Tyvek Tape is Essential: Use Tyvek tape to seal the flaps you’ve created to the frame of the window or door, ensuring a completely airtight seal.
-
Don’t Skimp on Tape: Use ample tape to create a strong, lasting bond. Overlap the tape generously onto both the Tyvek and the surface of the penetration.
-
Consider Flashing: For windows and doors, integrate the Tyvek with the window or door flashing for optimal water management.
Mastering Seams and Overlaps: Creating a Continuous Barrier
Tyvek’s effectiveness hinges on creating a continuous barrier. Seams and overlaps are where that continuity is most vulnerable.
-
Overlap Guidelines: Always adhere to the manufacturer’s recommended overlap guidelines (typically a minimum of 6 inches, but always consult the product specifications). More is always better.
-
Taping Overlaps: After overlapping the Tyvek, use Tyvek tape to seal the seam. This creates a robust, airtight connection.
-
Inspect, Inspect, Inspect: Thoroughly inspect every seam and overlap after taping. Look for any gaps or loose edges and address them immediately with additional tape.
-
Vertical Seams: Whenever possible, try to minimize vertical seams. Horizontal seams shed water much more effectively. If vertical seams are unavoidable, ensure they are meticulously taped.
And that’s it! Hopefully, you now feel confident tackling your next tyvek vapor barrier install. Go get ’em!