Timber frame joints, the crucial nexus points of any timber structure, demand meticulous craftsmanship and a deep understanding of structural principles. Traditional mortise and tenon joinery, a time-honored technique, exemplifies the strength and elegance achievable in timber frame construction. The Timber Framers Guild, a leading organization dedicated to preserving and promoting timber framing, champions the highest standards in joint design and execution. Utilizing tools such as the Mallet, a skilled craftsman can execute precise joinery that will secure the structure for ages. By understanding these concepts, you can begin to unravel the mystery of timber frame joints.
Timber framing stands as a testament to human ingenuity, blending structural necessity with artistic expression. Its enduring legacy, spanning centuries and cultures, speaks volumes about its effectiveness and adaptability. At the heart of every timber frame structure lies the critical element of the joint, the point where individual timbers unite to form a cohesive and load-bearing whole.
A Glimpse into Timber Framing’s Rich History
The history of timber framing is deeply intertwined with the development of human civilization. From ancient Japan to medieval Europe, timber-framed structures have provided shelter, community spaces, and enduring monuments. This construction method relies on heavy timbers joined together, without the need for nails or screws.
Instead, intricate joinery techniques create strong, stable, and beautiful structures. The longevity of these buildings is a direct result of the craftsmanship invested in each connection. Properly executed timber frame joints can withstand the test of time, resisting the forces of nature and the stresses of everyday use for centuries.
The Indispensable Role of Timber Frame Joints
Understanding timber frame joints is paramount, not only for structural integrity but also for the overall aesthetic appeal of the building. A well-designed and executed joint is more than just a connection; it’s a visual statement, showcasing the skill and artistry of the timber framer. The joint’s form can enhance the building’s beauty.
From a structural perspective, joints are the linchpins of the entire framework. They must be able to transfer loads efficiently, resist racking forces, and accommodate the natural movement of the wood. A weak or poorly designed joint can compromise the entire structure, leading to instability and potential failure.
Scope of This Guide: A Journey into Joinery
This guide aims to provide a comprehensive overview of essential timber frame joints, exploring their design, applications, and execution. We will delve into the anatomy of each joint, examining its strengths, weaknesses, and appropriate uses.
The focus will be on practical knowledge, providing the reader with the understanding and skills necessary to create robust and visually appealing timber frame connections. From the foundational mortise and tenon to the elegant dovetail, we will explore the key joints that form the backbone of timber frame construction.
The journey through timber framing’s historical context and the general importance of its joints naturally leads us to a more practical understanding of these connections. It’s time to delve into the specific joints that form the very foundation of this construction method.
The Cornerstone: Mastering Core Timber Frame Joints
This section serves as an in-depth exploration of four fundamental timber frame joints: the Mortise and Tenon, Dovetail, Lap, and Bridle Joints.
We will dissect each joint, revealing its anatomy, common variations, practical applications, and the crucial steps involved in its execution. Prepare to gain a solid grasp of these essential connections that underpin the strength and beauty of timber-framed structures.
The Mighty Mortise and Tenon Joint: The Backbone of Timber Frames
The mortise and tenon joint reigns supreme as the most widely used and arguably most important joint in timber framing. Its strength and adaptability make it the go-to choice for countless structural applications.
Defining the Mortise and Tenon Joint
At its core, the mortise and tenon joint consists of two primary components: the mortise, a cavity or hole cut into one timber, and the tenon, a protruding tongue or extension on the other timber that precisely fits into the mortise.
This interlocking connection provides exceptional resistance to pulling and shear forces. This makes it ideal for load-bearing applications. The snug fit between the mortise and tenon is crucial for the joint’s overall strength and stability.
Exploring Variations of the Mortise and Tenon Joint
The basic mortise and tenon can be modified to suit specific structural needs and aesthetic preferences. Some common variations include:
-
Through Tenons: The tenon extends completely through the mortised timber. This is often secured with a wedge for added strength and visual appeal.
-
Blind Tenons: The tenon does not extend all the way through the mortised timber, creating a cleaner look.
-
Wedged Tenons: Wedges are driven into slots cut into the tenon. This expands it within the mortise, creating an exceptionally tight and secure fit.
-
Tusk Tenons: A tenon with a shoulder that bears against the mortised timber, further secured with a removable "tusk" or wedge.
Applications of the Mortise and Tenon Joint
The versatility of the mortise and tenon joint makes it suitable for a wide array of applications in timber framing, including:
-
Primary Structural Connections: Connecting posts to beams, beams to rafters, and other critical load-bearing elements.
-
Posts and Beams: Creating strong and stable connections between vertical posts and horizontal beams, forming the basic framework of the structure.
Creating Robust and Accurate Mortise and Tenon Joints
Crafting a reliable mortise and tenon joint requires precision and careful attention to detail.
Key steps include:
- Accurate Layout: Precisely marking the dimensions of the mortise and tenon on both timbers.
- Mortise Creation: Carefully cutting the mortise using chisels, mortising machines, or a combination of both.
- Tenon Formation: Shaping the tenon to perfectly match the mortise.
- Test Fitting: Ensuring a snug and accurate fit between the mortise and tenon before final assembly.
- Securing the Joint: Driving pegs through pre-drilled holes to lock the joint in place, if desired.
Dovetail Joint: Interlocking Strength for Angled Connections
While the mortise and tenon excels in straight connections, the dovetail joint shines when joining timbers at an angle, providing exceptional resistance to pulling forces.
The Dovetail Joint’s Mechanical Locking Principle
The dovetail joint’s strength lies in its unique shape, which resembles a dove’s tail. The flared tenon, or "tail," is housed within a correspondingly shaped mortise, preventing the joint from being pulled apart. This mechanical interlock creates an inherently strong and stable connection.
Types of Dovetail Joints
Several variations of the dovetail joint exist, each offering different aesthetic and structural characteristics:
-
Full Dovetails: The entire dovetail is visible on both joined pieces.
-
Half-Blind Dovetails: The dovetail is only visible from one side.
-
Secret Dovetails: The dovetail is completely concealed, creating a seamless appearance.
Applications of the Dovetail Joint
Dovetail joints are commonly used in timber framing for:
-
Rafters: Connecting rafters to ridge beams or wall plates.
-
Braces: Joining angled braces to posts and beams for added stability.
-
Other Angular Connections: Situations where timbers meet at an angle and resistance to pulling forces is critical.
The Importance of Precise Cuts
The performance of a dovetail joint hinges on the accuracy of its cuts. Precise angles and tight fits are essential to maximize the joint’s strength and prevent movement or slippage over time. Sloppy cuts will significantly weaken the joint and compromise the structural integrity of the frame.
The Reliable Lap Joint: Simplicity and Effectiveness
The lap joint offers a straightforward and efficient method for joining timbers, particularly when a flush surface is desired. While not as structurally robust as the mortise and tenon or dovetail, it provides a reliable connection for specific applications.
Defining the Lap Joint
A lap joint is created by overlapping two timbers and securing them together. The simplicity of this joint makes it a popular choice for situations where ease of construction is prioritized.
Variations of the Lap Joint
Different variations of the lap joint cater to varying needs:
-
Full Lap: The full thickness of both timbers is overlapped.
-
Half Lap: Half the thickness of each timber is removed, allowing the joined surfaces to be flush.
-
Housed Lap: One timber is recessed to accept the other, creating a stronger connection than a simple lap joint.
Applications of the Lap Joint
Lap joints find common use in timber framing for:
- Joining Beams and Posts: Situations where a flush surface is needed for subsequent construction or aesthetic reasons.
Creating Strong Lap Joints
While lap joints are simple to execute, maximizing their strength requires careful attention.
-
Fasteners: Using screws, bolts, or nails to securely fasten the timbers together.
-
Adhesives: Applying construction adhesives to the mating surfaces for added bonding strength.
The choice of fastener and adhesive will depend on the specific application and the loads the joint will be subjected to.
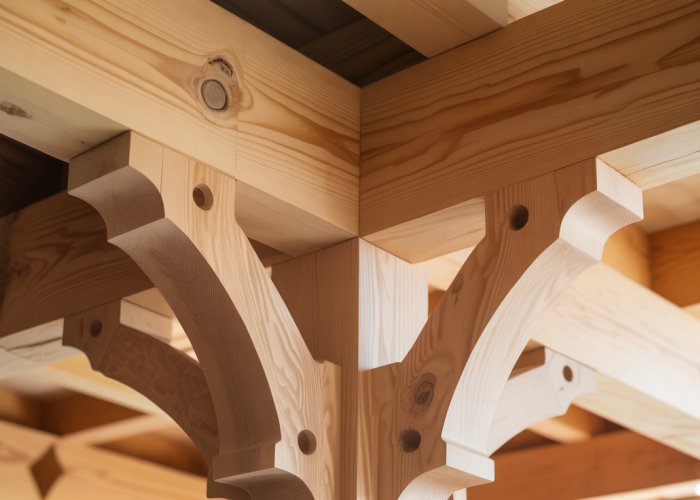
The Versatile Bridle Joint: Straddling Strength
The bridle joint presents a unique design where one timber, featuring a forked or "bridle" end, straddles another. This creates a strong and stable connection that is well-suited for specific structural scenarios.
Defining the Bridle Joint
In a bridle joint, the "bridle" (the forked end) typically receives the end of another timber, offering excellent resistance to racking forces.
Applications of the Bridle Joint
Bridle joints are often employed in timber framing for:
-
Connecting Posts and Beams: Providing a strong and stable connection, particularly when the beam needs to be supported along its length.
-
Specific Structural Scenarios: Situations where the unique straddling design of the bridle joint offers a distinct advantage over other types of joints.
Advantages of Using Bridle Joints
Bridle joints offer several benefits:
-
Increased Stability: The straddling design provides enhanced stability, particularly against lateral forces.
-
Efficient Load Transfer: The joint effectively distributes loads between the connected timbers.
-
Aesthetic Appeal: The bridle joint can add a unique visual element to the timber frame.
By understanding the nuances of these four core timber frame joints – the Mortise and Tenon, Dovetail, Lap, and Bridle – you gain a foundational understanding of how timber frames achieve their remarkable strength and longevity. Each joint plays a critical role in the overall structural integrity and aesthetic appeal of the finished structure.
The previous sections have detailed the anatomy and application of individual joints. But mastering those individual joints is not the finish line. It’s crucial to understand the broader context in which these joints operate, how they interact with the material, and how accuracy in execution directly translates to the overall integrity of the structure.
The Art of Connection: Key Considerations for Joint Design and Execution
Successful timber framing transcends the mere replication of joint designs. It demands a holistic understanding of joinery techniques, the strategic use of pegs, and an unwavering commitment to precision. These elements, when harmonized, form the bedrock of robust and aesthetically pleasing timber-framed structures.
Joinery Techniques: The Foundation of Strong Timber Frames
Joinery encompasses more than just cutting mortises and shaping tenons. It represents a comprehensive understanding of how wood behaves, how joints function under stress, and how to select the appropriate joint for a specific application.
Understanding Wood Movement
Wood is a dynamic material, constantly expanding and contracting in response to changes in moisture content. This inherent wood movement has profound implications for joint design.
Joiners must account for this movement to prevent joints from loosening, cracking, or even causing structural failure. Designs should allow for some degree of movement without compromising the joint’s integrity.
Choosing the Right Joint
Selecting the appropriate joint is paramount. The choice should never be arbitrary.
It must be guided by a thorough assessment of the structural loads the joint will bear and the specific demands of its location within the frame. A mortise and tenon joint, for example, may be ideal for a primary structural connection, while a dovetail joint might be better suited for resisting racking forces in a brace.
Pegs: The Silent Reinforcers
While the joinery itself provides the initial connection, pegs, often overlooked, play a critical role in securing timber frame joints. These wooden fasteners, driven through precisely drilled holes, add significant shear strength and prevent the joint from pulling apart under tension.
Material Matters
The selection of peg material is an important decision. Traditional choices include oak and ash, prized for their strength and durability.
The properties of the chosen wood – its density, grain orientation, and resistance to decay – directly impact the peg’s effectiveness. Softer woods are generally unsuitable, as they lack the necessary strength to withstand the forces exerted on the joint.
Placement and Sizing
Proper peg placement and sizing are crucial for optimal performance. Pegs should be positioned strategically to maximize their resistance to shear forces.
The diameter of the peg must be carefully considered. Too small, and it may shear under load; too large, and it could weaken the surrounding timber. The peg hole should also be drilled slightly offset to pull the joint tight as the peg is driven in, creating a draw-bore effect for enhanced strength.
Precision is Paramount: Layout and Accuracy
In timber framing, accuracy is not merely desirable; it is essential. Even slight deviations in layout or execution can compromise the structural integrity and aesthetic appeal of the entire frame.
The Importance of Layout Tools
A skilled timber framer relies on a variety of layout tools to ensure precise cuts and accurate joint placement. Squares, levels, measuring tapes, and plumb bobs are indispensable for establishing accurate reference lines and angles.
These tools, when used with care and precision, enable the framer to translate the design into reality with confidence.
Scribing Techniques for Complex Joints
For complex joints, particularly those involving irregular shapes or compound angles, scribing techniques are invaluable. Scribing involves transferring the exact contours of one timber onto another, ensuring a perfect fit.
This meticulous process requires patience and skill, but the resulting precision is well worth the effort.
Minimizing Errors and Ensuring Tight Fits
Ultimately, the success of any timber frame joint hinges on minimizing errors and ensuring tight fits. A properly executed joint should be snug and secure, with no gaps or play.
This level of precision demands unwavering attention to detail throughout the entire process, from initial layout to final assembly. It is this commitment to accuracy that distinguishes a truly masterful timber frame from one that is merely adequate.
Tools of the Trade: Essential Implements for Timber Frame Joinery
The creation of robust and beautiful timber frame structures hinges not only on skillful joinery but also on the selection and proper use of essential tools. While a comprehensive timber framing workshop might boast an array of specialized equipment, a few core implements stand out as indispensable for crafting precise and enduring joints. These include chisels, mallets, and saws, each playing a critical role in shaping and refining the timbers that form the backbone of these impressive structures.
The Humble Chisel: Precision Carving at its Finest
The chisel, in its various forms, is arguably the most versatile tool in a timber framer’s arsenal. It’s the instrument of finesse, capable of both roughing out material and executing the fine details that define a well-crafted joint.
From paring tenon shoulders to cleaning up mortise walls, the chisel is an extension of the craftsman’s hand, translating intent into tangible form.
Types of Chisels for Timber Framing
-
Mortise Chisels: These heavy-duty chisels, with their thick blades and robust construction, are designed for chopping mortises. Their strength allows them to withstand the repeated impact of a mallet, making quick work of removing substantial amounts of wood.
-
Paring Chisels: With their long, thin blades and delicate profiles, paring chisels are ideal for achieving clean, accurate surfaces. They are used primarily for refining tenons, smoothing mortise walls, and making precise adjustments to joint fits.
-
Slick Chisels: These are essentially oversized paring chisels, often two to three inches wide. Used for shaving large, flat surfaces, their length provides leverage and control, and their width reduces the number of passes needed to achieve a smooth finish.
Maintaining the Edge: The Key to Chisel Performance
A sharp chisel is a safe chisel. A dull chisel requires more force to use, increasing the risk of slipping and potential injury.
Regular honing and sharpening are essential for maintaining the edge and ensuring optimal performance. A well-maintained chisel will not only produce cleaner cuts but will also reduce fatigue and improve overall efficiency.
The Mallet: Delivering Controlled Force
The mallet is the chisel’s indispensable partner, providing the controlled force needed to drive the blade through the timber. Unlike metal hammers, mallets are typically made of wood or synthetic materials, which deliver a softer blow that minimizes damage to the chisel handle and the surrounding wood fibers.
Choosing the Right Mallet
The ideal mallet is heavy enough to deliver a forceful blow but light enough to be wielded comfortably for extended periods.
Mallets made from dense hardwoods like lignum vitae or maple offer excellent durability and impact resistance. Synthetic mallets are also available, offering similar performance with increased resistance to wear and tear.
Mallet Technique: Guiding the Chisel with Precision
Proper mallet technique is crucial for both safety and accuracy. The mallet should be held firmly but not too tightly, and the swing should originate from the shoulder, not just the wrist. The force of the blow should be directed straight down the chisel, avoiding glancing blows that can damage the chisel or the workpiece.
Saws: Shaping Timbers with Efficiency
While chisels excel at detail work, saws are essential for making larger cuts and shaping timbers to their approximate dimensions. A variety of saws are used in timber framing, each suited for specific tasks.
Essential Saw Types for Timber Framing
-
Timber Saws: Traditional timber saws, such as frame saws and pit saws, are large, hand-powered saws designed for ripping and crosscutting large timbers. While still used by some traditionalists, they have largely been supplanted by power tools for most tasks.
-
Circular Saws: Portable circular saws are indispensable for making quick, accurate cuts on timbers. Models with large blades can handle timbers of significant thickness, making them suitable for a wide range of tasks.
-
Chainsaws: For roughing out timbers and making large, irregular cuts, chainsaws offer unparalleled speed and power. However, they require a high degree of skill and caution to operate safely and accurately.
-
Hand Saws: Traditional hand saws, such as Japanese saws and Western-style crosscut saws, still have a place in the timber framer’s toolkit. They are particularly useful for making fine cuts, trimming tenon shoulders, and performing other detail work.
Saw Safety: A Non-Negotiable Priority
Regardless of the type of saw used, safety should always be the top priority. Always wear appropriate safety gear, including eye protection, hearing protection, and gloves. Ensure that the saw is properly maintained and that all safety guards are in place. Never operate a saw when fatigued or under the influence of drugs or alcohol.
Tools like chisels and saws, when wielded with skill, become extensions of the artisan’s vision. But how does this time-honored craft navigate the demands of contemporary construction?
Bridging the Gap: Modern Timber Framing Meets Traditional Joinery
Timber framing stands as a testament to enduring craftsmanship, yet its continued relevance hinges on its ability to adapt and integrate with modern building practices. This section explores the delicate balance between honoring traditional joinery methods and embracing the advancements of modern timber framing, particularly the crucial role of engineering principles in ensuring structural integrity and compliance with contemporary building codes.
The Symbiotic Relationship: Tradition and Innovation
The allure of timber framing lies in its handcrafted nature, where each joint tells a story of skill and dedication. However, uncritical adherence to tradition can sometimes fall short of meeting modern structural demands. The key lies in finding a symbiotic relationship between time-tested techniques and innovative approaches.
This involves understanding the strengths and limitations of traditional joints, and supplementing them with modern materials and engineering insights where necessary. It’s about preserving the aesthetic and philosophical essence of timber framing while ensuring its long-term viability and safety.
Engineering Principles: The Backbone of Structural Integrity
While the beauty of a timber frame is undeniable, its structural integrity must be paramount. This is where engineering principles come into play. Modern structural analysis techniques, such as finite element analysis (FEA), allow engineers to model and simulate the behavior of timber frame structures under various loads and conditions.
This enables them to identify potential weaknesses in joint designs and optimize them for maximum strength and stability. Furthermore, engineering calculations ensure that the size and spacing of timbers are adequate to support the intended loads, taking into account factors such as snow load, wind load, and seismic activity.
Load Paths and Stress Distribution
Understanding load paths is critical in timber frame design. Engineers analyze how loads are transferred through the frame, from the roof to the foundation, ensuring that each joint and timber is capable of bearing its share of the load. They also consider stress distribution within the joints, identifying areas of high stress concentration that may require reinforcement.
By applying these engineering principles, modern timber frames can achieve a level of structural performance that surpasses even the most meticulously crafted traditional structures.
Adapting Joint Designs for Modern Building Codes and Materials
Modern building codes are designed to ensure the safety and durability of structures. Timber frames, like all buildings, must comply with these codes, which often specify requirements for structural loads, fire resistance, and energy efficiency.
This can necessitate adapting traditional joint designs to meet these requirements. For example, steel connectors may be incorporated to enhance the strength of critical joints, or fire-resistant coatings may be applied to timbers to improve their fire performance.
The Role of Fasteners
While traditional timber frames relied primarily on wooden pegs to secure joints, modern timber framing often incorporates a wider range of fasteners, including bolts, screws, and metal plates. These fasteners can provide additional strength and stiffness to joints, particularly in areas where traditional joinery techniques are insufficient.
However, it’s important to use fasteners judiciously, ensuring that they are compatible with the wood and that they do not compromise the aesthetic integrity of the frame.
Material Considerations
The choice of materials also plays a critical role in modern timber framing. While traditional timber frames were typically constructed from locally sourced hardwoods, modern timber framers have access to a wider range of materials, including engineered wood products like glulam and laminated veneer lumber (LVL).
These materials offer superior strength, dimensional stability, and consistency compared to traditional solid-sawn timbers. They can be particularly useful in situations where large spans or complex geometries are required.
Blending Old and New
Ultimately, the art of modern timber framing lies in the skillful blending of traditional techniques with modern engineering and materials. By understanding the principles of both, timber framers can create structures that are both beautiful and structurally sound, honoring the legacy of the craft while embracing the possibilities of the future.
Timber Frame Joints: FAQs
Here are some frequently asked questions about timber frame joints, covering common concerns and helpful information for your timber framing project.
What’s the most crucial factor for a strong timber frame joint?
Precision is paramount. Accurate cutting and fitting of timber frame joints are essential for load-bearing capacity and long-term structural integrity. A poorly fitted joint compromises the entire frame.
Are metal fasteners always necessary in timber frame joints?
No, not always. Traditional timber framing relies heavily on joinery alone. However, metal fasteners, like bolts or screws, can add strength and security, especially in complex or highly stressed timber frame joints. Their use depends on the design and load requirements.
How do I choose the right timber frame joint for my project?
Consider the specific loads and stresses the joint will bear. Mortise and tenon joints are versatile, while dovetail joints excel in resisting pull-out forces. The complexity of the design and your skill level also factor into choosing suitable timber frame joints.
Can I use modern power tools for cutting traditional timber frame joints?
Yes, absolutely. While traditional methods used hand tools, power tools like chainsaws, mortisers, and planers significantly speed up the process of creating timber frame joints. Just remember to maintain accuracy and safety.
Alright, that’s a wrap on timber frame joints! Hope you found this helpful. Now go out there and build something amazing!