Protecting your home from the elements is crucial, and tar paper installation plays a vital role. Roofing felt, a common term for tar paper, provides a water-resistant barrier before your shingles go on. This process often involves using roofing nails to securely fasten the tar paper to the roof deck. Understanding proper tar paper installation is essential for any DIY home improvement project and helps ensure a longer lifespan for your roof, ultimately saving money on potential repairs. Following proper steps for tar paper installation will safeguard your home for a long time.
Cracking the Code: The Ideal Article Layout for "Tar Paper Installation: Your Go-To Guide! (DIY)"
This guide outlines the perfect article layout for a comprehensive and easy-to-follow DIY guide on "Tar Paper Installation," focusing primarily on the main keyword, "tar paper installation." We’ll structure it for clarity, readability, and maximum helpfulness for the homeowner.
Introduction: Setting the Stage
- Engaging Opening Paragraph: Start with a brief but compelling opening that highlights the importance of proper underlayment (tar paper) for roof longevity and protection. Mention common roofing problems that tar paper can prevent, such as leaks and water damage. Briefly tease the benefits of DIY tar paper installation (cost savings, satisfaction of completing the project yourself).
- What This Guide Covers: Clearly state the purpose of the article: "This guide will walk you through the entire process of tar paper installation, step-by-step. Whether you’re replacing an old roof or building new, we’ll cover everything you need to know to do it right."
- Safety First! Immediately include a prominent safety warning. Emphasize the dangers of working on roofs, including falls. Advise readers to wear appropriate safety gear (harness, non-slip shoes, gloves, eye protection). Strongly recommend hiring a professional if unsure about any aspect of the process.
- Brief Definition of Tar Paper: Explain what tar paper is in simple terms. Differentiate it from other roofing underlayments (synthetic options) without getting overly technical. The goal is to quickly establish a common understanding.
Gathering Your Tools and Materials
This section details everything the reader needs before they start.
-
Materials Checklist (Bullet Points):
- Roll(s) of tar paper (specify different weights/grades and their uses – 15lb, 30lb)
- Roofing nails (specify size and type – galvanized roofing nails)
- Cap nails (alternative fastener)
- Seam tape (optional, for enhanced weatherproofing)
- Drip edge (for eaves and rakes)
-
Tools Checklist (Bullet Points):
- Utility knife with extra blades
- Measuring tape
- Chalk line
- Hammer or nail gun
- Stapler (optional, for temporary fastening)
- Safety harness and rope
- Non-slip roofing shoes
- Gloves
- Safety glasses
-
Estimating Tar Paper Quantity: Provide a simple formula or guide to help readers calculate how much tar paper they’ll need based on their roof’s square footage. Include a small buffer for waste.
Preparing the Roof Deck: A Crucial Step
Proper preparation is essential for a successful installation.
- Inspection: Emphasize the importance of inspecting the roof deck for damage (rot, soft spots, loose nails). Explain how to identify and address these issues.
- Cleaning: The roof deck must be clean and dry. Remove old roofing materials, debris, and loose nails. Use a broom or leaf blower.
- Repairing Damage: Explain how to repair minor damage to the roof deck (replacing rotted wood, securing loose boards). For more extensive damage, recommend consulting a professional.
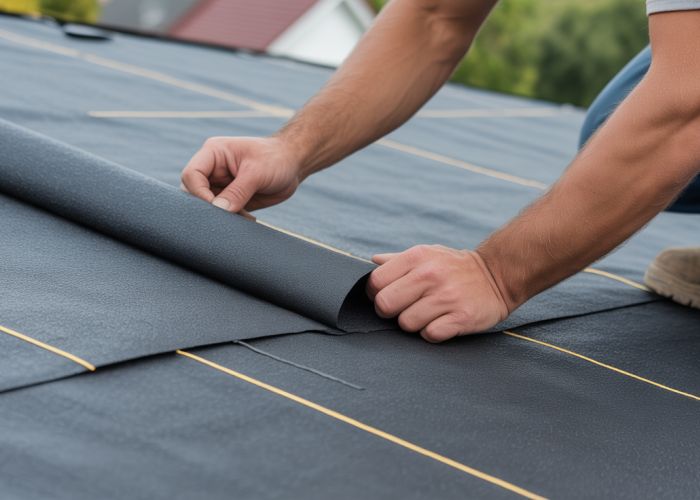
Tar Paper Installation: The Step-by-Step Guide
This is the heart of the article. Use a clear, numbered list with accompanying images or diagrams.
- Installing Drip Edge (If Applicable):
- Explanation of why drip edge is important (water runoff protection).
- How to install drip edge along the eaves and rakes of the roof.
- Overlap and secure the drip edge with roofing nails.
- Measuring and Cutting Tar Paper:
- Explain how to measure and cut the tar paper into manageable lengths.
- Emphasize the importance of accurate cuts.
- Laying the First Course (Row):
- Start at the lowest point of the roof (eaves).
- Overlap the drip edge by at least 2 inches.
- Ensure the tar paper is aligned straight and taut.
- Securing the Tar Paper:
- How to use roofing nails or cap nails to secure the tar paper.
- Spacing of nails (every few inches along the edges and in the field).
- Avoid over-driving nails, which can damage the tar paper.
- Overlapping Subsequent Courses:
- Explain the required overlap (typically 2-4 inches).
- The importance of overlapping downwards to prevent water from getting underneath.
- Use a chalk line to ensure consistent overlap.
- Working Around Roof Penetrations (Vents, Chimneys):
- How to properly cut and seal tar paper around vents, chimneys, and other roof penetrations.
- Use flashing tape or sealant for added protection.
- Seaming (Optional):
- How to use seam tape to seal the seams between courses for extra weather protection, especially in harsh climates.
Troubleshooting Common Issues
Address common problems readers might encounter.
- Tar Paper Tearing: Causes and solutions (sharp objects, improper handling, high winds).
- Nail Pops: Causes and solutions (over-driving nails, shifting roof deck).
- Wrinkles and Bubbles: Causes and solutions (uneven surface, moisture).
- Leaks: How to identify the source and make temporary repairs before installing shingles.
Maintenance and Best Practices
- Regular Inspections: Encourage readers to periodically inspect their tar paper for damage.
- Prompt Repairs: Emphasize the importance of repairing any damage immediately.
- Storage of Leftover Tar Paper: Proper storage to prevent damage and degradation.
FAQs About Tar Paper Installation
Here are some frequently asked questions regarding tar paper installation to help you better understand the process and ensure a successful DIY project.
What is the purpose of tar paper in roofing?
Tar paper acts as a crucial underlayment during roofing. It creates a waterproof barrier between your roof deck and the shingles, protecting against water damage from rain or snow that might penetrate the shingles. Proper tar paper installation is essential for extending the life of your roof.
Can I skip tar paper installation if my shingles are high quality?
No, even high-quality shingles require tar paper. While shingles are the primary defense against the elements, tar paper provides an additional layer of protection. It helps prevent leaks, even if a shingle is damaged or displaced. Skipping tar paper installation can lead to significant water damage to your roof deck.
How much overlap is required when installing tar paper?
Generally, a minimum of 2-4 inches of overlap is recommended for each course of tar paper. This overlap ensures a watertight seal and prevents water from seeping through the seams. Refer to the tar paper manufacturer’s instructions for specific overlap requirements for optimal tar paper installation.
What type of nails should I use for tar paper installation?
Use roofing nails with large, flat heads to secure the tar paper to the roof deck. The large head prevents the nails from tearing through the tar paper and provides a secure hold. Ensure the nails are long enough to penetrate the roof deck adequately. Using the correct nails is important for proper tar paper installation.
Alright, that wraps it up for our guide on tar paper installation! Hope you found it helpful, and now you’re ready to tackle that DIY project. Remember to stay safe and happy roofing!