If persistent wrist pain is impacting your daily life, you might be encountering tape de quervain, a condition affecting the tendons on the thumb side of your wrist. Inflammation, a primary characteristic of this condition, is often addressed through conservative treatments. The Eichhoff test, commonly used by healthcare professionals, aids in the diagnosis of this ailment. Many individuals seek relief through various methods, including support from a hand therapist focused on targeted exercises and ergonomic adjustments. These interventions aims to reduce strain and promote healing, ultimately minimizing discomfort associated with tape de quervain.
Tape de Quervain’s: A Comprehensive Guide to Relief with Taping
If you’re experiencing pain on the thumb side of your wrist, especially when gripping or making a fist, you might be dealing with de Quervain’s tenosynovitis. This guide will walk you through understanding the condition and, most importantly, how taping can help provide relief. We’ll focus on proper taping techniques so you can manage your pain effectively.
Understanding de Quervain’s Tenosynovitis
It’s essential to understand what’s happening in your wrist to better appreciate the benefits of taping.
What Exactly Is It?
De Quervain’s involves the tendons that control thumb movement. These tendons run through a narrow tunnel on the thumb side of your wrist. When this tunnel becomes inflamed, it pinches the tendons, causing pain. Think of it like this:
- Tendons: The ropes that connect muscles to bones, allowing you to move your thumb.
- Tendon Sheath: The tunnel that guides these tendons, like a protective sleeve.
- Inflammation: Swelling inside the sheath, making it harder for the tendons to glide smoothly.
Common Symptoms
Recognizing the symptoms is the first step. You might experience:
- Pain on the thumb side of your wrist, often radiating up your forearm.
- Pain that worsens with thumb or wrist movement, such as gripping, lifting, or turning your wrist.
- Swelling or tenderness in the affected area.
- A "sticking" or "catching" sensation when you move your thumb.
- Difficulty making a fist or grasping objects.
Causes and Risk Factors
While the exact cause isn’t always known, repetitive hand or wrist movements are often to blame. Other factors may include:
- Repetitive Activities: Gardening, playing musical instruments, or any job involving repetitive hand motions.
- Pregnancy: Hormonal changes and fluid retention during pregnancy can contribute.
- Arthritis: Inflammatory conditions like rheumatoid arthritis.
- Direct Injury: A blow to the thumb or wrist.
The Role of Taping for Relief
Taping provides support and stability, helping to reduce strain on the affected tendons. When correctly applied, tape de quervain can significantly alleviate pain and improve function.
How Taping Helps
- Stabilizes the Wrist: Limits excessive movement that aggravates the tendons.
- Supports the Thumb: Provides support, reducing stress on the tendons during activities.
- Reduces Swelling: Compresses the area, helping to minimize swelling.
- Alleviates Pain: Provides pain relief by offloading the tendons.
Types of Tape to Use
Choosing the right type of tape is important.
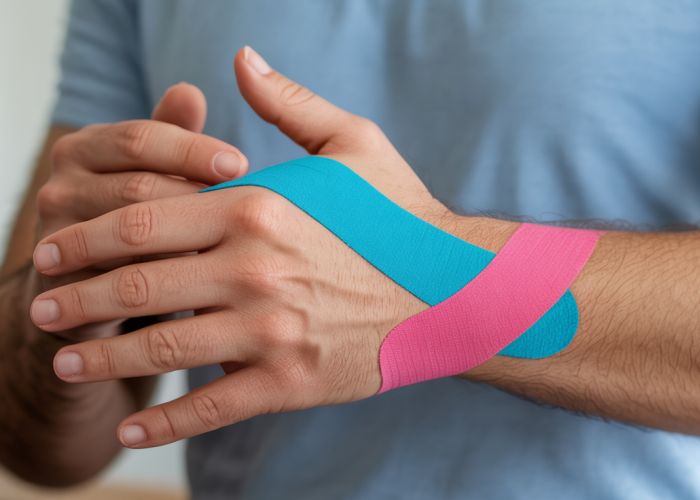
- Kinesiology Tape (K-Tape): Offers flexibility and support. It’s stretchy and allows for a greater range of motion while still providing support. This is a popular choice for tape de quervain due to its flexibility.
- Athletic Tape (Zinc Oxide Tape): Provides rigid support. It’s less stretchy than K-Tape and offers more stability. Often used in conjunction with underwrap.
Here’s a quick comparison:
| Feature | Kinesiology Tape (K-Tape) | Athletic Tape (Zinc Oxide) |
|---|---|---|
| Stretch | Yes | No |
| Support Level | Moderate | High |
| Flexibility | High | Low |
| Best Use | Pain relief, support | Strong stabilization |
Step-by-Step Taping Techniques for de Quervain’s
These instructions guide you through two common taping methods: K-Tape and Athletic Tape. Always consult with a healthcare professional or physical therapist before starting any new treatment.
Kinesiology Tape (K-Tape) Application
-
Preparation:
- Clean and dry the area thoroughly. Remove any lotions or oils.
- Round the edges of the tape strips to prevent them from catching on clothing.
-
Measurement:
- Cut two strips of K-Tape.
- The first strip should be long enough to run from the base of your thumb, across your wrist, and up your forearm.
- The second strip should be about half the length of the first.
-
Application:
- Anchor Strip 1: Peel back the paper backing of the first strip. Anchor the first 2 inches of tape without any stretch at the base of your thumb, near the joint.
- Apply with Stretch: Gently stretch the tape (approximately 25-50% stretch) as you apply it across your wrist, following the path of the tendons.
- Anchor the End: Anchor the last 2 inches of the tape without any stretch on your forearm.
- Anchor Strip 2: Peel back the paper backing of the second strip. Anchor the first 2 inches of the tape without any stretch directly over the area of most intense pain on your wrist (typically where the tendons run through the tunnel).
- Apply with Stretch: Apply the tape perpendicular to the first strip, stretching it approximately 50-75% over the area of pain. This strip should wrap around the wrist like a bracelet.
- Anchor the End: Anchor the last 2 inches of the tape without any stretch.
-
Rub to Activate: Rub the tape firmly to activate the adhesive.
Athletic Tape Application
-
Preparation:
- Clean and dry the area.
- Apply a thin layer of underwrap to protect your skin.
-
Measurement:
- Cut several strips of athletic tape, each approximately 4-6 inches long.
-
Application:
- Anchor: Start by applying a strip of tape around your wrist, just above the thumb joint. This acts as an anchor.
- Thumb Support: Apply a strip from the anchor point, running diagonally across the base of your thumb and back to the anchor point. This provides support to the thumb.
- Wrist Stabilization: Apply additional strips overlapping the previous one, working your way up the wrist. Ensure the tape is snug but not too tight.
- Circular Support: Finish with a few circular strips of tape around your wrist for additional support and to secure the ends of the diagonal strips.
-
Check Circulation: Ensure you can still feel a pulse in your fingers and that they don’t turn blue. If you experience numbness or tingling, remove the tape immediately.
Important Considerations for Effective Taping
Taping is a helpful tool, but it’s essential to use it correctly and responsibly.
Tips for Success
- Skin Sensitivity: If you have sensitive skin, test a small area with the tape before applying it fully.
- Proper Application: Incorrect application can be ineffective or even harmful. Watch videos or consult a professional for guidance.
- Tape Removal: Gently peel off the tape in the direction of hair growth to minimize skin irritation. Use oil to loosen the adhesive if needed.
- Listen to Your Body: If the tape increases your pain or causes any adverse reactions, remove it immediately.
- Don’t Over-Tighten: Applying the tape too tightly can restrict blood flow and cause discomfort.
When to Seek Professional Help
Taping can provide relief, but it’s not a substitute for professional medical advice. See a doctor or physical therapist if:
- Your pain is severe or doesn’t improve with taping.
- You experience numbness, tingling, or weakness in your hand or fingers.
- You have difficulty using your hand for everyday activities.
- You have any underlying medical conditions.
Remember, tape de quervain can be a valuable tool in managing your pain, but it’s only one part of a comprehensive treatment plan. Combining taping with other therapies, such as rest, ice, and exercises, can help you achieve long-term relief and regain full function of your wrist.
FAQs: De Quervain’s Tenosynovitis & Taping
This section answers common questions about De Quervain’s tenosynovitis and how taping can help manage the pain.
How does taping actually help De Quervain’s?
Taping for De Quervain’s helps by providing support and limiting the movement of the tendons in the thumb and wrist. This reduces the friction and inflammation that causes the pain. Think of it as a gentle splint, assisting the tendons.
Is taping a permanent solution for tape de quervain?
No, taping is generally considered a temporary solution to manage the symptoms of tape de quervain. It can offer relief and support while you’re healing or undergoing other treatments, but it doesn’t address the underlying cause. Consult a doctor or physical therapist for a long-term plan.
Can I tape my wrist myself, or should I see a professional?
While you can learn to tape your wrist yourself, it’s often recommended to consult a physical therapist or other healthcare professional initially. They can show you the proper technique for applying the tape effectively for your tape de quervain and provide guidance on the right amount of tension.
What kind of tape is best for De Quervain’s?
Typically, rigid athletic tape or kinesiology tape are used for De Quervain’s. Rigid tape provides strong support and limits movement, while kinesiology tape can offer more flexibility and promote circulation. Your choice may depend on your activity level and desired level of support. A healthcare professional can advise on the best option.
So, if your wrist is acting up, remember these tips and tricks! Take care of that tape de quervain, and get back to doing the things you love!