Poplar wood, known for its affordability and versatility, responds exceptionally well to various staining techniques. Woodworking projects benefit greatly from using properly stained poplar wood, adding a touch of elegance without breaking the bank. Understanding the nuances of wood finishing allows even beginner DIYers to achieve professional-looking results. Specifically, mastering the application process enables you to enhance the natural grain and character of stained poplar wood, bringing out its inherent beauty for long-lasting and visually appealing creations.
Stained Poplar Wood: The Ultimate Guide to Achieving a Beautiful Finish
This guide will provide you with everything you need to know about staining poplar wood, from understanding its unique characteristics to achieving professional-looking results. We will delve into the specifics of preparing the wood, selecting the right stain, and applying it effectively for a stunning and durable finish on your stained poplar wood projects.
Understanding Poplar Wood
Before diving into staining, it’s crucial to understand the wood itself.
What is Poplar Wood?
Poplar refers to several species of trees, with the most common being Yellow Poplar (also known as Tulip Poplar, though it’s technically a magnolia). It’s a relatively soft hardwood, known for its affordability and workability.
Characteristics of Poplar Wood Relevant to Staining
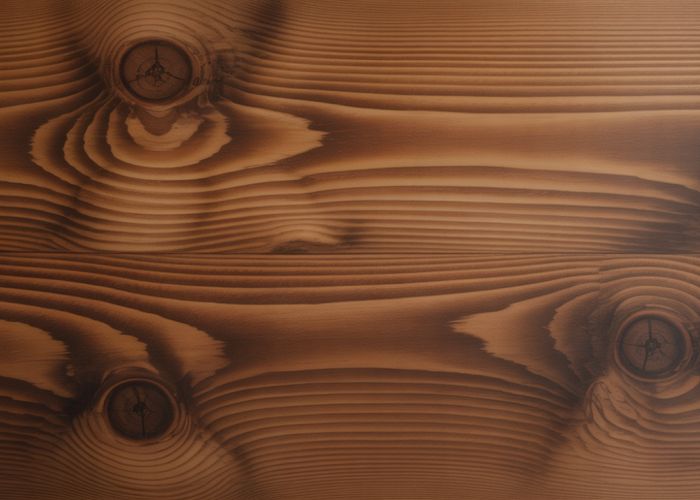
- Color: Poplar has a naturally light color, ranging from creamy white to pale yellow and sometimes featuring green or brown streaks. This uneven color can make staining challenging if not properly addressed.
- Grain: It has a relatively straight and closed grain, meaning it doesn’t absorb stain as deeply or evenly as woods with more open grains, like oak or ash. This is why stained poplar wood can sometimes look blotchy.
- Porosity: Poplar is moderately porous. This influences how well the stain adheres and the intensity of the color achieved.
Advantages and Disadvantages of Using Poplar for Staining
| Feature | Advantage | Disadvantage |
|---|---|---|
| Affordability | Typically less expensive than other hardwoods suitable for staining. | Can be seen as less desirable by some due to its inherent grain and color variation. |
| Workability | Easy to cut, sand, and shape, making it suitable for a wide range of projects. | Can be prone to denting or scratching due to its softness. |
| Paintability | Takes paint extremely well, offering a smooth and uniform finish. | Stainability: Stained poplar wood can be prone to blotching if not properly prepped. |
Preparing Poplar Wood for Staining: The Key to Success
Proper preparation is paramount for achieving a beautiful stained poplar wood finish.
Sanding Poplar
Sanding is the crucial first step.
- Start with the Right Grit: Begin with 120-grit sandpaper to remove any imperfections or mill marks.
- Progress to Finer Grits: Gradually move to finer grits like 180-grit and then 220-grit to create a smooth, even surface.
- Sand in the Direction of the Grain: Always sand in the direction of the grain to avoid scratches that will be highlighted by the stain.
- Clean Thoroughly: After sanding, remove all sanding dust with a tack cloth or vacuum cleaner. Residual dust will interfere with stain penetration.
Addressing Uneven Color and Blotching
Because of its inherent color variations and medium porosity, poplar requires special attention to prevent blotching.
- Wood Conditioner: Applying a pre-stain wood conditioner is highly recommended. This product helps to equalize the wood’s porosity, allowing the stain to absorb more evenly.
- Apply the conditioner according to the manufacturer’s instructions.
- Allow it to penetrate for the recommended time (usually 5-15 minutes) before wiping off any excess.
- Gel Stain: Consider using a gel stain. Gel stains sit on top of the wood rather than penetrating deeply, resulting in a more even color on stained poplar wood.
- Dye Stain: Water-based dye stains can sometimes be less prone to blotching than pigment-based stains, especially when followed with a clear coat.
Choosing the Right Stain for Poplar Wood
Selecting the appropriate stain is vital to achieving the desired look for your stained poplar wood project.
Types of Stains and Their Suitability for Poplar
- Oil-Based Stains: These stains penetrate well but may accentuate the grain inconsistencies in poplar. They offer good durability.
- Water-Based Stains: Water-based stains tend to raise the grain slightly, requiring additional sanding. They dry quickly and are low in VOCs (volatile organic compounds). They can sometimes yield a less blotchy look.
- Gel Stains: As mentioned earlier, gel stains are a good option for achieving a more uniform color on poplar because they sit on the surface.
- Dye Stains: Dye stains penetrate the wood, coloring the fibers directly. They can produce vibrant and consistent colors.
Color Selection and Considerations
- Light vs. Dark Stains: Lighter stains will highlight the natural grain and color variations in the wood, while darker stains will mask them.
- Testing the Stain: Always test the stain on a scrap piece of poplar before applying it to your project. This allows you to see how the stain will look on the wood and adjust the application technique as needed.
- Undertones: Consider the undertones of the stain (e.g., warm, cool, neutral) and how they will complement the existing colors in your space.
Applying Stain to Poplar Wood: A Step-by-Step Guide
The staining process requires patience and attention to detail for a professional result on your stained poplar wood project.
Tools and Materials Needed
- Stain of your choice
- Stir sticks
- Lint-free cloths or rags
- Foam brushes or stain applicators
- Gloves
- Safety glasses
- Drop cloths
The Staining Process
- Stir the Stain Thoroughly: Make sure the stain is well-mixed before you start.
- Apply the Stain Evenly: Use a brush or cloth to apply the stain in the direction of the grain. Avoid applying too much stain at once, as this can lead to blotching.
- Allow the Stain to Penetrate: Let the stain sit on the wood for the recommended time (usually 5-15 minutes). The longer it sits, the darker the color will be.
- Wipe Off the Excess Stain: Use a clean cloth to wipe off any excess stain. Wipe in the direction of the grain.
- Allow the Stain to Dry Completely: Let the stain dry completely according to the manufacturer’s instructions (usually 24-48 hours).
Tips for Achieving an Even Stain
- Work in Sections: Apply the stain in small sections to avoid uneven application and ensure that you can wipe off the excess stain before it dries.
- Maintain a Wet Edge: Keep a wet edge as you move from section to section to prevent overlap marks.
- Multiple Coats (Optional): For a darker color, you can apply a second coat of stain after the first coat has dried completely. Lightly sand between coats with 320-grit sandpaper.
Protecting Your Stained Poplar Wood: Sealing and Finishing
Protecting your stained poplar wood surface with a clear coat is essential for durability and longevity.
Types of Clear Coats
- Polyurethane: Provides a durable and water-resistant finish. Available in oil-based and water-based formulas.
- Lacquer: Dries quickly and provides a smooth, hard finish.
- Varnish: Offers good durability and resistance to scratches and chemicals.
Applying the Clear Coat
- Lightly Sand the Stained Surface: Before applying the clear coat, lightly sand the stained surface with 320-grit sandpaper to create a smooth base.
- Apply Thin Coats: Apply thin, even coats of clear coat using a brush or spray gun.
- Allow Each Coat to Dry Completely: Allow each coat to dry completely according to the manufacturer’s instructions.
- Sand Lightly Between Coats (Optional): Lightly sand between coats with 400-grit sandpaper for an even smoother finish.
- Apply Multiple Coats: Apply at least two to three coats of clear coat for optimal protection.
FAQs About Stained Poplar Wood
Here are some frequently asked questions to help you better understand staining poplar wood. We hope these answers provide clarity and guidance for your woodworking projects.
Why is poplar often recommended for painting rather than staining?
Poplar wood has a closed grain and tends to absorb stain unevenly, sometimes resulting in a blotchy appearance. This is why it is often preferred to be painted. However, with proper preparation and techniques, stained poplar wood can achieve beautiful results.
What type of stain works best on poplar?
Gel stains and wood conditioners are often recommended when working with stained poplar wood. A gel stain sits more on the surface and minimizes blotchiness, while a wood conditioner pre-seals the wood to promote even stain absorption. Experimenting is key!
How do I properly prepare poplar for staining?
Proper preparation is crucial for a successful stain job on poplar. Start by sanding the wood smooth with progressively finer grits of sandpaper. Apply a wood conditioner before staining to help even out stain absorption. This ensures a more consistent finish on your stained poplar wood.
Can I achieve a dark stain color on poplar?
Yes, you can achieve a dark stain color on poplar. Because poplar can be prone to uneven staining, multiple thin coats of stain are often more effective than one thick coat. This allows you to build up the desired color gradually and control the final look of your stained poplar wood project.
So, there you have it! Hopefully, you feel ready to tackle your own project using stained poplar wood. Now go get creative and have some fun bringing your vision to life!