Shoe longevity significantly benefits from utilizing a sole repair kit. Consider Barge Cement, a popular adhesive amongst cobblers, as a vital component. Many find that a comprehensive sole repair kit offers a cost-effective alternative to professional shoe repair services. Ultimately, investing in a sole repair kit means empowering yourself to maintain and extend the life of your favorite footwear.
Optimizing Your "Sole Repair Kit: Save Your Shoes With These Simple Steps!" Article Layout
This document outlines the ideal layout for an article focused on shoe sole repair kits, aiming to provide clear, helpful instructions for readers looking to fix their shoes at home. We’ll focus on optimizing the structure around the keyword "sole repair kit."
1. Introduction: Identifying the Problem and Offering the Solution
- Hook: Start with a relatable scenario. For example: "Are your favorite shoes falling apart? Don’t throw them away just yet! Worn-out soles are a common problem, but one that’s easily fixed."
- Problem Statement: Clearly articulate the issue – worn-out shoe soles. Highlight the cost of replacing shoes versus repairing them.
- Solution Introduction: Introduce the "sole repair kit" as a cost-effective and convenient solution. Briefly mention the types of repairs possible with a kit.
- Benefits Teaser: List the key benefits of using a sole repair kit: saves money, extends shoe lifespan, environmentally friendly.
2. Understanding the Sole Repair Kit
- Definition: What exactly is a sole repair kit? Be clear and concise.
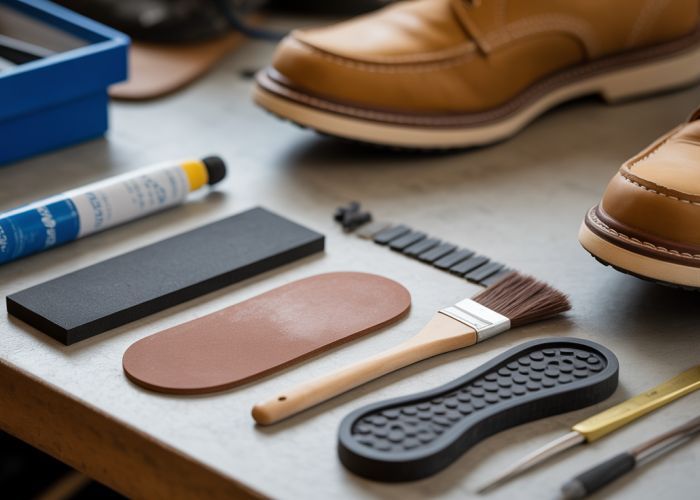
- Essential Components: List and describe the common components of a typical "sole repair kit":
- Adhesive: The most crucial component. Describe different types of adhesive (e.g., polyurethane, contact cement) and their ideal applications.
- Sole Material: Different types of rubber sheets or patches, their thickness, and suitability for different shoe types (e.g., sneakers, boots, dress shoes).
- Applicator: Brushes, spatulas, or nozzles for applying the adhesive.
- Sandpaper or Abrasive Pad: For preparing the sole surface.
- Clamps or Weights: For securing the repair while the adhesive cures.
- Optional Items: (Depending on the kit) – Needles, thread, awls, knives for trimming.
- Choosing the Right Kit: Guide readers on how to select the appropriate "sole repair kit" based on their specific needs and shoe type. Consider factors like:
- Shoe Type: What kind of shoes are being repaired?
- Repair Type: Is it a minor separation or a complete sole replacement?
- Material: What material is the shoe sole made from?
- User Skill Level: Is the user a beginner or experienced with DIY repairs?
3. Step-by-Step Repair Guide
This section is the core of the article. Provide detailed, easy-to-follow instructions with visual aids (images or videos are highly recommended).
3.1 Preparation is Key
- Cleaning the Area: Thoroughly clean the damaged area with a brush and appropriate solvent (e.g., rubbing alcohol). This removes dirt, grease, and debris.
- Preparing the Surface: Use sandpaper or an abrasive pad to roughen the surfaces to be bonded. This creates a better grip for the adhesive.
- Dry Fit: Before applying the adhesive, test fit the replacement sole or patch to ensure proper alignment.
3.2 Applying the Adhesive
- Applying the Adhesive: Apply a thin, even layer of adhesive to both surfaces to be joined. Follow the specific instructions provided with your "sole repair kit."
- Waiting Time: Allow the adhesive to "tack up" according to the manufacturer’s recommendations. This typically involves waiting a few minutes until the adhesive becomes slightly sticky.
3.3 Bonding the Sole
- Joining the Surfaces: Carefully align the surfaces and press them together firmly.
- Securing the Repair: Use clamps or weights to hold the surfaces together while the adhesive cures. Ensure even pressure is applied.
- Curing Time: Allow the adhesive to cure completely according to the manufacturer’s instructions. This can take several hours or even overnight.
3.4 Finishing Touches
- Trimming Excess Material: Once the adhesive has cured, trim any excess sole material with a sharp knife or blade.
- Sanding and Smoothing: Sand down any rough edges or imperfections for a seamless finish.
- Cleaning Up: Remove any remaining adhesive residue with a solvent.
4. Tips and Troubleshooting
- Working Safely: List safety precautions when using a "sole repair kit," especially when working with adhesives and sharp tools.
- Choosing the Right Adhesive: Provide guidance on selecting the best adhesive for different materials and repair types.
- Dealing with Common Problems: Address common issues like:
- Adhesive not bonding properly
- Sole peeling off after repair
- Uneven application of adhesive
- Extending the Life of Your Repair: Offer tips on how to maintain the repaired sole and prevent future damage. For instance, using shoe protectors or applying a sealant.
5. Where to Buy a Sole Repair Kit
- Online Retailers: List popular online stores that sell "sole repair kits" (e.g., Amazon, specialized shoe repair stores).
- Local Stores: Suggest checking local hardware stores, shoe repair shops, and crafting stores.
- Factors to Consider When Purchasing: Remind readers to consider factors like kit contents, adhesive type, and customer reviews when choosing a "sole repair kit."
This structured layout ensures readers easily find the information they need to confidently use a "sole repair kit" and repair their shoes effectively.
Sole Repair Kit FAQs: Quick Answers to Common Questions
Here are some frequently asked questions about using a sole repair kit to fix your shoes. We hope this clarifies any doubts and helps you get back on your feet!
What types of shoe damage can be fixed with a sole repair kit?
A sole repair kit is best for addressing separated soles, worn heels, and small holes or tears in the sole’s material. It’s perfect for extending the life of your favorite shoes when minor sole issues arise.
What’s usually included in a sole repair kit?
Most kits include a strong adhesive specifically designed for shoe repair, sandpaper to prepare the surfaces, and sometimes patches or fillers for larger damages. Some advanced kits may also contain tools like applicators and clamps.
How long does it typically take for the adhesive in a sole repair kit to fully cure?
Cure times vary depending on the adhesive used in the sole repair kit, but generally, it takes between 24 to 72 hours for the adhesive to fully bond. Refer to the instructions provided with your specific kit. Avoid wearing the shoes during the curing process.
Can I use any type of glue instead of a sole repair kit adhesive?
No, it’s strongly recommended to use the specialized adhesive included in a sole repair kit. Regular glues may not provide the necessary flexibility and durability to withstand the wear and tear that soles endure, leading to premature failure of the repair.
So, there you have it! Armed with your sole repair kit, you’re ready to tackle those shoe emergencies. Now go forth and give those soles a new lease on life!