Proper flashing, a crucial element in weatherproofing, ensures a watertight seal where your chimney meets your home’s exterior. Incorrect installation often leads to costly repairs involving qualified contractors. The procedure can be complex, requiring a sound understanding of building codes and best practices. Mastering the art of siding around chimney involves a careful approach, guaranteeing both aesthetic appeal and long-term protection from the elements.
Protecting Your Home with Chimney Siding: A Critical Defense
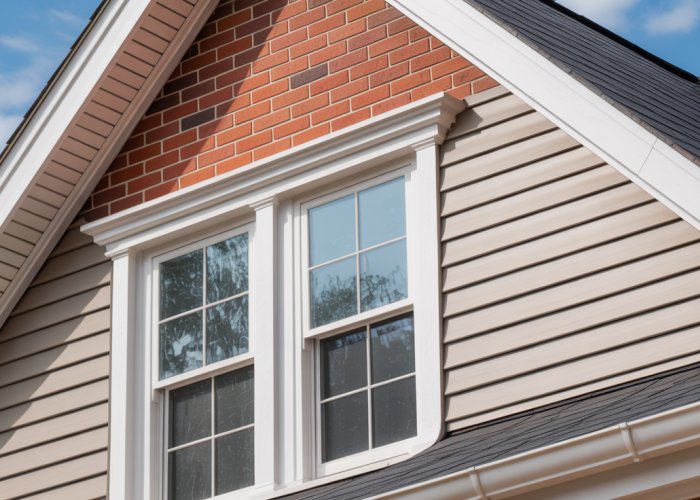
The siding around your chimney is more than just an aesthetic detail; it’s a vital component of your home’s overall protection. Proper installation is paramount, acting as the first line of defense against the elements and ensuring the longevity of your property.
The Crucial Role of Chimney Siding
Think of your chimney as a vertical shaft, exposed to everything Mother Nature throws its way: rain, snow, ice, and intense sunlight.
Without properly installed siding, water can seep behind the exterior, leading to a cascade of problems.
It’s not merely about preventing drafts; it’s about safeguarding the very structure of your home.
Consequences of Improper Installation
Ignoring the importance of correctly installed chimney siding can lead to dire consequences.
Water damage is the most immediate and pervasive threat.
Moisture intrusion can rot the wooden supports around the chimney, compromise insulation, and create a breeding ground for mold and mildew.
This not only weakens the structural integrity but also poses serious health risks to your family.
Furthermore, improper siding installation can contribute to structural issues.
The freeze-thaw cycle can exacerbate cracks in the chimney itself, leading to costly repairs down the road.
Neglecting this critical area can ultimately diminish your home’s value and necessitate extensive renovations.
What We’ll Cover
In the following sections, we will equip you with the knowledge to understand the crucial aspects of chimney siding.
The preceding sections highlighted the critical role of chimney siding in protecting your home from the elements. Now, to fully appreciate the installation process and make informed decisions, it’s essential to understand the individual components at play. We’ll delve into the anatomy of a chimney, the function of flashing, the types of siding materials available, the importance of weather barriers, and the role of sealants.
Understanding Chimney and Siding Components
A successful chimney siding installation hinges on understanding each component’s role and how they work together. From the chimney’s structure to the final sealant, each element contributes to a weathertight and durable system.
Chimney Anatomy 101
Understanding the basic parts of a chimney is the foundation for proper siding installation. The chimney isn’t just a single structure; it’s a system with distinct components.
-
Chase: The chase is the decorative enclosure that surrounds the flue. It’s the part of the chimney you see from the outside, and it’s often framed with wood or metal. Siding is attached to the chase.
-
Flue: The flue is the internal passageway or vent within the chimney that channels smoke and combustion gases away from fireplaces, stoves, or furnaces. It’s typically made of clay tiles, metal, or concrete.
-
Crown: The crown is the concrete or masonry top of the chimney, designed to prevent water from entering the flue. A damaged crown can lead to water damage and structural issues within the chimney.
The Role of Flashing
Flashing is a critical element in preventing water intrusion around the chimney. It’s a thin, water-resistant material, typically metal, installed at the intersection of the chimney and the roof or siding.
Flashing creates a barrier that directs water away from vulnerable areas. Without properly installed flashing, water can seep behind the siding and into the structure of your home.
There are several types of flashing materials, each with its own advantages and disadvantages:
-
Aluminum Flashing: Aluminum is a cost-effective and lightweight option. However, it’s more prone to corrosion than other materials, especially when in contact with dissimilar metals.
-
Copper Flashing: Copper is a durable and aesthetically pleasing choice, offering excellent resistance to corrosion. However, it’s a more expensive option than aluminum.
The choice of flashing material often depends on budget, aesthetic preferences, and the specific climate conditions. Regardless of the material, proper installation is paramount.
Types of Siding Suitable for Chimneys
Selecting the right siding material is essential for both aesthetics and performance. Different materials offer varying levels of durability, weather resistance, and visual appeal. Here are some common options:
Vinyl Siding
Vinyl siding is a popular choice due to its low cost, ease of installation, and minimal maintenance requirements. It’s resistant to rot and insects, but it can be susceptible to damage from extreme weather conditions.
Wood Siding
Wood siding offers a classic and natural look, but it requires regular maintenance to prevent rot, insect infestation, and water damage. It’s important to choose a durable wood species and apply a protective sealant.
Fiber Cement Siding
Fiber cement siding is a durable and fire-resistant option that mimics the look of wood. It’s more expensive than vinyl siding but offers superior longevity and resistance to the elements.
Metal Siding
Metal siding, such as aluminum or steel, is a highly durable and weather-resistant choice. It’s often used in areas with harsh climates. Metal siding is resistant to fire, insects, and rot.
The Importance of a Weather Barrier (House Wrap)
A weather barrier, commonly known as house wrap, is a synthetic material installed beneath the siding to protect the underlying structure from moisture.
House wrap acts as a secondary line of defense against water intrusion, preventing water that penetrates the siding from reaching the sheathing and framing. It also allows moisture vapor to escape from the interior of the wall, preventing mold and mildew growth.
Caulk/Sealant
Caulk and sealant are used to create a watertight seal around the chimney and siding, preventing water from entering gaps and cracks.
These materials are applied to joints, seams, and penetrations to block moisture. It’s essential to use high-quality, weather-resistant caulk or sealant that is compatible with the siding material. Regular inspection and reapplication of caulk or sealant are necessary to maintain a weathertight seal over time.
The preceding sections highlighted the critical role of chimney siding in protecting your home from the elements. Now, to fully appreciate the installation process and make informed decisions, it’s essential to understand the individual components at play. We’ll transition from understanding the components to discussing the crucial preparatory steps.
Preparation is Key: Tools, Safety, and Assessment
Success in any construction project, especially one involving heights and potentially hazardous materials, hinges on meticulous preparation. Rushing into a chimney siding installation without proper planning can lead to costly mistakes, injuries, or a compromised final product. This section outlines the essential steps for ensuring a safe and effective installation, covering everything from gathering the necessary tools to conducting a thorough assessment of the existing conditions.
Tools and Materials Checklist
Before you even consider climbing a ladder, ensure you have all the necessary tools and materials readily available. A well-stocked workspace saves time, minimizes frustration, and enhances safety. Here’s a comprehensive checklist:
-
Safety Gear: Safety glasses, work gloves, a hard hat (especially crucial when working below someone), and appropriate fall protection (harness, lanyard) are non-negotiable.
-
Measuring Tools: A reliable measuring tape, a level (both standard and potentially a laser level for longer runs), and a speed square are essential for accurate cuts and alignment.
-
Cutting Tools: Depending on the type of siding, you’ll need a circular saw with appropriate blades (e.g., a fiber cement blade), a utility knife with plenty of replacement blades, and potentially metal snips for flashing.
-
Fastening Tools: A drill or impact driver with various bits, a hammer, and potentially a nail gun (with compressor if needed) will be required for securing the siding and flashing.
-
Other Essential Tools: A caulk gun, a pry bar (for removing old siding), a ladder (in good condition and appropriate height), scaffolding (if necessary for larger chimneys), and a dust mask are also crucial.
-
Materials: Siding material (vinyl, wood, fiber cement, or metal), flashing (aluminum or copper), house wrap, caulk/sealant (specifically designed for exterior use), nails or screws (appropriate for the siding material), and potentially furring strips (for creating a level surface) are key materials.
Safety First: Prioritizing Your Well-being
Working at heights presents inherent risks. Taking the necessary precautions is paramount to prevent serious injuries.
- Ladder Safety: Always inspect your ladder for damage before each use. Ensure it’s placed on a stable, level surface. Maintain three points of contact (two hands and one foot, or two feet and one hand) at all times. Never overreach; reposition the ladder as needed.
- Fall Protection: If working at significant heights, a safety harness and lanyard system are highly recommended. Secure the lanyard to a reliable anchor point.
- Weather Conditions: Avoid working in windy, rainy, or icy conditions. These conditions significantly increase the risk of falls.
- Personal Protective Equipment (PPE): Always wear safety glasses to protect your eyes from debris, work gloves to protect your hands, and a hard hat when there’s a risk of falling objects.
- Communicate: If possible, have someone else present while you’re working, especially at heights. This allows for quick assistance in case of an emergency.
- Power Line Awareness: Be acutely aware of any overhead power lines. Maintain a safe distance at all times.
- Know Your Limits: Do not attempt tasks that exceed your skill level or physical capabilities. If you’re uncomfortable with any aspect of the job, consult a professional.
Assessing Existing Conditions: A Pre-Installation Inspection
Before tearing off the old siding, a thorough assessment of the existing conditions is crucial for identifying potential problems and ensuring a smooth installation.
- Siding Inspection: Carefully examine the existing siding for signs of damage, such as rot, cracks, warping, or loose sections. Note any areas that require special attention or repair.
- Flashing Inspection: Pay close attention to the flashing around the chimney base and where the chimney meets the roof. Look for signs of corrosion, damage, or improper installation. Damaged or missing flashing is a common cause of water leaks.
- Chimney Crown Inspection: The chimney crown, the concrete or masonry top of the chimney, should be inspected for cracks or deterioration. A damaged crown allows water to penetrate the chimney structure, leading to costly repairs.
- Underlying Structure: Check the condition of the sheathing or framing beneath the siding. Water damage can compromise the structural integrity of the chimney chase.
- Water Damage Signs: Look for water stains, mold, or mildew growth on the siding, flashing, or surrounding areas. These are indicators of existing leaks that need to be addressed before installing new siding.
- Chimney Shape and Size: Document the dimensions and shape of the chimney. Non-standard shapes or sizes may require custom siding cuts or flashing solutions.
By meticulously assessing the existing conditions, you can proactively address potential problems, ensuring a long-lasting and weathertight chimney siding installation. This step is often overlooked, but it is essential for a successful project.
The preceding sections highlighted the critical role of chimney siding in protecting your home from the elements. Now, to fully appreciate the installation process and make informed decisions, it’s essential to understand the individual components at play.
Step-by-Step Installation: A Practical Guide
Installing siding around a chimney requires precision and attention to detail. This section provides a comprehensive guide, walking you through each step of the process. From safely removing the old siding to ensuring a weathertight seal with caulk, we’ll cover the essential techniques for a successful installation.
Removing Old Siding: Safe and Effective Techniques
Before installing new siding, the old material must be removed. This process requires caution to avoid damaging the underlying structure or injuring yourself.
-
Safety First: Always wear safety glasses and work gloves. If the siding contains asbestos (common in older homes), professional removal is essential.
-
Gentle Removal: Use a pry bar or flat bar to carefully detach the siding, working from the top down. Avoid excessive force, which can damage the sheathing beneath.
-
Fastener Removal: Remove any nails or screws securing the siding. A nail puller or drill can be helpful.
-
Proper Disposal: Dispose of the old siding according to local regulations. Some materials may require special handling.
Installing Flashing Correctly: Protecting Against Water Intrusion
Flashing is a crucial component in preventing water damage around the chimney. Proper installation ensures water is diverted away from vulnerable areas.
Step Flashing vs. Continuous Flashing
Two primary types of flashing are used: step flashing and continuous flashing. Step flashing is used where the roof meets the chimney, while continuous flashing is often used at the top of the chimney chase.
-
Step Flashing Installation: Each piece of step flashing should be integrated with the roofing material, overlapping each shingle. Secure each piece with nails or screws.
-
Counter Flashing: Install counter flashing over the step flashing, embedding it into the chimney mortar joints. This creates a two-layered barrier against water penetration.
-
Continuous Flashing Installation: Overlap the flashing pieces adequately and seal the seams with roofing cement. Extend the flashing far enough onto the roof to ensure proper water runoff.
-
Ensuring a Tight Seal: Pay special attention to corners and seams. Use roofing cement or sealant to create a weathertight barrier.
Cutting and Fitting Siding: Achieving a Professional Finish
Precise cuts are essential for a professional-looking siding installation. Accurate measurements and the right tools are key.
-
Accurate Measurements: Measure the area to be covered carefully. Account for overlaps and expansion gaps.
-
Cutting Techniques: Use a circular saw with a blade designed for the siding material. For fiber cement, use a fiber cement blade. For vinyl, use a fine-tooth blade installed backward.
-
Clean Cuts: Score the siding with a utility knife before cutting to prevent chipping.
-
Test Fitting: Before securing the siding, test fit each piece to ensure a proper fit. Make adjustments as needed.
Securing Siding to the Chimney Chase: Maintaining a Watertight Seal
Properly securing the siding to the chimney chase is vital for both aesthetics and weather protection.
-
Fastener Selection: Use corrosion-resistant nails or screws designed for exterior use. The fastener length should be sufficient to penetrate the siding and the sheathing beneath.
-
Proper Spacing: Follow the manufacturer’s recommendations for fastener spacing. Over-nailing can restrict expansion and contraction, leading to buckling.
-
Watertight Seals: Consider using sealant around fastener heads to prevent water penetration, especially in areas prone to heavy rain or snow.
-
Maintaining a Consistent Appearance: Align the siding properly and ensure consistent spacing for a uniform and professional look.
Sealing with Caulk/Sealant: The Final Weathertight Barrier
Caulk and sealant are essential for creating a weathertight seal around the chimney siding. They fill gaps and prevent water from penetrating the structure.
-
Selecting the Right Sealant: Choose a high-quality exterior-grade sealant that is compatible with the siding material. Polyurethane or silicone sealants are generally good choices.
-
Proper Application: Clean the surfaces to be sealed thoroughly. Apply the sealant in a continuous bead, ensuring it fills all gaps and cracks.
-
Tooling the Sealant: Use a wet finger or a sealant tool to smooth the bead and create a professional finish. Remove any excess sealant.
-
Regular Inspections: Inspect the sealant regularly for cracks or damage. Reapply as needed to maintain a weathertight seal.
The preceding sections highlighted the critical role of chimney siding in protecting your home from the elements. Now, to fully appreciate the installation process and make informed decisions, it’s essential to understand the individual components at play.
Overcoming Installation Challenges
No chimney siding project is without its potential hurdles. The unique architecture of each home, coupled with unforeseen issues like hidden damage, can present challenges that require creative solutions and a solid understanding of best practices. Let’s explore some common obstacles and how to navigate them effectively.
Adapting to Chimney Shape and Size
Chimneys aren’t always simple squares or rectangles. They come in various shapes and sizes, each demanding a tailored approach to siding installation.
Round chimneys, for example, present a unique challenge for siding, which is typically designed for flat surfaces. Achieving a clean, professional look often requires using flexible materials or employing specialized cutting and fitting techniques. Precise measurements and careful planning are paramount.
For particularly large chimneys, consider breaking up the siding into smaller sections to manage material and weight. This approach also allows for expansion and contraction, reducing the risk of warping or buckling over time.
Unconventional shapes demand even greater creativity. In these cases, consider using custom-fabricated siding pieces or employing a professional with experience in complex installations.
The Vital Role of a Chimney Cricket
A chimney cricket is a sloped structure installed on the roof behind a chimney. Its primary purpose is to divert water away from the chimney’s back side, preventing accumulation that can lead to leaks and structural damage.
Ignoring the need for a cricket, especially on wider chimneys, is a recipe for disaster. Water pooling behind the chimney can seep into the roof sheathing, causing rot, mold growth, and costly repairs.
The size and slope of the cricket should be proportional to the chimney’s dimensions and the roof’s pitch. A properly designed and installed cricket acts as a critical shield, ensuring long-term protection against water intrusion.
Consider a cricket mandatory for chimneys wider than 30 inches.
Troubleshooting Leaks and Water Damage
Even with meticulous installation, leaks can sometimes occur. Identifying and addressing these issues promptly is crucial to prevent further damage.
Start by inspecting the flashing, which is a common source of leaks. Look for gaps, cracks, or signs of corrosion. Ensure the flashing is properly integrated with both the chimney and the roof.
Check the siding itself for any signs of damage, such as cracks, loose seams, or warped boards. Pay close attention to areas around windows, doors, and other penetrations.
If you suspect a leak, use a hose to carefully test different areas of the chimney and siding. Have someone inside the house observe for any signs of water intrusion.
Addressing water damage promptly is essential. Remove any wet or damaged materials, allow the area to dry thoroughly, and then repair or replace the affected components. Ignoring water damage can lead to more extensive and costly problems down the road.
When in doubt, consult a qualified professional. They have the expertise and tools to diagnose and repair complex leaks, ensuring your chimney and home are protected for years to come.
The preceding sections highlighted the critical role of chimney siding in protecting your home from the elements. Now, to fully appreciate the installation process and make informed decisions, it’s essential to understand the individual components at play.
Building Codes and Compliance
Navigating the world of home improvement often feels like a complex maze, and chimney siding is no exception. Beyond the aesthetic considerations and practical installation techniques lies a critical layer of regulations: building codes. Ignoring these codes isn’t just a technical oversight; it can lead to safety hazards, structural instability, and potential legal ramifications.
Deciphering Local Building Codes
Building codes aren’t universal; they vary significantly depending on your geographical location. These codes are meticulously crafted by local municipalities, taking into account factors like climate, seismic activity, and common construction practices specific to the region.
Therefore, the first and most crucial step is to identify and thoroughly understand the building codes that apply to your property.
Contact your local building department or consult their website. These resources are invaluable for obtaining the most up-to-date information on chimney and siding regulations in your area.
Key Areas Covered by Building Codes
While specific regulations differ, building codes typically address several key aspects of chimney siding:
-
Fire Safety: Codes often dictate the types of materials permitted for siding around chimneys, emphasizing fire-resistant options to prevent the spread of flames. Clearances between the chimney and combustible materials are strictly regulated to minimize fire hazards.
-
Structural Integrity: The method of attaching siding to the chimney chase must comply with structural requirements to ensure stability and prevent collapse. Codes may specify fastener types, spacing, and load-bearing capacities.
-
Weather Resistance: Building codes frequently mandate the use of proper flashing techniques and weather-resistant barriers to prevent water intrusion. This is essential to protect the underlying structure from rot, mold, and other forms of water damage.
-
Energy Efficiency: Some codes address insulation requirements for chimneys, aiming to improve energy efficiency and reduce heat loss. This can involve specifying insulation materials and R-values.
The Imperative of Compliance
Adhering to building codes isn’t simply a matter of following rules; it’s an investment in the safety, longevity, and value of your home. Non-compliance can have significant consequences:
-
Safety Risks: Improperly installed siding or the use of non-compliant materials can create fire hazards, structural weaknesses, and other safety risks for your family and neighbors.
-
Structural Damage: Ignoring weather-resistance requirements can lead to water damage, compromising the structural integrity of your chimney and surrounding areas.
-
Failed Inspections: Building inspections are often required after siding installations. Failure to meet code requirements can result in failed inspections, requiring costly repairs or replacements.
-
Reduced Property Value: Non-compliant installations can negatively impact your property value, as potential buyers may be wary of taking on the risks associated with code violations.
-
Legal Ramifications: In some cases, violating building codes can result in fines, legal action, or even the forced removal of non-compliant installations.
By ensuring your chimney siding project adheres to local building codes, you not only protect your home and family but also safeguard your investment for years to come.
Maintenance and Longevity: Protecting Your Investment
Installing chimney siding represents a significant investment in your home’s protection and aesthetic appeal. However, the job isn’t truly complete once the last nail is hammered or the final bead of caulk is applied. Ensuring the longevity and performance of your chimney siding requires a commitment to regular maintenance and a keen eye for potential problems. Neglecting this aspect can lead to premature deterioration, costly repairs, and ultimately, a compromised home envelope.
Regular Inspection: The First Line of Defense
Proactive inspection is paramount in preventing minor issues from escalating into major headaches. Make it a habit to visually inspect your chimney siding at least twice a year, ideally in the spring and fall. These seasonal check-ups allow you to catch any damage caused by harsh weather conditions or the natural freeze-thaw cycle.
What to Look For:
-
Cracks and Gaps: Carefully examine the siding for any cracks, splits, or gaps, particularly around joints, corners, and areas where the siding meets other building materials like roofing or windows. These openings can allow water to penetrate, leading to rot, mold growth, and structural damage.
-
Loose or Missing Siding: Check for any siding panels that are loose, warped, or missing entirely. High winds and impacts from debris can dislodge siding, leaving the underlying structure vulnerable.
-
Damaged Flashing: Pay close attention to the flashing around the chimney base and any other areas where it’s installed. Look for signs of rust, corrosion, or bending, which can compromise its ability to divert water away from the chimney and siding.
-
Caulk and Sealant Issues: Inspect the caulk and sealant around the chimney, siding edges, and any penetrations like pipes or vents. Cracks, peeling, or crumbling caulk can create pathways for water intrusion.
-
Signs of Water Damage: Be vigilant for signs of water damage, such as staining, discoloration, or efflorescence (a white, powdery deposit) on the siding or surrounding areas. These indicators suggest that water is seeping behind the siding and potentially causing hidden damage.
-
Pest Infestation: Look for signs of nesting or pest activity, such as holes, droppings, or chewed siding. Insects and rodents can cause significant damage to siding and compromise its integrity.
Proper Maintenance Techniques: Extending Siding Lifespan
Beyond regular inspections, implementing proper maintenance techniques can significantly extend the lifespan of your chimney siding.
-
Cleaning: Periodically clean your chimney siding to remove dirt, debris, and algae growth. Use a soft brush or sponge and a mild detergent solution. Avoid using high-pressure washers, as they can damage the siding and force water behind it.
-
Caulking and Sealing: Address any cracks or gaps in the caulk and sealant promptly. Remove the old, damaged caulk and apply a fresh bead of high-quality, exterior-grade caulk to create a watertight seal.
-
Painting or Staining: If your siding is painted or stained, reapply the finish as needed to protect it from the elements and maintain its appearance. Follow the manufacturer’s instructions for proper application and preparation.
-
Vegetation Control: Keep vegetation trimmed back from the chimney siding to prevent moisture buildup and pest infestations. Overhanging branches can trap moisture against the siding, creating an ideal environment for mold and rot.
When to Call a Construction Professional/Contractor: Recognizing When Professional Help is Needed
While some maintenance tasks can be handled by homeowners, certain situations warrant the expertise of a qualified construction professional or contractor.
-
Extensive Damage: If you discover extensive damage to your chimney siding, such as widespread rot, structural issues, or significant water damage, it’s best to consult a professional. Attempting to repair these problems yourself may lead to further damage or compromise the structural integrity of your home.
-
Flashing Issues: Flashing installation and repair require specialized knowledge and skills. If you suspect problems with your chimney flashing, it’s crucial to hire a qualified contractor to ensure that it’s properly installed and functioning correctly.
-
Complex Repairs: Certain siding repairs can be complex and require specialized tools or techniques. If you’re unsure about how to tackle a particular repair, it’s always best to err on the side of caution and seek professional assistance.
-
Safety Concerns: Working at heights or dealing with potentially hazardous materials can be dangerous. If you’re uncomfortable working on a ladder or handling power tools, it’s best to leave the job to a professional.
-
Building Code Compliance: Ensuring that your chimney siding meets local building codes is essential for safety and legal compliance. A qualified contractor can ensure that your siding is installed correctly and in accordance with all applicable regulations.
By proactively inspecting your chimney siding, implementing proper maintenance techniques, and recognizing when professional help is needed, you can protect your investment and ensure the long-term performance of this critical component of your home.
Chimney Siding FAQs
Here are some frequently asked questions to help you master chimney siding installation and achieve professional results.
What’s the best material for siding around a chimney?
Durable, weather-resistant materials like fiber cement, vinyl, or metal are generally recommended. Consider factors like your home’s existing siding, budget, and climate when making your choice. Ensure the chosen material is rated for exterior use and can withstand temperature fluctuations.
How do I properly flash siding around the chimney?
Flashing is crucial to prevent water damage. Install step flashing along the sides where the siding meets the chimney. Overlap each piece of flashing, integrating it with the siding layers. Use counter flashing at the top, embedded in the chimney mortar joint and overlapping the step flashing.
What’s the biggest mistake people make installing siding around a chimney?
Improper flashing is a common error. Also, failing to leave adequate expansion gaps for the siding can cause buckling. Make sure all cuts are clean and precise, especially where the siding meets the chimney, to prevent water intrusion.
Do I need a professional to install siding around my chimney?
While DIY is possible, chimney siding requires precision and knowledge of flashing techniques. If you lack experience with siding or are uncomfortable working at heights, hiring a professional is highly recommended. This ensures proper installation and prevents costly repairs later.
Alright, now you’re armed with the know-how to tackle that siding around chimney like a seasoned pro! Get out there and make it happen. Good luck, and happy siding!