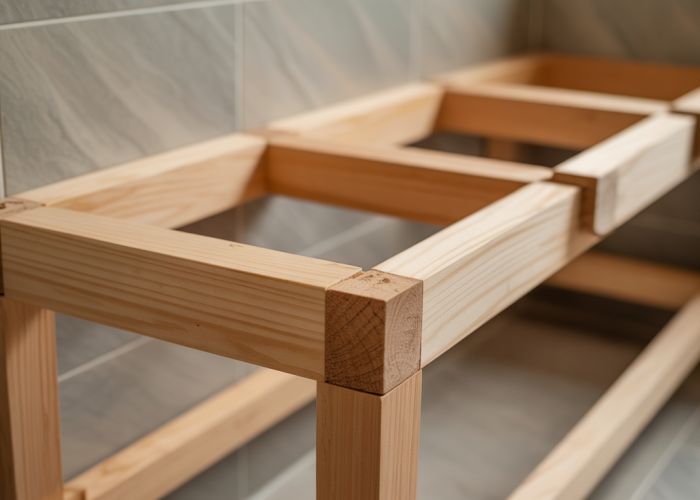
Shower bench framing, a crucial aspect of accessible bathroom design, requires careful consideration of several factors. Waterproofing, essential for longevity, directly impacts the durability of the frame. Tile setters, professionals skilled in surface installation, often collaborate on achieving a seamless, waterproofed finish. Understanding ADA guidelines, which dictate accessibility standards, is paramount for ensuring compliance and user safety. Implementing correct techniques for shower bench framing ensures a safe, long-lasting and aesthetically pleasing structure.
Optimizing Your "Shower Bench Framing: Pro Secrets Revealed!" Article Layout
This guide outlines the best article layout to effectively explain "shower bench framing," focusing on clarity, practicality, and reader engagement. Our goal is to provide actionable advice that empowers readers to successfully frame a shower bench.
Understanding the Importance of a Well-Framed Shower Bench
Before diving into the "pro secrets," it’s crucial to establish the "why" behind robust shower bench framing. This section sets the stage and highlights potential pitfalls of inadequate framing.
- Structural Integrity: Emphasize how proper framing ensures the bench can safely support weight over time, preventing collapses and injuries.
- Water Resistance: Underscore the importance of building a framework that minimizes water intrusion and prevents mold growth, crucial in a wet environment.
- Tile Support: Explain how a well-built frame provides a solid and level base for tile, ensuring a professional and long-lasting finish.
- Code Compliance: Briefly mention the need to adhere to local building codes related to bench dimensions, support requirements, and waterproofing.
Materials and Tools Checklist: Your Preparation Roadmap
This section will list all the materials and tools you will need for this project. Consider a table for easier readability.
| Material/Tool | Description | Quantity (Example) | Notes |
|---|---|---|---|
| Lumber (e.g., 2×4 treated) | Pressure-treated lumber is essential for resisting moisture and preventing rot. Choose the right dimensions for your bench size and intended load. | Varies | Ensure it’s rated for direct contact with concrete if resting on the shower floor. |
| Fasteners | Exterior-grade screws or nails resistant to corrosion. Avoid drywall screws. | Varies | Consider using stainless steel screws for superior corrosion resistance. |
| Cement Backer Board | A water-resistant substrate that accepts tile adhesive. | Varies | HardieBacker or similar brands are recommended. |
| Thin-Set Mortar | Modified thin-set mortar designed for wet environments. | Varies | Choose a high-quality, polymer-modified thin-set for superior bond strength and water resistance. |
| Waterproofing Membrane | A liquid or sheet membrane to prevent water penetration. | Varies | Schluter-KERDI is a common choice. Follow the manufacturer’s instructions for application. |
| Measuring Tape | Essential for accurate measurements. | 1 | |
| Level | Ensures the bench is perfectly horizontal. | 1 | A spirit level or laser level is recommended. |
| Circular Saw / Hand Saw | For cutting lumber to size. | 1 | |
| Drill / Driver | For driving screws. | 1 | |
| Safety Glasses | Protection for your eyes. | 1 | Always wear safety glasses when cutting or drilling. |
Step-by-Step Guide to Shower Bench Framing: Pro Secrets
This is the core of the article. Each step needs to be explained with enough detail to be easily followed.
Step 1: Planning and Measurement
- Determine Bench Dimensions: Decide on the desired width, depth, and height of the bench. Consider shower size and user needs.
- Mark Bench Location: Clearly mark the outline of the bench on the shower walls.
- Check for Plumbing & Electrical: Ensure there are no hidden pipes or wires within the bench area.
Step 2: Building the Frame
- Cut Lumber to Size: Precisely cut the lumber according to your planned dimensions. Double-check measurements.
- Construct the Support Structure: Build the inner frame, ensuring it provides adequate support. Think about weight distribution. Consider vertical supports spaced every 12-16 inches for optimal strength.
- Attach to Walls: Securely attach the frame to the shower walls. Pro Secret: Use ledger boards (horizontal supports attached to the walls) to provide a stable base. Ensure the ledger boards are perfectly level. Use appropriate fasteners based on the wall material (e.g., concrete screws for concrete walls).
Step 3: Installing the Cement Backer Board
- Cut Backer Board: Cut the cement backer board to fit the framed structure.
- Attach Backer Board: Screw the backer board to the frame using backer board screws. Ensure proper spacing.
Step 4: Waterproofing
- Apply Waterproofing Membrane: Apply a waterproofing membrane to the entire bench surface, including corners and seams. Follow manufacturer’s instructions meticulously. Overlap seams adequately.
Step 5: Tiling (Brief Overview)
- Prepare the Surface: Ensure the surface is clean and dry.
- Apply Thin-Set Mortar: Apply a layer of thin-set mortar.
- Set Tiles: Carefully set the tiles, ensuring proper spacing and alignment.
Framing Variations: Tailoring to Your Needs
This section will briefly cover alternative framing techniques or specific scenarios.
- Floating Shower Bench: Discuss the unique considerations for framing a floating bench, emphasizing the need for robust wall support and hidden brackets.
- Corner Bench: Explain how the corner location affects the framing design, including the angled cuts and support needed.
- Curved Bench: Briefly mention the complexity of framing a curved bench and suggest consulting a professional.
Troubleshooting Common Framing Issues
Address potential problems and provide solutions.
- Wobbly Bench: Diagnose the causes (e.g., insufficient support, loose fasteners) and offer fixes.
- Water Leaks: Explain how to identify leaks and properly seal the bench.
- Unlevel Surface: Describe how to correct an unlevel frame before tiling.
Shower Bench Framing: FAQs
Here are some common questions about shower bench framing techniques and best practices.
What’s the best material to use for shower bench framing?
Pressure-treated lumber is essential for shower bench framing. It resists moisture and prevents rot, ensuring your bench lasts longer in the damp shower environment. Standard lumber will quickly deteriorate.
How do I ensure proper water drainage on my shower bench?
Slope the shower bench seat slightly (about 1/4 inch per foot) towards the drain. This prevents water from pooling on the surface and helps keep the bench clean and dry. Consider using a waterproof membrane over the framing.
What’s the ideal height for a shower bench?
A comfortable height for a shower bench is typically between 17 and 19 inches. Consider the needs of all users when deciding on the final height of your shower bench framing.
What’s the best way to waterproof the shower bench frame?
Apply a waterproof membrane over the entire shower bench framing before tiling. This creates a barrier against moisture penetration and protects the underlying structure, and can be purchased at local home improvement stores. Proper waterproofing is crucial for a long-lasting shower bench.
Alright, you’ve got the inside scoop on shower bench framing! Time to put those pro secrets to use and create something amazing. Happy building!