Understanding shin splints, also known as medial tibial stress syndrome (MTSS), is crucial for effective treatment. Many athletes find that shin splints strapping, when applied correctly, can provide significant relief. Proper technique, using materials like elastic adhesive bandage (EAB), supports the lower leg muscles. This guide provides a step-by-step approach to shin splints strapping, helping you get back on your feet with confidence.
Shin Splints Strapping: Your Step-by-Step Guide to Relief
Shin splints can be a real pain, interrupting your runs, workouts, and even just daily activities. Fortunately, strapping your shins correctly can provide significant support and pain relief. This guide will walk you through the process of "shin splints strapping" step-by-step, ensuring you get the best possible results. We’ll break down each stage to make it easy to understand, even if you’ve never done it before.
Understanding Shin Splints and the Role of Strapping
Before we jump into the strapping process, let’s quickly understand what shin splints are and how strapping helps.
What Are Shin Splints?
Shin splints, also known as medial tibial stress syndrome (MTSS), refers to pain along the shinbone (tibia). It’s often caused by repetitive stress on the tibia and the connective tissues that attach muscles to the bone. Factors like overtraining, improper footwear, and flat feet can contribute to shin splints.
How Strapping Provides Support
Strapping your shin helps in the following ways:
- Reduces Stress: By providing external support, strapping can reduce the stress on the muscles and tendons around your shinbone.
- Increases Stability: The tape helps to stabilize the area, limiting excessive movement that can aggravate the condition.
- Provides Compression: The gentle compression from the tape can improve blood flow and reduce inflammation.
- Offers Pain Relief: The support and compression together can significantly reduce the pain associated with shin splints.
Gathering Your Supplies for Shin Splints Strapping
To strap your shin effectively, you’ll need the right materials. Here’s what you’ll require:
- Zinc Oxide Tape (Rigid Strapping Tape): This is the primary tape for providing support. Choose a width of 3.8cm (1.5 inches) or 5cm (2 inches).
- Underwrap (Pre-Wrap): This thin foam layer protects your skin from irritation and makes tape removal easier.
- Scissors: For cutting the tape to the appropriate lengths.
- Razor (Optional): If you have excessive hair on your lower leg, shaving the area where the tape will be applied can improve adhesion and comfort. Be cautious while shaving!
- Alcohol Wipe: To clean and degrease the skin for better tape adhesion.
Step-by-Step Guide to Strapping for Shin Splints Relief
Follow these steps carefully for optimal support. It’s helpful to have someone assist you, especially the first few times.
Preparation: Getting Ready to Strap
- Clean the Area: Use an alcohol wipe to thoroughly clean the area of your lower leg where the tape will be applied. This removes oils and dirt, enhancing tape adhesion.
- Apply Underwrap (Pre-Wrap): Start just above your ankle and wrap the pre-wrap evenly up to just below your knee. Overlap each layer slightly. The pre-wrap should be snug but not too tight. This protects your skin.
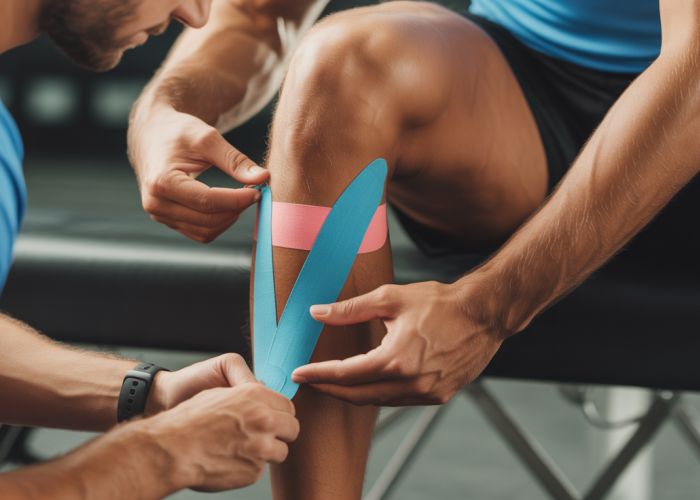
Applying the Zinc Oxide Tape: The Strapping Process
This section details the precise tape application for effective support.
-
Anchor Strips:
- Ankle Anchor: Apply a strip of zinc oxide tape around your ankle, directly on top of the pre-wrap. Ensure it’s snug but not overly tight to avoid restricting circulation.
- Calf Anchor: Similarly, apply a strip of zinc oxide tape around your calf, just below your knee, again directly on top of the pre-wrap.
-
Support Strips (The "X" Pattern): This is the core of the strapping technique.
- First Strip: Start on the inside of your ankle (medial malleolus) and run the tape diagonally across the front of your shin (over the area of pain), attaching it to the calf anchor on the outside of your calf. Apply the tape with gentle tension.
- Second Strip: Start on the outside of your ankle (lateral malleolus) and run the tape diagonally across the front of your shin (overlapping slightly with the first strip), attaching it to the calf anchor on the inside of your calf. Again, use gentle tension. This creates an "X" pattern over the painful area.
- Repeat: Continue applying alternating strips in this "X" pattern, overlapping each strip by about half its width. Each strip should start from either the outside or inside of your ankle, running diagonally over the painful area and attaching to the opposite side of the calf anchor. Apply 3-5 "X" patterns.
-
Closing Strips (Securing the Strapping):
- Ankle Closer: Apply a strip of zinc oxide tape around your ankle, covering the ends of the "X" strips and securing them to the ankle anchor.
- Calf Closer: Apply a strip of zinc oxide tape around your calf, covering the ends of the "X" strips and securing them to the calf anchor.
-
Reinforcement (Optional): For added support, you can apply a few more horizontal strips of zinc oxide tape around the lower leg, overlapping slightly and covering the entire strapping area.
Important Considerations During Application:
- Tension: Apply the tape with gentle tension. Too much tension can restrict circulation and cause discomfort. If your toes start to feel tingly or numb, remove the tape immediately and reapply with less tension.
- Overlap: Ensure each strip of tape overlaps the previous one by about half its width. This provides consistent support.
- Smoothness: Smooth out any wrinkles or creases in the tape to prevent irritation.
- Pain Relief: As you apply the tape, gently massage the area of pain.
Aftercare and Maintenance
Taking care of your strapping will help it last longer and remain effective.
Checking for Circulation:
After applying the strapping, immediately check your toes to ensure they have good circulation. You should be able to wiggle them easily, and they should be pink and warm. If you notice any numbness, tingling, or discoloration, remove the tape immediately and reapply it with less tension.
Duration of Wear:
The strapping is typically effective for 1-2 days, depending on your activity level and how well the tape adheres.
Removing the Tape:
To remove the tape:
- Carefully cut the tape along its length with scissors, avoiding cutting your skin.
- Gently peel the tape off your skin. If you encounter resistance, use baby oil or adhesive remover to loosen the tape.
- Moisturize your skin after removing the tape to prevent dryness.
When to Seek Professional Help:
Strapping can provide significant relief from shin splint pain. However, it’s essential to consult with a doctor or physical therapist if:
- Your pain is severe or doesn’t improve with strapping.
- You suspect a stress fracture.
- You experience numbness or tingling in your foot or leg.
- You have any other concerns about your condition.
FAQs: Shin Splints Strapping
Here are some frequently asked questions about shin splints strapping to help you understand the process and its benefits better.
When should I use shin splints strapping?
You should use shin splints strapping when you experience pain along your shinbone, especially during or after exercise. Strapping can provide support and reduce stress on the muscles and tissues in your lower leg. Consult a medical professional for proper diagnosis.
How often should I reapply the shin splints strapping?
Reapply the shin splints strapping every day or after each exercise session, or whenever the tape loses its adhesiveness or support. It’s important to use fresh tape to ensure optimal compression and stability.
Can I shower or swim with shin splints strapping on?
Generally, it’s best to avoid prolonged exposure to water with shin splints strapping on. Moisture can weaken the adhesive and cause the tape to peel off. If you need to shower, try to keep the area dry or reapply fresh tape afterward.
What if the shin splints strapping is too tight?
If you experience tingling, numbness, or increased pain after applying the shin splints strapping, it’s likely too tight. Remove the tape immediately and reapply it with slightly less tension. It should provide support without restricting circulation.
And there you have it! You now know the ins and outs of shin splints strapping. Give it a try and let us know how it works for you. Best of luck getting those shins feeling better!