Constructing a reliable shed requires strong support, and the quality of your shed foundation concrete determines the longevity of the entire structure. Proper concrete mixing is essential for achieving a durable base, ensuring it can withstand environmental factors. Choosing the right forms from your local Home Depot can greatly simplify the pouring process. Moreover, consulting resources like those provided by the Portland Cement Association offers valuable insights into best practices for concrete work. So, if you’re diving into this DIY project, ensure that every step, from preparing the site to curing the concrete, is carefully executed, laying a solid foundation for your shed for seasons to come.
Mastering Your Shed Foundation: A Concrete Guide
This guide provides a step-by-step approach to building a durable and reliable concrete foundation for your shed. We will focus on best practices and essential steps to ensure a long-lasting structure.
1. Planning and Preparation: Setting the Stage for Success
Proper planning is crucial before you even think about mixing concrete. A well-thought-out plan prevents costly mistakes and ensures a structurally sound foundation.
1.1 Determining Shed Size and Location
- Shed Size: Accurately measure the dimensions of your shed. This will dictate the size of your foundation. Add a few extra inches (at least 6 inches) to each side of the shed footprint for the foundation. This provides a solid base for the shed walls and helps prevent water runoff from collecting at the base.
- Location: Consider the following:
- Zoning Regulations: Check local building codes and zoning regulations before you start. You may need a permit.
- Soil Conditions: Assess the soil. Is it stable and well-drained? If not, you might need to amend the soil or consult with a professional.
- Slope: Aim for a level surface. Addressing a significant slope requires more extensive excavation and potentially retaining walls.
- Accessibility: Ensure easy access to the site for materials (concrete, gravel, tools).
1.2 Gathering Tools and Materials
You’ll need a specific set of tools and materials for this project. Having everything ready beforehand will save time and frustration.
- Tools:
- Shovels and Picks: For excavation.
- Wheelbarrow: For transporting materials.
- Level: For ensuring a level foundation.
- Measuring Tape: For accurate measurements.
- String Line and Stakes: For outlining the foundation.
- Tamper or Plate Compactor: For compacting the gravel base.
- Concrete Mixer (optional, but recommended for larger sheds): For mixing concrete.
- Finishing Trowel and Edger: For smoothing the concrete surface.
- Safety Glasses and Gloves: For protection.
- Materials:
- Gravel: For the base of the foundation (3/4" crushed gravel is a good choice).
- Concrete Mix: Buy pre-mixed bags or mix your own.
- Rebar (optional, but recommended for larger sheds or unstable soil): For reinforcing the concrete.
- Form Boards (typically 2×4 or 2×6 lumber): For creating the form for the concrete.
- Fasteners (nails or screws): For securing the form boards.
- Plastic Sheeting (optional): To prevent moisture from wicking up into the concrete.
2. Building the Foundation: Step-by-Step Instructions
This section provides detailed instructions on how to build your shed foundation using concrete.
2.1 Excavation and Form Construction
- Mark the Area: Use stakes and string to outline the perimeter of your foundation. Ensure the corners are square using the 3-4-5 method (a right triangle with sides of 3, 4, and 5 feet will be perfectly square).
- Excavate: Dig down to the desired depth. This depends on your local frost line (the depth to which the ground freezes in winter) and the thickness of your gravel base. A common depth is 6-8 inches below ground level, allowing for 4 inches of gravel and 4 inches of concrete.
- Compact the Soil: Use a tamper or plate compactor to compact the exposed soil at the bottom of the excavation.
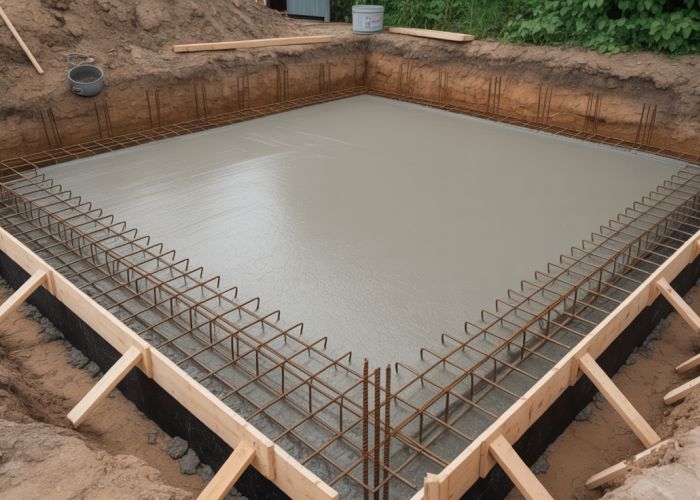
- Build the Form: Construct a wooden form using your form boards. The form should accurately reflect the desired size and shape of your foundation. Secure the boards together using nails or screws. Ensure the top of the form is level. Consider adding stakes on the outside of the form for extra support.
2.2 Installing the Gravel Base
- Pour the Gravel: Pour gravel into the excavated area, filling it to a depth of approximately 4 inches.
- Level and Compact: Use a rake to level the gravel and then compact it thoroughly with a tamper or plate compactor. A well-compacted gravel base is crucial for proper drainage and stability.
2.3 Mixing and Pouring the Concrete
- Mix the Concrete: Follow the instructions on the concrete mix bag carefully. Add water gradually until you achieve the desired consistency. The concrete should be thick but pourable. If mixing manually, do so in a wheelbarrow or large tub.
- Pour the Concrete: Carefully pour the concrete into the form, starting in one corner and working your way around.
- Consolidate the Concrete: Use a shovel or trowel to work the concrete into all the corners and to eliminate air pockets. If using rebar, insert it into the wet concrete now, ensuring it’s evenly spaced and covered by at least 2 inches of concrete.
2.4 Finishing and Curing the Concrete
- Screeding: Use a screed board (a long, straight piece of wood) to level the concrete surface. Rest the screed board on the top edges of the form and drag it across the surface, removing excess concrete.
- Floating: After screeding, use a float (a flat, rectangular tool) to further smooth the surface and bring fine particles to the top.
- Edging: Use an edger to round the edges of the concrete slab. This prevents chipping and creates a cleaner look.
- Troweling: Once the concrete has begun to harden slightly, use a finishing trowel to create a smooth, hard surface. This step may require multiple passes.
- Curing: Cover the concrete with plastic sheeting or spray it with a curing compound to prevent it from drying out too quickly. Keep the concrete moist for at least 5-7 days. This is crucial for proper curing and maximum strength.
3. Important Considerations
3.1 Frost Line and Drainage
- Frost Line: The depth to which the ground freezes during winter is a critical factor. If your foundation is not below the frost line, the ground can heave and crack the concrete. Consult local building codes for frost line depth information.
- Drainage: Proper drainage is essential to prevent water from pooling around the foundation. Ensure the gravel base allows for adequate drainage and consider adding drainage pipes if necessary.
3.2 Reinforcement (Rebar)
Using rebar significantly increases the strength and durability of the concrete foundation. Consider using rebar if:
- Your shed is large.
- The soil is unstable.
- You live in an area with frequent seismic activity.
3.3 Concrete Mix Ratios
If mixing your own concrete, use the following general ratio:
| Ingredient | Proportion |
|---|---|
| Cement | 1 part |
| Sand | 2 parts |
| Gravel | 3 parts |
| Water | As needed |
Important: Always follow the specific instructions provided by the cement manufacturer.
Shed Foundation Concrete: Frequently Asked Questions
Want to build a durable and long-lasting shed foundation concrete base? These frequently asked questions clarify key steps in the DIY guide.
How thick should my shed foundation concrete slab be?
Generally, a 4-inch thick concrete slab is sufficient for most sheds. For larger or heavier sheds, consider a 6-inch thick slab to provide extra support and prevent cracking. This ensures the shed foundation concrete remains stable.
What type of concrete mix should I use for my shed foundation?
A standard concrete mix with a compressive strength of 3000 PSI (pounds per square inch) is suitable for shed foundation concrete projects. Check local building codes for specific requirements in your area.
How long should I wait before building my shed on the new concrete foundation?
Allow the concrete to cure for at least 7 days before building on top of it. Proper curing is essential for the concrete to reach its full strength. Keep the shed foundation concrete moist during the curing process to prevent cracking.
Do I need to use rebar in my shed foundation concrete?
While not always mandatory for smaller sheds, incorporating rebar into your shed foundation concrete will significantly increase its strength and durability. Rebar helps prevent cracking and extends the lifespan of your foundation, especially in areas with frost heave or unstable soil.
Alright, you’ve got the lowdown on shed foundation concrete! Time to grab your tools and get building. Feel free to reach out with any questions as you go – happy constructing!