Maintaining a pristine lawn requires diligent care, and mower reel sharpening is an absolutely essential aspect of that process. The Backlapping Kit, a crucial tool, ensures the rotating blades achieve optimal sharpness. Proper adjustment of the bedknife, as recommended by companies like Foley United, directly impacts the quality of the cut. Incorrect sharpening, on the other hand, leads to turf damage, a concern often highlighted by lawn care specialists in the United States. To achieve professional results and avoid common pitfalls, mastering mower reel sharpening techniques is key.
Do you dream of a lawn so perfectly manicured, it looks like it belongs on a magazine cover? The secret to achieving that level of pristine perfection often lies not in expensive fertilizers or complicated watering systems, but in something far simpler: a sharp mower reel.
The Unsung Hero of Lawn Care: Mower Reel Sharpening
The mower reel is the heart of your reel mower, and its sharpness directly impacts the health and appearance of your lawn. A dull mower reel doesn’t slice cleanly; instead, it tears and shreds the grass blades. This not only results in an unsightly, ragged appearance, but also weakens the grass plants, making them more susceptible to disease and pests.
Think of it like using a dull knife in the kitchen. Instead of making clean, precise cuts, you end up hacking and tearing, damaging the food in the process. The same principle applies to your lawn.
A sharp mower reel, on the other hand, acts like a pair of precision scissors, delivering a clean, even cut that promotes healthy growth and a lush, vibrant lawn.
Sharpening and Lawn Health: A Direct Correlation
The benefits of a sharp mower reel extend far beyond mere aesthetics. A clean cut heals quickly, minimizing moisture loss and reducing the risk of fungal infections. This results in stronger, healthier grass plants that are better able to withstand the stresses of heat, drought, and foot traffic.
Conversely, a dull mower reel leaves ragged edges that provide entry points for disease and pests. The damaged grass also loses moisture more rapidly, requiring more frequent watering and increasing the risk of dehydration.
Essentially, sharpening your mower reel is an investment in the long-term health and beauty of your lawn.
What You’ll Learn: Your Guide to Mower Reel Sharpening
This guide will equip you with the knowledge and skills you need to maintain a perfectly sharpened mower reel and unlock the full potential of your lawn. We’ll delve into the essential methods for reel maintenance, covering both the commonly used backlapping and the more aggressive method of grinding. You’ll also learn how to properly adjust your mower after sharpening to achieve optimal cutting performance. By following these steps, you’ll be well on your way to achieving the lawn of your dreams.
A sharp mower reel, on the other hand, leaves ragged edges that provide entry points for disease and pests. Understanding the mechanics of your mower reel system, and particularly the roles of the reel and bedknife, is the first step in achieving that perfect cut and maintaining a healthy lawn.
Understanding Your Mower Reel System: The Core Components
At the heart of your reel mower lies a carefully engineered system designed to deliver a precise and healthy cut. Understanding the core components – the mower reel and the bedknife – and how they interact is crucial for effective maintenance and achieving a lawn that’s the envy of the neighborhood. Let’s break down the functionality of each.
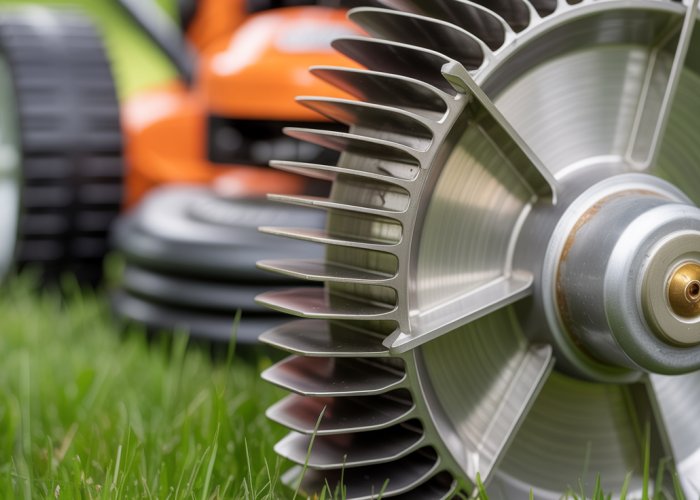
The Mower Reel: The Rotating Blade Assembly
The mower reel is a cylindrical assembly consisting of multiple curved blades arranged in a spiral pattern around a central shaft.
As the mower is pushed (or driven), the reel rotates.
These rotating blades perform the primary cutting action.
Think of it as a sophisticated, multi-bladed scissor.
The number of blades on the reel influences the frequency of cut, with more blades generally resulting in a smoother, more even cut, particularly at lower mowing heights.
The reel’s rotational speed, combined with the mower’s forward speed, determines the clip rate, which affects the overall quality of the cut.
The Bedknife: The Stationary Cutting Edge
The bedknife is a stationary, straight blade located at the bottom of the cutting unit.
It acts as the opposing edge against which the rotating mower reel blades shear the grass.
The bedknife must be perfectly straight and properly aligned to ensure consistent contact with the reel blades.
The sharpness of the bedknife is equally important as the sharpness of the reel blades; a dull bedknife will contribute to tearing and shredding.
The Synergy: How the Reel and Bedknife Work Together
The magic happens where the rotating reel blades meet the stationary bedknife.
As the reel spins, it forces the grass blades against the bedknife.
This creates a shearing action, slicing the grass cleanly and precisely.
The quality of this cut is entirely dependent on the sharpness of both the reel blades and the bedknife, as well as the precision of their alignment.
If either component is dull or misaligned, the grass will be torn instead of cut, leading to ragged edges and increased susceptibility to disease.
Sharpening: The Key to a Clean and Healthy Cut
Sharpening the mower reel and bedknife is not merely about aesthetics; it’s about promoting lawn health.
A sharp reel mower slices the grass cleanly, allowing the plant to heal quickly and efficiently.
This minimizes moisture loss, reduces the risk of fungal infections, and encourages healthy growth.
Conversely, a dull mower tears and shreds the grass, creating ragged edges that are vulnerable to disease and pests.
The energy that the grass plant would otherwise spend on healthy growth is diverted to recovering from the trauma of a poor cut.
Regular sharpening, therefore, is essential for maintaining a healthy, vibrant, and resilient lawn. By understanding the core components of your mower reel system and prioritizing their maintenance, you’re investing in the long-term health and beauty of your lawn.
The bedknife’s precise angle and condition directly affect the quality of the cut. Keeping both the reel and bedknife properly maintained ensures a clean, scissor-like action that promotes healthy grass growth. But before you even think about touching that lapping compound or angle grinder, there’s a crucial step that cannot be overlooked: safety.
Safety First: Gearing Up for a Safe Sharpening Experience
Working with tools, especially power tools like grinders, and even seemingly simple hand tools, inherently carries risks. When it comes to sharpening mower reels, the stakes are even higher. The blades are sharp, the equipment can be unwieldy, and a moment’s carelessness can lead to serious injury. Therefore, prioritizing safety isn’t just a suggestion; it’s an absolute necessity. Before you begin any sharpening procedure, take the time to understand the potential hazards and equip yourself with the proper safety gear.
Understanding the Hazards
Mower reel sharpening, while a rewarding DIY project, presents several potential hazards.
-
Flying Debris: Grinding, in particular, can send metal shards and abrasive particles flying at high speeds. These projectiles can cause serious eye injuries or skin lacerations.
-
Sharp Blades: Even when not in motion, the blades of a mower reel are designed to cut, posing a risk of cuts and punctures if handled carelessly.
-
Moving Parts: If using power tools, the rotating components of the grinder or drill attachment can snag clothing, hair, or jewelry, leading to entanglement and potential injury.
-
Dust Inhalation: Grinding generates dust particles that can irritate the respiratory system and, over time, potentially lead to more serious health problems.
-
Electrical Hazards: When using powered tools, there’s always a risk of electric shock if the equipment is faulty or used improperly.
Knowing these potential hazards is the first step in mitigating them.
Essential Safety Gear: Your Personal Protective Equipment (PPE) Checklist
The right safety gear forms a crucial barrier between you and potential harm. Don’t even think about starting without these essentials:
-
Safety Glasses or a Face Shield: Eye protection is non-negotiable. A full face shield provides even greater protection against flying debris. Ensure they are ANSI-approved.
-
Work Gloves: Heavy-duty work gloves protect your hands from cuts, abrasions, and potential punctures. Leather gloves offer a good balance of protection and dexterity.
-
Dust Mask or Respirator: If grinding, wear a dust mask or, ideally, a respirator to prevent inhalation of harmful particles. A respirator with a particulate filter offers the best protection.
-
Hearing Protection: Grinding can be noisy, so protect your hearing with earplugs or earmuffs, particularly when using power tools.
-
Closed-Toe Shoes: Never work in sandals or bare feet. Wear sturdy, closed-toe shoes to protect your feet from dropped tools and sharp objects.
-
Appropriate Clothing: Avoid loose clothing or jewelry that could get caught in moving parts. Wear close-fitting attire that won’t pose a snagging hazard.
Adhering to Safety Guidelines: A Step-by-Step Approach
Equipped with the right gear, it’s time to reinforce safe work habits.
-
Read the Manuals: Before using any tool, thoroughly read and understand the manufacturer’s instructions and safety guidelines.
-
Inspect Your Equipment: Regularly inspect your tools for any signs of damage or wear. Replace worn or damaged components immediately.
-
Work in a Well-Ventilated Area: If grinding, work outdoors or in a well-ventilated area to minimize dust inhalation.
-
Secure the Mower Reel: Ensure the mower reel is securely clamped or held in place before sharpening to prevent it from moving unexpectedly.
-
Maintain a Clear Workspace: Keep your workspace clean and free of clutter to prevent tripping hazards and ensure you have ample room to maneuver.
-
Focus and Avoid Distractions: Sharpening requires concentration. Avoid distractions and take breaks as needed to maintain focus.
-
Unplug When Not in Use: When using power tools, always unplug them when not in use and before making any adjustments.
-
First Aid Kit Nearby: Keep a well-stocked first aid kit readily accessible in case of minor injuries.
-
Know Your Limits: If you’re uncomfortable with any part of the sharpening process, seek help from a qualified professional. It’s always better to be safe than sorry.
By prioritizing safety and adhering to these guidelines, you can minimize the risks associated with mower reel sharpening and enjoy a pristine lawn without compromising your well-being.
Understanding the hazards allows us to choose the right protective measures. But with the safety briefing complete and your gear donned, it’s time to delve into the heart of mower reel sharpening. Let’s start with the method favored for its gentleness and effectiveness: backlapping.
Method 1: Backlapping – The Gentle Art of Sharpening
Backlapping is a sharpening technique that involves running the mower reel in reverse against a lapping compound. This method, often favored by professionals and DIY enthusiasts alike, hones the blades without removing excessive material. Backlapping is particularly well-suited for reels that are only slightly dull or need a touch-up.
What is Backlapping?
Essentially, backlapping is like giving your mower reel a spa treatment. Instead of aggressively grinding away metal, you’re gently polishing and refining the cutting edges.
The lapping compound, a mildly abrasive paste, is the key to this process. As the reel spins in reverse, the compound works to smooth out imperfections and restore a sharp edge to both the reel blades and the bedknife.
Advantages of Backlapping
Compared to grinding, backlapping offers several distinct advantages:
-
Minimal Material Removal: This prolongs the life of your reel by preserving the original blade geometry.
-
Reduced Heat: The gentle action of backlapping generates less heat, minimizing the risk of warping or damaging the blades.
-
Even Sharpening: Backlapping tends to sharpen all blades evenly, leading to a consistent cut across the entire mowing width.
-
Safer Process: With no high-speed grinding wheels involved, backlapping is generally a safer procedure for the home mechanic.
Tools and Materials You’ll Need
Before you start, gather these essential items:
-
Lapping Compound: Choose a high-quality lapping compound specifically designed for mower reels.
Different grits are available; a medium grit is usually a good starting point. -
Application Brush: A small paintbrush or disposable applicator for applying the lapping compound evenly.
-
Drill Attachment (Optional): Some backlapping kits include a drill attachment that connects to the reel, making the process easier and more consistent. However, many reels can be backlapped manually.
-
Cleaning Supplies: A hose, bucket, and mild detergent for cleaning the reel after lapping.
-
Gloves: To keep your hands clean and protected.
-
Eye Protection: Even though backlapping is less hazardous than grinding, eye protection is still recommended.
-
Wrench/Socket Set: To adjust the reel if needed.
Step-by-Step Backlapping Instructions
Follow these steps carefully to achieve the best results:
Step 1: Preparation
Thoroughly clean your mower reel and bedknife. Remove any grass clippings, dirt, or debris that could interfere with the lapping process.
Step 2: Applying the Sharpening Compound
Using your brush or applicator, apply a generous, even coat of lapping compound to the leading edge of the reel blades.
Ensure the compound also coats the bedknife surface where it contacts the reel.
Step 3: Running the Reel in Reverse
This is the core of the backlapping process.
If you have a drill attachment, connect it to your drill and set the drill to a slow, reverse speed. Carefully engage the drill, allowing the reel to spin in reverse against the bedknife.
If you’re backlapping manually, rotate the reel backward by hand, ensuring consistent pressure and even coverage.
Step 4: Duration
The duration of backlapping depends on the sharpness of your blades. A general guideline is to run the reel for 3-5 minutes initially.
Periodically inspect the blades. You’re looking for a clean, polished edge. If the blades are still dull, repeat the process for another few minutes.
Step 5: Cleaning and Inspection
Once you’re satisfied with the sharpness of the blades, thoroughly clean the reel and bedknife.
Use a hose and mild detergent to remove all traces of the lapping compound.
Inspect the cutting edges carefully. They should appear bright and sharp. Run your fingers carefully along the bedknife (exercise extreme caution) to feel for any remaining dull spots or imperfections.
Step 6: Fine-Tuning
After cleaning, make sure to adjust the bedknife to the reel properly. This ensures optimal contact and a clean, precise cut. Refer to your mower’s manual for specific adjustment instructions.
Backlapping is a simple process that can make a big difference in the quality of your cut. By following these steps carefully, you can keep your mower reel in top condition and enjoy a beautifully manicured lawn.
With the safety briefing complete and your gear donned, it’s time to delve into the heart of mower reel sharpening. Let’s start with the method favored for its gentleness and effectiveness: backlapping. But when backlapping simply won’t cut it, or when faced with severely damaged blades, it’s time to consider a more assertive approach.
Method 2: Grinding – Achieving a Razor-Sharp Edge (With Caution)
Grinding represents the heavy artillery in your mower reel sharpening arsenal. It’s a method that employs an abrasive wheel to aggressively remove material and reshape the cutting edges.
While backlapping excels at honing already decent blades, grinding is the go-to solution for reels suffering from significant damage, deep gouges, or severe dullness that backlapping can’t rectify.
When to Choose Grinding
Grinding isn’t a first resort; it’s a strategic intervention. Opt for grinding when:
- Your mower reel exhibits substantial damage to the blades.
- Backlapping proves ineffective after several attempts.
- The blade edges are so rounded that backlapping would take an unreasonably long time.
- You need to reshape a blade that has been nicked or bent.
However, always remember that grinding removes more material than backlapping. This reduces the lifespan of your reel, so use it judiciously.
Tools and Materials for Grinding
Grinding demands precision and the right equipment. Here’s what you’ll need:
- Angle Grinder: A variable-speed angle grinder provides control.
- Grinding Wheel: A fine-grit grinding wheel is essential. Avoid aggressive, coarse wheels that can remove too much material too quickly. Look for wheels specifically designed for sharpening blades.
- Safety Gear: Safety glasses, work gloves, a dust mask, and hearing protection are non-negotiable. Grinding generates sparks, dust, and noise, so protect yourself comprehensively.
- Bench Vise: A sturdy bench vise will hold the reel securely during grinding.
- Permanent Marker: A marker helps track progress and ensure even grinding.
- Water or Cutting Oil: Keeping the blade cool during grinding is crucial to prevent overheating and potential warping.
Step-by-Step Grinding Instructions (With Stringent Safety Precautions)
WARNING: Grinding involves high-speed machinery and can be dangerous if not performed correctly. If you are uncomfortable with power tools or lack experience, seek professional assistance.
-
Secure the Reel: Mount the mower reel firmly in the bench vise. Ensure it’s stable and won’t move during grinding.
-
Inspect the Blades: Carefully examine each blade, noting areas that require the most attention. Use a permanent marker to highlight these areas.
-
Prepare the Grinder: Attach the fine-grit grinding wheel to the angle grinder. Ensure the wheel is properly secured and in good condition.
-
Safety Check: Double-check your safety gear. Make sure your safety glasses are securely in place, your gloves are on, and your dust mask is fitted properly.
-
Grind with Precision: Hold the angle grinder at a consistent angle to the blade. Use light, controlled passes, moving along the cutting edge. Avoid applying excessive pressure, which can overheat the blade and damage the grinding wheel. Grind in the same direction as the original blade angle.
-
Keep it Cool: Frequently dip the blade in water or apply cutting oil to prevent overheating. Overheating can cause the blade to warp or lose its temper, rendering it useless.
-
Monitor Progress: Regularly check your progress, comparing the sharpened area to the rest of the blade. Aim for a consistent, even edge.
-
Repeat for All Blades: Repeat steps 5-7 for each blade on the mower reel. Take your time and focus on achieving a uniform sharpness.
-
Deburr the Blades: After grinding, use a fine file or honing stone to remove any burrs (small, sharp edges) that may have formed on the back of the blades.
-
Clean and Inspect: Thoroughly clean the reel and inspect each blade for any imperfections.
-
Reinstall and Adjust: Reinstall the sharpened reel onto the mower and adjust the bedknife according to the manufacturer’s instructions.
Critical Safety Reminders:
- Never grind aggressively or attempt to remove too much material at once.
- Always wear appropriate safety gear.
- Keep the blade cool to prevent overheating and warping.
- Use a fine-grit grinding wheel to minimize material removal and achieve a smooth finish.
- If in doubt, consult a professional.
Grinding, when performed with care and precision, can restore severely damaged mower reels to their former glory. However, it demands a cautious approach and a commitment to safety. Mastering this technique will significantly extend the life of your equipment.
With grinding complete, the individual blades should now boast a renewed, sharper edge. However, even the most meticulously sharpened reel is only as good as its adjustment. Without proper fine-tuning, all that effort will translate to a subpar cut, potentially damaging your lawn.
Fine-Tuning for Perfection: The Importance of Adjustment
Sharpening your mower reel is only half the battle. Achieving that coveted, golf course-quality cut hinges just as much on the precision adjustment of the bedknife in relation to the reel. This critical step ensures the blades shear the grass cleanly, rather than tearing or ripping it. Neglecting this adjustment can lead to a host of problems, undoing all the hard work you put into sharpening.
Why Adjustment Matters Post-Sharpening
Think of your mower reel and bedknife as a pair of scissors. If the blades are too loose, they won’t cut effectively; if they’re too tight, they’ll bind and strain the motor.
Sharpening alters the geometry of the blades, however subtly. This change necessitates a corresponding adjustment to the bedknife to restore the optimal cutting relationship.
Without adjustment, you might experience:
- Uneven cutting: Some blades cut cleanly, while others tear.
- Scalping: The mower digs into the turf in certain areas.
- Increased friction: Leading to premature wear and tear on the reel and bedknife.
- Poor cutting performance: Overall, a ragged and unhealthy lawn.
Adjusting the Bedknife: Achieving Optimal Contact
The goal of bedknife adjustment is to achieve a light, consistent contact between the bedknife and the reel blades across their entire length.
This requires careful observation and a systematic approach. Here’s a general guide, but always consult your mower’s manual for specific instructions as procedures can vary between models:
-
Loosen the Adjustment Bolts: Locate the bolts that secure the bedknife to the mower frame. These are typically found on either side of the bedknife. Loosen them just enough to allow for slight movement.
-
Adjust for Light Contact: Most mowers have an adjustment mechanism to move the bedknife closer to or farther away from the reel. Adjust until you feel a slight resistance when turning the reel by hand. You should feel a gentle "kiss" between the blades and the bedknife.
-
Check for Uniform Contact: Rotate the reel slowly and listen carefully. You should hear a consistent, faint scraping sound as each blade passes the bedknife. If the sound is uneven or absent in certain areas, it indicates uneven contact.
-
Tighten the Adjustment Bolts: Once you’ve achieved consistent contact, carefully tighten the adjustment bolts. Tighten them evenly to avoid distorting the bedknife’s alignment.
Testing and Further Refinement
After the initial adjustment, it’s crucial to test the cutting quality and make further refinements.
Here’s how:
-
The Paper Test: Hold a sheet of paper upright in front of the reel. Slowly rotate the reel by hand. The blades should cleanly slice through the paper along the entire length of the reel. If the paper tears or folds, the adjustment needs further attention.
-
Test on Grass: Take your mower for a test run on a small, inconspicuous area of your lawn. Observe the cut closely. Are the blades cutting cleanly, or are they tearing the grass?
-
Iterative Adjustments: Based on the paper and grass tests, make small, incremental adjustments to the bedknife. Repeat the testing process until you achieve a clean, precise cut. This may require patience, but the results will be well worth the effort.
-
Listen for Noise: Pay attention to the sound of the mower while it’s running. Excessive noise or vibration can indicate that the bedknife is too tight, causing undue stress on the system.
Fine-tuning your mower reel and bedknife is a process of careful observation and incremental adjustments. By taking the time to do it right, you’ll ensure a pristine cut and a healthy, vibrant lawn.
Sharpening your mower reel breathes new life into your lawn care routine, delivering a cleaner cut and healthier turf. But, just like any finely tuned machine, your mower reel requires ongoing care to maintain its peak performance. The effort you invest in sharpening will only pay dividends if you commit to a regular maintenance schedule.
Maintaining Your Sharpened Mower Reel: Long-Term Care Tips
Think of your mower reel as a precision instrument, deserving of the same care you’d give a high-end tool. Proper maintenance not only prolongs the life of your freshly sharpened blades but also ensures consistently superior cutting results.
Proactive Measures for Lasting Sharpness
Preventative care is key to minimizing the frequency of sharpening. Here’s how to keep your reel in top condition:
-
Avoid Obstacles: This seems obvious, but be vigilant about removing rocks, sticks, and other debris from your lawn before mowing. These objects can quickly dull or even damage the blades.
-
Mow Regularly: Frequent mowing, at the correct height for your grass type, prevents the grass from becoming overly thick and tough, reducing the strain on the blades. Aim to cut no more than one-third of the grass blade height in a single mowing session.
-
Proper Storage: Store your mower in a dry, sheltered location to prevent rust and corrosion, which can significantly degrade the blades’ cutting ability.
The Importance of Routine Cleaning
Grass clippings and sap accumulate on the reel and bedknife, creating friction and accelerating wear.
Regular cleaning is essential to remove this buildup and maintain smooth operation.
Post-Mowing Cleaning Ritual
Immediately after each mowing session, take a few minutes to clean your mower reel.
-
Brush Away Debris: Use a stiff brush or scraper to remove loose grass clippings from the reel, bedknife, and surrounding areas.
-
Hose Down: Gently rinse the mower with a garden hose, being careful not to direct high-pressure water directly at the bearings or seals.
-
Dry Thoroughly: Allow the mower to air dry completely before storing it, or use a clean cloth to dry the blades and other components. This is especially important to prevent rust.
Deep Cleaning for Optimal Performance
Periodically, perform a more thorough cleaning to remove stubborn residue and ensure all moving parts are free of obstructions.
-
Disassemble Components (If Comfortable): Consult your mower’s owner manual for instructions on safely disassembling the reel and bedknife. Only disassemble if you are comfortable doing so and can properly reassemble the components.
-
Soak and Scrub: Soak the reel and bedknife in a solution of mild detergent and water to loosen caked-on debris. Use a scrub brush or non-abrasive pad to remove any remaining residue.
-
Apply Lubricant: After cleaning and drying, apply a light coat of lubricant to the reel, bedknife, and any other moving parts. This will help prevent rust and ensure smooth operation. Use a lubricant specifically designed for lawnmowers.
Regular Inspection: Catching Problems Early
Regular visual inspections can help you identify potential problems before they escalate into major issues.
-
Blade Condition: Examine the blades for nicks, dents, or other signs of damage. Even minor imperfections can affect cutting performance.
-
Bedknife Alignment: Check the alignment of the bedknife to ensure it’s making consistent contact with the reel blades. Misalignment can lead to uneven cutting and premature wear.
-
Hardware Security: Inspect all nuts, bolts, and screws to ensure they are properly tightened. Loose hardware can cause vibration and damage to the mower.
By implementing these simple yet effective maintenance practices, you can significantly extend the life of your sharpened mower reel and enjoy a beautifully manicured lawn for years to come.
Think of your mower reel as a precision instrument, deserving of the same care you’d give a high-end tool. Proper maintenance not only prolongs the life of your freshly sharpened blades but also ensures consistently superior cutting results.
Even with the best techniques, sometimes things don’t go exactly as planned. After sharpening, you might encounter some issues that need troubleshooting. Let’s delve into common post-sharpening problems and how to resolve them.
Troubleshooting: Addressing Common Sharpening Issues
Sharpening your mower reel is a rewarding process, but occasionally, things don’t go perfectly. After putting in the effort, you might find yourself facing unexpected issues. Don’t worry; most of these problems are easily solvable with a little troubleshooting.
This section addresses common post-sharpening issues, providing practical solutions to get your mower reel performing at its best. We’ll cover everything from uneven cuts to a reel that won’t spin freely, ensuring you achieve that pristine lawn you’re aiming for.
Uneven Cuts: Diagnosing the Cause
One of the most frustrating issues is an uneven cut after sharpening. This indicates that some blades are cutting better than others. Here’s how to diagnose and fix the problem.
Bedknife Alignment
The first step is to check the alignment of the bedknife.
Is the bedknife parallel to the reel?
A misaligned bedknife can cause inconsistent cutting. Loosen the bedknife bolts slightly and carefully adjust its position until it is perfectly parallel.
Tighten the bolts back down, ensuring the alignment doesn’t shift.
Tight Spots and Blade Condition
Examine the reel for any tight spots or inconsistencies. Rotate the reel slowly by hand to feel for any areas where it binds or drags.
Are any blades nicked, bent, or dull?
Even a slight imperfection can cause an uneven cut. If you find any damaged blades, you may need to touch them up with a file or grinding wheel, taking extreme care to maintain the original blade angle.
Insufficient Sharpening
It’s possible that some blades simply weren’t sharpened enough. If you used the backlapping method, you might need to repeat the process, focusing on the blades that appear duller.
For grinding, double-check that each blade received equal attention.
Reel Not Spinning Freely: Identifying the Obstruction
If your mower reel is difficult to turn or doesn’t spin freely, it indicates excessive friction or an obstruction. Here’s how to address this:
Over-Adjustment of the Bedknife
A common cause is the bedknife being set too tightly against the reel. This creates excessive friction.
Is the bedknife rubbing too hard against the reel?
Slightly loosen the bedknife adjustment screws to increase the gap between the bedknife and reel. The reel should spin freely without excessive drag.
Debris Buildup
Grass clippings and debris can accumulate between the reel and bedknife, hindering free movement.
Is there any visible debris obstructing the reel’s movement?
Thoroughly clean the reel and bedknife with a brush and compressed air. Remove any trapped debris.
Lack of Lubrication
Friction can increase if the reel isn’t properly lubricated. Apply a light coating of machine oil or lubricant to the reel bearings and contact points.
This reduces friction and allows the reel to spin more smoothly.
Scalping: Adjusting Cutting Height
Scalping, where the mower cuts too low and removes patches of grass down to the soil, can occur even after sharpening if the cutting height isn’t properly set.
Review Cutting Height
Double-check the mower’s cutting height settings. Make sure they are appropriate for your grass type.
Is the cutting height set too low?
Raising the cutting height can prevent scalping. Remember the one-third rule: never remove more than one-third of the grass blade in a single mowing.
Uneven Terrain
Uneven terrain can also contribute to scalping.
Is your lawn surface uneven?
Consider leveling out any significant bumps or dips in your lawn to create a more uniform mowing surface.
Still Not Cutting Cleanly? Seek Professional Help
If you’ve tried these troubleshooting steps and are still experiencing problems, it might be time to consult a professional lawn mower technician. They can diagnose more complex issues, such as bent reels or damaged bearings.
Sharpening Your Mower Reel: Frequently Asked Questions
Here are some common questions about sharpening your mower reel to help you achieve a professional-quality cut at home.
How often should I sharpen my mower reel?
The frequency of mower reel sharpening depends on usage. If you notice tearing instead of clean cuts, or if your mower is struggling, it’s time to sharpen. Typically, once or twice a season is sufficient for most homeowners.
What tools do I need for mower reel sharpening?
You’ll generally need lapping compound, a backlapping kit or drill adapter, and some basic tools like wrenches. The specific tools needed can vary based on your mower model, so consult your owner’s manual.
Can I damage my mower reel by sharpening it incorrectly?
Yes, improper mower reel sharpening can damage the blades and rollers. Over-grinding or using the wrong techniques can lead to uneven cuts or even ruin the reel. Always follow the manufacturer’s instructions carefully.
Is backlapping the only way to sharpen a mower reel?
Backlapping is a common and effective method of mower reel sharpening. However, professional grinding is another option, though typically more expensive. Backlapping is a great starting point for maintaining sharpness at home.
And that’s the secret to mower reel sharpening! Get out there, keep those blades sharp, and enjoy a beautifully manicured lawn!