Proper sauna maintenance requires diligent attention to several key components, and the sauna floor drain is undoubtedly one of the most crucial. Indeed, inadequate drainage systems can lead to significant structural damage and foster the growth of mold, necessitating costly repairs. The Finnish Sauna Society, renowned for its expertise in sauna construction standards, emphasizes the importance of selecting the right type of drain strainer to prevent debris buildup. Implementing best practices during installation, often guided by the Uniform Plumbing Code (UPC), is paramount to ensuring the sauna floor drain functions effectively. Furthermore, understanding the role of proper slope design to facilitate efficient water runoff directly contributes to the longevity and hygiene of your sauna environment, particularly around the sauna floor drain.
Sauna Floor Drain Guide: Avoid Costly Mistakes!
Choosing the right sauna floor drain and installing it correctly is crucial to prevent water damage, mold growth, and expensive repairs down the line. This guide provides a detailed explanation of everything you need to know about sauna floor drains, helping you avoid common and costly mistakes.
Understanding the Purpose of a Sauna Floor Drain
The primary function of a sauna floor drain is to effectively remove excess water generated during sauna use. This includes water from rinsing, spilled water during bucket use, and condensation. A properly functioning drain ensures:
- Proper drainage: Prevents water from pooling on the sauna floor.
- Mold and mildew prevention: Eliminates moisture that encourages the growth of mold and mildew, contributing to a healthier sauna environment.
- Structural integrity: Protects the sauna’s structural components (wood, flooring, framing) from water damage and rot.
- Odor control: Reduces unpleasant odors caused by stagnant water.
Selecting the Right Sauna Floor Drain
Choosing the correct sauna floor drain involves considering several factors. This selection is not one-size-fits-all; factors such as the size of your sauna, the type of sauna (wet or dry), and local building codes play a significant role.
Material Considerations
The material of your sauna floor drain impacts its durability, resistance to corrosion, and overall lifespan. Common materials include:
- Stainless Steel: A popular choice due to its excellent corrosion resistance and durability. It can withstand the humid environment of a sauna without rusting or degrading. Stainless steel drains are generally a good investment for long-term performance.
- Brass: Another durable option that offers good corrosion resistance. Brass drains often have a classic look, but can be more expensive than stainless steel.
- PVC: A less expensive option suitable for some sauna environments. However, PVC may become brittle over time with constant exposure to high temperatures and humidity. Ensure the PVC is rated for high temperatures if considering this option.
Drain Size and Flow Rate
The drain size (typically measured in inches of diameter) and its flow rate (gallons per minute – GPM) must be adequate for the amount of water expected in the sauna.
- Small Sauna (under 6’x6′): A 2-inch drain with a flow rate of 5-7 GPM is usually sufficient.
- Medium Sauna (6’x6′ to 8’x8′): A 3-inch drain with a flow rate of 8-10 GPM is recommended.
- Large Sauna (over 8’x8′): A 4-inch drain or multiple smaller drains may be necessary, depending on usage. Consult with a plumbing professional to determine the optimal flow rate.
Drain Type
Various types of sauna floor drains exist, each with its own installation requirements and benefits.
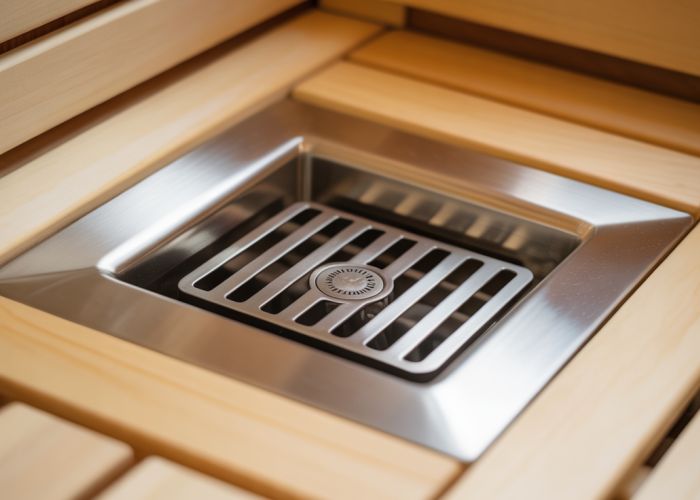
- Standard Floor Drain: The most common type, featuring a strainer to prevent debris from entering the drainpipe.
- Linear Drain: A long, narrow drain that can be placed along a wall or at the entrance to the sauna. Linear drains offer a sleek, modern look and efficient water removal.
- Shower Drain: While technically designed for showers, certain shower drain models can be used in saunas, provided they are compatible with the sauna’s temperature and humidity levels.
- Tiled-In Drain: A drain designed to be seamlessly integrated with tile flooring. These drains typically feature a grate that can be filled with tile, creating a uniform look.
Trap Type
The drain trap is a crucial component that prevents sewer gases from entering the sauna. Common trap types include:
- P-Trap: The most common type, featuring a U-shaped bend that holds water to create a seal.
- S-Trap: An older design that is generally not recommended due to its tendency to siphon dry, allowing sewer gases to escape.
- Bottle Trap: A compact trap suitable for tight spaces.
Always ensure the trap is properly vented to prevent siphoning.
Proper Sauna Floor Drain Installation
Correct installation is critical for the drain to function effectively and prevent leaks. Incorrect installation is a primary cause of drain failures.
Pre-Installation Planning
- Building Codes: Always check local building codes and regulations regarding sauna floor drains. Codes may dictate the type of drain required, the plumbing connections needed, and the permitted materials.
- Subfloor Preparation: Ensure the subfloor is level and properly sloped towards the drain. A slope of 1/4 inch per foot is generally recommended for effective drainage.
- Plumbing Connections: Plan the plumbing connections carefully. The drainpipe must be properly connected to the main drain line with appropriate fittings and sealants.
Step-by-Step Installation (General Guidelines)
- Step 1: Position the Drain: Place the drain body in the desired location, ensuring it is properly aligned with the drainpipe.
- Step 2: Connect the Drainpipe: Connect the drainpipe to the drain body using appropriate fittings and PVC cement or thread sealant.
- Step 3: Secure the Drain: Secure the drain body to the subfloor using screws or construction adhesive.
- Step 4: Create the Slope: Build up the surrounding floor to create the necessary slope towards the drain.
- Step 5: Waterproofing: Apply a waterproof membrane around the drain and across the entire sauna floor to prevent water from seeping through the floor.
- Step 6: Install Flooring: Install the chosen flooring material, ensuring it is properly sealed around the drain.
- Step 7: Install Drain Grate: Attach the drain grate to the drain body.
Common Installation Mistakes to Avoid
| Mistake | Consequence | Prevention |
|---|---|---|
| Improper Slope | Water pooling, mold growth | Ensure a consistent 1/4 inch per foot slope towards the drain. |
| Inadequate Waterproofing | Water damage to subfloor and surrounding areas | Use a high-quality waterproofing membrane and apply it meticulously. |
| Incorrect Drain Connections | Leaks, sewer gas entry | Use appropriate fittings and sealants, and double-check all connections. |
| Ignoring Building Codes | Fines, required rework | Research and comply with all local building codes. |
| Using the Wrong Materials | Drain failure, corrosion | Select materials specifically designed for sauna environments (stainless steel, brass). |
Maintaining Your Sauna Floor Drain
Regular maintenance is essential to keep your sauna floor drain functioning properly and prevent clogs.
Routine Cleaning
- Remove Debris: Regularly remove hair, soap scum, and other debris from the drain strainer.
- Flush with Hot Water: Periodically flush the drain with hot water to help dissolve any buildup.
Addressing Clogs
- Plunger: Use a plunger to dislodge minor clogs.
- Drain Snake: Use a drain snake to remove more stubborn clogs.
- Baking Soda and Vinegar: Pour a mixture of baking soda and vinegar down the drain, followed by hot water, to help dissolve clogs.
Professional Inspection
Schedule a professional plumbing inspection periodically to identify and address any potential issues before they become major problems.
Sauna Floor Drain Guide: FAQs
Here are some common questions about sauna floor drain installation and maintenance to help you avoid costly mistakes.
Why is a floor drain important in a sauna?
A sauna floor drain is essential for properly draining water from cleaning, spills, or condensation. Without it, moisture buildup can lead to mold, mildew, and structural damage to your sauna. A properly functioning sauna floor drain protects your investment.
What are common mistakes to avoid when installing a sauna floor drain?
Key mistakes include using the wrong type of drain material (it must withstand high temperatures), improper slope leading to standing water, and inadequate sealing around the drain, which can cause leaks. Always check local codes for sauna floor drain requirements.
How often should I clean my sauna floor drain?
Regular cleaning, at least monthly or more frequently with heavy sauna use, is crucial. Remove hair, debris, and mineral buildup to prevent clogs and ensure proper drainage. A clogged sauna floor drain can create unsanitary conditions.
What are the signs that my sauna floor drain needs professional attention?
Signs include persistent slow drainage, foul odors emanating from the drain, or visible water damage around the drain area. These issues indicate a potential problem with the drainpipe, slope, or sealing, which may require a plumber to properly repair the sauna floor drain.
So, there you have it – a comprehensive look at avoiding those pesky mistakes with your sauna floor drain. Now, go enjoy that sweat session knowing you’re on the right track!