Looking to upgrade your style without breaking the bank? A rope belt diy project might be just what you need. The crafting process involved is simpler than you think, and the resulting accessory can add a unique, nautical-inspired flair to any outfit. Fashion bloggers often highlight the versatility of these handmade belts, showcasing them with everything from jeans to dresses. Consider exploring different knot tying techniques, as the choice of knot significantly impacts the final aesthetic of your rope belt diy.
Crafting the Perfect "Rope Belt DIY" Article Layout
Creating a compelling article on "Rope Belt DIY: Style on a Budget (Easy Guide)" requires a layout that’s both informative and easy to follow. We want readers to feel confident in their ability to create their own stylish rope belt. Here’s a suggested structure:
Introduction: Hooking Your Reader
The introduction is crucial. It needs to grab the reader’s attention and clearly explain the value of the article.
- Start with a relatable problem: Perhaps something like, "Tired of the same old belts? Want to add a unique touch to your wardrobe without breaking the bank?"
- Briefly introduce the solution: Mention the "rope belt DIY" as a cost-effective and stylish alternative.
- Highlight the benefits: Emphasize the affordability, customizability, and unique style of a rope belt.
- Preview what the article covers: Briefly mention the materials needed and the steps involved.
- Include a visually appealing photo: Showcasing a finished rope belt (or several) to immediately grab attention.
Materials & Tools: Gearing Up for Success
A clear list of materials and tools is essential for a successful DIY project.
What You’ll Need
This section should be organized and easy to scan.
-
Rope:
- Specify the type of rope (e.g., cotton, jute, nylon).
- Suggest ideal rope thicknesses (e.g., 1/4 inch to 1/2 inch).
- Recommend length based on waist size, with extra for knots and adjustments (e.g., "Measure your waist and add 24 inches for knotting and adjustment."). A table with suggested rope lengths based on waist sizes might be useful.
Waist Size (Inches) Recommended Rope Length (Inches) 28-30 52-54 32-34 56-58 36-38 60-62 -
Scissors: Sharp scissors for cutting the rope.
-
Measuring Tape: For accurate measurements.
-
Lighter or Flame (Optional): To seal the ends of synthetic rope and prevent fraying. Safety Warning Highly Suggested
-
Decorative Beads or Charms (Optional): For adding a personal touch.
-
Hardware (Optional): Metal rings, clasps, or buckles for a more professional finish. If incorporating hardware, detail how to select the right sizes.
Considerations for Material Selection
- Durability: Discuss the pros and cons of different rope materials regarding durability and wear.
- Aesthetics: Suggest different rope colors and textures to match various styles.
- Cost: Highlight budget-friendly options.
- Comfort: Emphasize the importance of choosing a rope that feels comfortable against the skin.
Step-by-Step Instructions: The Heart of the Guide
This is the core of the "rope belt DIY" article. Clear, detailed instructions are crucial.
Preparing the Rope
- Measure and Cut: "Measure your waist, add [specified amount] for tying, and cut the rope to the desired length." Include a clear image illustrating this step.
- Seal the Ends (If Necessary): "If using synthetic rope, carefully melt the ends with a lighter to prevent fraying. Exercise caution when working with fire." Include a bolded safety warning.
- Smooth the Rope (Optional): Suggest techniques like running the rope through a damp cloth to soften it and remove any rough fibers.
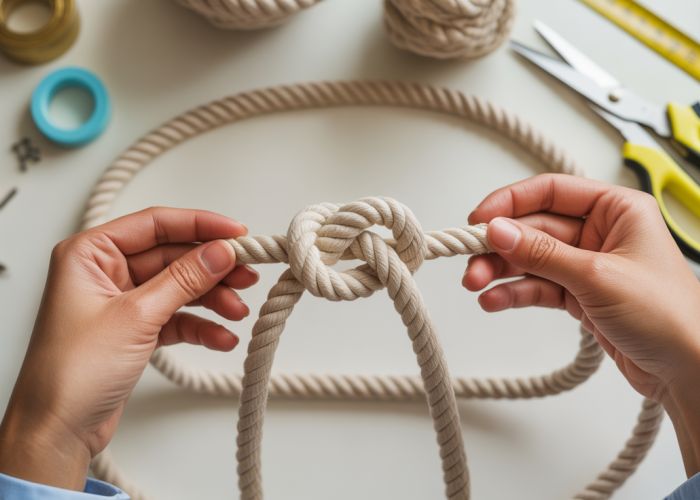
Tying the Knots (Choose One or More Methods)
Offer different knotting styles for varying skill levels and aesthetic preferences.
-
Simple Overhand Knot:
- "Tie a simple overhand knot at each end of the rope."
- "Adjust the knots to your desired length."
- Include a series of images or a short video showing the knot-tying process.
-
Figure-Eight Knot: Explain the figure-eight knot as a more secure and decorative option. Provide step-by-step instructions with visuals.
-
Sliding Knot Adjustment:
- "Create a loop at one end of the rope."
- "Thread the other end of the rope through the loop."
- "Adjust the size of the loop to fit your waist." Include visual aids showing this process.
Adding Embellishments (Optional)
- Beads: "Thread beads onto the rope before tying the knots, or attach them afterward using craft glue." Show examples of different bead placements and styles.
- Charms: "Attach charms using jump rings or by tying them directly onto the rope."
- Painted Accents: "Use fabric paint to add patterns or designs to the rope."
- "Braided Rope Designs": Explain how to create a simple braided pattern along part of the rope belt for an added touch.
Styling Your Rope Belt: Completing the Look
Provide inspiration on how to style the finished rope belt.
- Outfit Ideas: Suggest different outfits that would pair well with a rope belt (e.g., jeans, dresses, skirts).
- Color Combinations: Offer advice on choosing rope colors that complement various wardrobe staples.
- Occasions: Discuss appropriate occasions for wearing a rope belt (e.g., casual outings, beach days, summer festivals). Include images or examples.
- Versatility: Emphasize the versatility of the rope belt and how it can be adapted to different personal styles.
FAQs: Rope Belt DIY – Style on a Budget
This FAQ aims to address common questions and provide further clarification on making your own stylish rope belt.
What kind of rope works best for a rope belt diy?
Natural fibers like cotton or hemp offer a softer feel and a more bohemian look. Synthetic ropes, such as nylon or polypropylene, are more durable and weather-resistant, but can be stiffer. Consider the overall aesthetic you’re aiming for when choosing.
How do I determine the right length of rope?
Measure your waist or hips (where you intend to wear the belt) and add at least 30 inches for tying. It’s better to have extra length you can trim than to come up short. Remember to account for any knotting or braiding you plan to incorporate into your rope belt diy project.
What are some alternative closure methods besides knots?
Consider using metal rings, D-rings, or even carabiners for a more polished and secure closure. You can attach these with glue or by wrapping and sewing the rope ends around them. It depends on the thickness of the rope used in your rope belt diy.
How can I customize my rope belt to match my personal style?
Experiment with different rope colors and thicknesses. Add beads, charms, or tassels to the ends. Braiding, twisting, or knotting techniques can also create unique textures and patterns. The possibilities are endless when creating your perfect rope belt diy!
So, ready to give rope belt diy a whirl? We bet you’ll love rocking your unique creation! Show us what you make!