Damaged drywall corners, those pesky points of impact, can easily detract from a room’s overall appeal. Often, this damage requires more than just a simple touch-up; it requires skillful application using drywall knives, a core tool for any repair drywall corner project. Addressing these imperfections efficiently demands understanding the proper techniques, which many homeowners learn from resources like This Old House, a trusted source for home improvement guidance. Furthermore, the type of corner bead used impacts the durability of the repair. Let’s get started so you can tackle that corner crunch like a true pro!
Drywall corners. They’re those often-overlooked edges that define the structure and finish of our homes.
Yet, they’re also among the most vulnerable areas, prone to damage from everyday life.
From accidental bumps with furniture to the inevitable settling of a house, these corners often bear the brunt, resulting in unsightly cracks, dents, and even significant structural compromises.
The Ubiquitous Problem of Damaged Drywall Corners
It’s a scenario familiar to almost every homeowner: you’re moving furniture, a child is playing a bit too enthusiastically, or simply over time, the corners of your walls begin to show wear and tear.
These seemingly minor imperfections can quickly escalate, becoming not just eyesores, but also potential entry points for moisture and pests.
Ignoring damaged drywall corners isn’t just about aesthetics; it’s about protecting the integrity of your home.
Why Proper Drywall Corner Repair Matters
The importance of addressing damaged drywall corners goes beyond mere cosmetic appeal.
A structurally sound corner provides crucial support to the surrounding wall, preventing further cracking and instability.
Proper repair also prevents moisture from seeping into the drywall, which can lead to mold growth and costly repairs down the line.
Furthermore, a well-repaired corner enhances the overall value and appeal of your home.
Whether you’re planning to sell or simply want to maintain a comfortable living space, addressing these issues promptly is essential.
Empowering You to Repair Like a Pro
This guide is designed to empower you, the homeowner and DIY enthusiast, with the knowledge and skills to effectively repair drywall corners.
We’ll walk you through the process step-by-step, from identifying the type of damage to applying the finishing touches.
You’ll learn how to select the right tools and materials, master essential techniques, and achieve professional-looking results.
Our goal is to demystify the drywall repair process and equip you with the confidence to tackle these projects yourself, saving you time and money while enhancing the beauty and structural integrity of your home.
Drywall corners. They’re those often-overlooked edges that define the structure and finish of our homes.
Yet, they’re also among the most vulnerable areas, prone to damage from everyday life.
From accidental bumps with furniture to the inevitable settling of a house, these corners often bear the brunt, resulting in unsightly cracks, dents, and even significant structural compromises.
Understanding the nature and causes of drywall corner damage is the first crucial step in effectively addressing these issues. Before you can pick up your tools and begin the repair process, it’s essential to accurately assess the type of damage you’re dealing with and understand why it occurred in the first place. This knowledge will not only inform your repair strategy but also help prevent future problems.
Understanding Drywall Corner Damage: Types, Causes, and Why It Matters
Drywall corners, while seemingly simple, are surprisingly susceptible to a variety of damages. Recognizing the specific type of damage is crucial for choosing the correct repair approach.
Types of Drywall Corner Damage
Several common types of damage plague drywall corners, each requiring a slightly different approach to repair.
Cracks
Cracks are perhaps the most common issue, often appearing as hairline fractures along the corner bead or where the drywall panels meet.
These can range from superficial surface cracks to deeper, more significant fissures. Small cracks are typically cosmetic, while larger cracks can indicate structural movement or underlying problems.
Holes (Small and Large)
Holes, whether tiny punctures or gaping cavities, are another frequent occurrence.
Small holes might result from errant nails or screws, while larger holes are often caused by impact damage from furniture, doorknobs, or other blunt forces.
Dents
Dents typically manifest as shallow indentations in the corner bead or drywall surface.
These are usually caused by minor impacts and, while often unsightly, are usually among the easiest damages to repair.
Impact Damage
Impact damage refers to more severe cases resulting from significant force. This can lead to crushed corner beads, shattered drywall, and even displaced framing.
Repairing impact damage often requires replacing damaged materials and reinforcing the underlying structure.
Common Causes of Drywall Corner Damage
Understanding the root cause of drywall corner damage is just as important as identifying the type of damage itself. Addressing the underlying cause can prevent future recurrences.
Accidental Bumps and Scrapes
This is the most straightforward and easily understood cause. Everyday life, with its furniture shuffling, playful children, and general clumsiness, inevitably leads to accidental collisions with drywall corners.
House Settling
As a house ages, it naturally settles, and shifts in the foundation can exert stress on drywall corners.
This stress often manifests as cracks, particularly along seams and corners. Settling cracks are often unavoidable, but monitoring them is crucial to ensure they don’t indicate more serious structural issues.
Moisture Damage
Water intrusion, whether from leaks, humidity, or condensation, can wreak havoc on drywall.
Moisture weakens the drywall, causing it to crumble, warp, and develop mold. Damaged corners can also be caused by moisture. Addressing moisture issues promptly is vital to prevent extensive damage and costly repairs.
The Importance of Prompt Repair
Ignoring damaged drywall corners is a risky proposition that can lead to a cascade of problems.
Leaving damage unaddressed allows it to worsen over time, leading to increased repair costs and potentially compromising the structural integrity of the wall.
Furthermore, open cracks and holes can provide entry points for moisture, pests, and drafts, creating an unhealthy and uncomfortable living environment. Timely repair is not just about aesthetics; it’s about protecting your investment and ensuring the long-term health of your home.
Gather Your Arsenal: Essential Tools and Materials for Drywall Corner Repair
Before diving into the art of drywall corner repair, it’s crucial to assemble the right tools and materials. Having these essentials on hand will not only streamline the process but also significantly improve the quality and longevity of your repair. This section serves as a comprehensive guide to equipping yourself for success, explaining the purpose and selection criteria for each item in your drywall repair arsenal.
Joint Compound: Choosing the Right Mud for the Job
Joint compound, often referred to as "mud," is the backbone of any drywall repair. Its primary purpose is to fill imperfections, create a smooth surface, and adhere drywall tape or corner bead. However, not all joint compounds are created equal. Understanding the different types and their applications is key to achieving a professional finish.
-
All-Purpose Joint Compound: This is a versatile option suitable for most drywall repairs. It’s easy to sand and provides good adhesion. However, it shrinks more than other types, potentially requiring additional coats.
-
Lightweight Joint Compound: As the name suggests, this type is lighter and easier to spread. It’s excellent for taping and topping coats because it sands very easily. Its reduced weight also minimizes sagging on ceilings and vertical surfaces. However, it’s more prone to cracking in areas with significant movement.
-
Setting-Type Joint Compound (Quick-Setting Compound): This compound hardens through a chemical reaction rather than drying. It sets much faster than other types, allowing for quicker project completion. It’s ideal for filling large gaps or holes, as it shrinks very little. However, it’s more challenging to sand and has a limited working time, so mix only what you can use in a short period.
Drywall Tape: Paper vs. Mesh
Drywall tape reinforces joints between drywall sheets, preventing cracks and ensuring a seamless finish. The two primary types are paper and mesh, each with its own strengths and weaknesses.
-
Paper Tape: This is the traditional choice, offering superior strength and crack resistance. It requires embedding in a thin layer of joint compound and creates a very strong bond. It is generally preferred for inside corners.
-
Mesh Tape: Made of fiberglass, mesh tape is self-adhesive and easier to apply, particularly for beginners. However, it’s less strong than paper tape and can be prone to cracking if not properly embedded in joint compound. It’s better suited for smaller repairs and outside corners.
Corner Bead: Reinforcing Vulnerable Edges
Corner bead provides a clean, crisp edge to drywall corners while also protecting them from impact. Choosing the right type depends on the location and severity of the damage.
-
Metal Corner Bead: This is the most durable option, providing excellent impact resistance. It’s best for high-traffic areas or corners prone to abuse. However, it can be susceptible to rust if exposed to moisture.
-
Vinyl Corner Bead: Vinyl corner bead is rust-proof and slightly more flexible than metal. It’s a good choice for areas with slight movement or moisture concerns.
-
Paper-Faced Corner Bead: This type combines the strength of metal or vinyl with a paper facing. The paper facing accepts joint compound readily, creating a smooth, seamless transition to the surrounding drywall.
Mudding Knives: Applying and Smoothing
Mudding knives are essential for applying and smoothing joint compound. A variety of sizes are needed for different stages of the repair process.
-
6-inch Mudding Knife: Ideal for applying the first coat of joint compound, embedding drywall tape, and performing small patching jobs.
-
12-inch Mudding Knife: Used for feathering the edges of joint compound, creating a smooth transition between the repaired area and the surrounding wall. Larger knives minimize ridges and imperfections.
Sanding Sponge/Block: Achieving a Smooth Finish
A sanding sponge or block is crucial for achieving a smooth, paintable surface. Choose a medium-grit sponge for initial sanding and a fine-grit sponge for the final smoothing.
Safety Gear: Protecting Yourself
Safety should always be a top priority. Essential safety gear includes:
-
Dust Mask: Protects your lungs from harmful drywall dust.
-
Safety Glasses: Shield your eyes from debris.
Primer: Preparing for Paint
Primer is essential for preparing the repaired surface for painting. It seals the joint compound, ensuring uniform paint adhesion and preventing the paint from being absorbed unevenly.
Utility Knife: Precision Cutting
A utility knife with sharp blades is indispensable for trimming drywall tape, scoring drywall for clean cuts, and removing loose debris.
Drywall Saw (or Utility Knife): Patching Perfection
A drywall saw (or a utility knife for smaller cuts) is necessary for cutting drywall to create patches for larger holes.
Stud Finder: Secure Attachment
A stud finder helps locate studs behind the drywall, ensuring that the corner bead is securely attached to a solid backing.
Screws/Nails: Fastening the Foundation
Screws or nails are used to physically attach the corner bead to the wall studs, providing additional support and stability. Choose fasteners appropriate for the type of corner bead and wall construction.
Joint compound, drywall tape, and corner beads are just the beginning. Now, let’s walk through the process of restoring those damaged corners to their former glory. This comprehensive step-by-step guide will equip you with the knowledge and techniques to repair drywall corners effectively, ensuring a professional-looking finish that seamlessly blends with the surrounding wall.
Step-by-Step Guide: Repairing a Damaged Drywall Corner Like a Pro
Preparing the Damaged Area
The foundation of any successful repair lies in thorough preparation. Before applying any materials, you must ensure the area is clean, stable, and ready to receive the repair compound.
-
Removing Loose Debris and Damaged Material:
Begin by carefully removing any loose pieces of drywall, crumbled corner bead, or flaking paint from the damaged area. A utility knife or a small pry bar can be helpful for this task. Be thorough. Any remaining loose material will compromise the adhesion of your repair.
-
Cleaning the Surface for Optimal Adhesion:
Once the loose debris is removed, clean the surrounding surface with a damp sponge or cloth to remove dust, dirt, and grime. This is crucial for ensuring proper adhesion of the joint compound. Allow the area to dry completely before proceeding.
Applying Corner Bead (If Necessary)
If the existing corner bead is damaged beyond repair or missing entirely, installing a new one is essential for providing a crisp, protective edge.
-
Measuring and Cutting the Corner Bead to the Correct Length:
Measure the height of the corner and cut the corner bead to the exact length using tin snips or a utility knife. Accuracy is key here; a corner bead that’s too short will leave the corner vulnerable, while one that’s too long will be difficult to install.
-
Attaching the Corner Bead:
There are several ways to attach a corner bead: with joint compound (crimping), nails, or screws.
- Joint Compound (Crimping): Apply a generous layer of joint compound to the drywall on both sides of the corner where the corner bead will sit. Press the corner bead firmly into the compound, ensuring it’s straight and flush with the wall. Use a 6-inch mudding knife to "crimp" the compound, working it through the holes in the corner bead. Remove any excess compound.
- Nails/Screws: Position the corner bead against the corner and secure it with drywall nails or screws every 6-8 inches. Ensure the fasteners are driven straight and don’t crush the corner bead.
Regardless of the method, it’s vital to check the corner bead with a level to ensure it’s perfectly vertical. Adjust as needed before the joint compound dries or before fully tightening the fasteners.
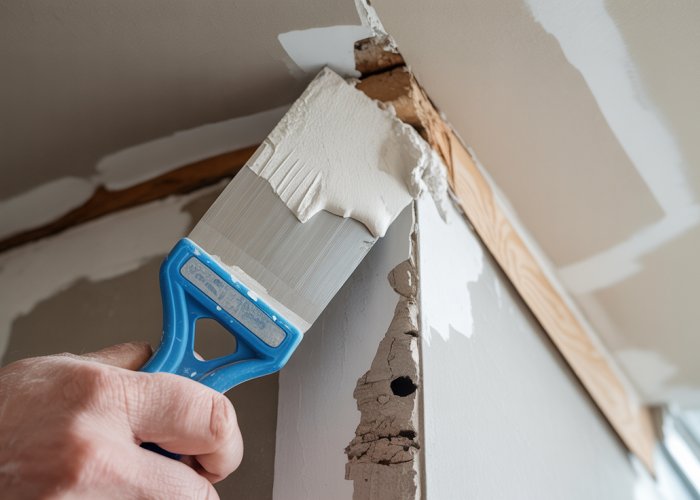
Applying the First Coat of Joint Compound
The first coat, sometimes called the "bedding coat," establishes the foundation for a smooth, durable repair.
-
Applying a Thin, Even Coat:
Using a 6-inch mudding knife, apply a thin, even coat of joint compound over the corner bead (or directly to the drywall corner if no corner bead is used). The goal is to completely cover the corner bead or drywall tape while minimizing the amount of excess compound.
-
Embedding Drywall Tape (If Not Using Corner Bead):
If you’re using drywall tape instead of a corner bead, apply a thin layer of joint compound to the corner. Center the drywall tape over the corner and press it firmly into the compound, using your mudding knife to smooth out any air bubbles. The tape should be fully embedded in the compound.
Applying Subsequent Coats of Joint Compound
Patience is key! Multiple thin coats are always better than one thick coat when applying joint compound.
-
Allowing Each Coat to Dry Completely:
This is perhaps the most critical step. Allow each coat of joint compound to dry completely before applying the next. Drying times will vary depending on humidity and temperature, but typically it takes 12-24 hours. Rushing this step will lead to cracking and adhesion problems.
-
Sanding Lightly Between Coats:
Once each coat is completely dry, lightly sand the surface with a sanding sponge or block to remove any imperfections, ridges, or bumps. Don’t over-sand; the goal is to create a smooth surface for the next coat, not to remove all the joint compound.
Feathering the Edges
Feathering is the art of blending the repair seamlessly into the surrounding wall. This is essential for achieving a professional, invisible repair.
-
Blending Seamlessly:
With each subsequent coat of joint compound, extend the application slightly further out from the corner. Use a wider mudding knife (10-12 inch) to apply the compound thinly and smoothly, gradually tapering the edges to blend them seamlessly with the existing wall surface. The goal is to create a smooth, gradual transition, so there are no abrupt edges or visible lines.
Patching Holes (If Necessary)
If the corner has a hole, patching is necessary to restore the structural integrity and provide a smooth surface for finishing.
-
Cutting Away the Damaged Area:
Use a utility knife or drywall saw to cut away the damaged drywall around the hole, creating a clean, square or rectangular opening. Ensure the edges are clean and free of loose debris.
-
Installing a Drywall Patch:
There are several methods for patching a hole, including using a self-adhesive patch, a paper patch, or creating a custom drywall patch. For larger holes, a custom drywall patch is often the best solution.
- Custom Drywall Patch: Cut a piece of drywall that’s slightly smaller than the opening. Attach wood furring strips to the inside of the existing drywall around the opening, providing a surface to screw the patch into. Secure the drywall patch to the furring strips with drywall screws. Apply joint compound over the seams, embedding drywall tape for added strength.
Sanding and Priming
The final steps bring the repair to a finished state, ready for painting.
-
Sanding to a Smooth Finish:
After the final coat of joint compound is completely dry, sand the entire repaired area with a sanding sponge or block to achieve a smooth, even finish. Pay close attention to the feathered edges, ensuring they blend seamlessly with the surrounding wall.
-
Applying Primer:
Apply a coat of drywall primer to the repaired area. Primer seals the surface, improves paint adhesion, and helps to create a uniform finish. Allow the primer to dry completely before painting.
Joint compound, drywall tape, and corner beads are just the beginning. Now, let’s walk through the process of restoring those damaged corners to their former glory. This comprehensive step-by-step guide will equip you with the knowledge and techniques to repair drywall corners effectively, ensuring a professional-looking finish that seamlessly blends with the surrounding wall.
Advanced Techniques and Troubleshooting for Drywall Corner Repairs
While basic drywall corner repair is achievable for most DIYers, some situations demand more advanced techniques and a deeper understanding of potential problems. This section addresses complex scenarios, offering solutions for large holes, recurring cracks, and achieving that coveted professional finish. We’ll also discuss when it’s best to call in the pros.
Repairing Large Holes in Drywall Corners
Dealing with large holes in drywall corners requires a different approach than simple patching. The key is to provide adequate backing and support for the new drywall section.
Creating a Stable Backing
For holes larger than a few inches, you’ll need to create a sturdy backing structure. This can be achieved using:
-
Furring Strips: Cut furring strips to fit inside the wall cavity behind the damaged area. Secure them to the existing studs or drywall with screws. This provides a solid base to attach the drywall patch.
-
Backing Boards: Similar to furring strips, backing boards can be larger pieces of wood that span across multiple studs, offering even greater support.
Installing the Drywall Patch
Once the backing is in place, carefully measure and cut a drywall patch to fit the opening.
Ensure the patch is flush with the existing wall surface. Secure the patch to the backing using drywall screws. Apply joint compound and tape, following the same steps as a standard drywall repair, feathering the edges for a seamless transition.
Addressing Recurring Cracks and Their Underlying Causes
Recurring cracks in drywall corners are a sign of a deeper issue, usually related to structural movement or stress. Simply patching the cracks will only provide a temporary fix. It’s crucial to identify and address the underlying cause to prevent the cracks from reappearing.
Identifying the Root Cause
Common causes of recurring cracks include:
-
House Settling: Natural settling can cause stress on drywall, particularly at corners.
-
Foundation Issues: More serious foundation problems can lead to significant cracking. If you suspect foundation issues, consult with a structural engineer.
-
Framing Problems: Improperly installed or weakened framing can also contribute to cracks.
Addressing Structural Issues
If the cracks are caused by settling, monitor them over time. Minor settling cracks can often be repaired and may not reappear. However, if the cracks continue to widen or new ones appear, it’s essential to consult with a professional to assess the structural integrity of your home.
For more severe issues, such as foundation or framing problems, professional repairs are necessary.
Tips for Achieving a Smooth, Professional-Looking Finish
Achieving a flawless finish on drywall corner repairs requires patience and attention to detail.
The Importance of Sanding
Sanding is crucial for blending the repair seamlessly with the surrounding wall. Use a sanding sponge or block with fine-grit sandpaper. Avoid over-sanding, as this can damage the surrounding drywall.
Feathering Techniques
Feathering the edges of the joint compound is essential for creating a smooth transition. Use a wide mudding knife (10-12 inches) to apply thin, even coats, gradually extending the compound outwards.
Apply pressure to the edge of the knife to blend the compound into the existing wall.
Priming and Painting
Always prime the repaired area before painting. This helps to seal the joint compound and ensures a uniform finish. Use a high-quality paint that matches the existing wall color.
Knowing When to Call a Professional Drywall Repairer
While many drywall corner repairs can be tackled by DIYers, there are situations where it’s best to call in a professional.
-
Extensive Damage: If the drywall corner is severely damaged or involves structural issues, a professional has the expertise and equipment to handle the repair safely and effectively.
-
Recurring Problems: As mentioned earlier, recurring cracks often indicate underlying problems that require professional assessment.
-
Lack of Experience: If you’re uncomfortable with any aspect of the repair process, it’s better to err on the side of caution and hire a professional. A poorly executed repair can be more costly to fix in the long run.
Ultimately, the decision of whether to DIY or hire a professional depends on the extent of the damage, your skill level, and your comfort level. Don’t hesitate to seek professional help when needed to ensure a safe and long-lasting repair.
Advanced techniques can solve many drywall corner problems, but nothing is more important than your well-being. Let’s shift our focus now to an absolutely critical aspect of drywall repair: safety. This isn’t just an afterthought; it’s a fundamental principle that should guide every step of your project, from initial preparation to final cleanup.
Safety First: Protecting Yourself During Drywall Repair
Working with drywall, joint compound, and other construction materials can expose you to potential hazards if proper precautions aren’t taken. Protecting yourself is not just about avoiding injury; it’s about ensuring long-term health and a safe working environment for everyone involved. Let’s explore the essential safety measures you need to take.
Essential Safety Gear: Your First Line of Defense
Your personal protective equipment (PPE) is your primary defense against the risks associated with drywall repair. Don’t compromise on quality or skip any of these essentials:
-
Dust Mask/Respirator: Drywall dust is a fine particulate matter that can irritate your lungs and respiratory system. A properly fitted N95 dust mask is the minimum requirement, but for extensive sanding or working with older drywall that may contain asbestos (though rare, it’s a serious concern), consider a respirator with appropriate filters.
-
Safety Glasses/Goggles: Protect your eyes from flying debris, dust particles, and splashes of joint compound. Choose safety glasses with side shields or goggles for a more secure and comprehensive protection.
-
Gloves: Joint compound can dry out your skin and prolonged exposure can cause irritation. Wear gloves to protect your hands from these effects, as well as from cuts and scrapes. Nitrile or latex gloves are suitable for most drywall work.
The Importance of Proper Ventilation
Drywall dust hangs in the air for a long time. It’s important to consider how you can minimize dust exposure:
-
Open Windows and Doors: Whenever possible, open windows and doors to create cross-ventilation in the work area. This helps to dissipate dust and fumes.
-
Use a Fan: Position a fan to blow air out of the room, directing dust away from your breathing zone. This is especially helpful when sanding.
-
Consider an Air Purifier: For extensive projects, consider using an air purifier with a HEPA filter to remove dust particles from the air.
Waste Disposal: Responsible Cleanup Practices
Proper disposal of waste materials is important for both safety and environmental responsibility:
-
Collect Debris: Use a plastic drop cloth to collect dust, debris, and scrap materials as you work. This makes cleanup easier and prevents dust from spreading.
-
Seal and Dispose: Place all drywall scraps, used joint compound, and sanding dust in sealed bags before disposal. Check your local regulations for proper disposal methods, especially for potentially hazardous materials.
-
Clean Your Tools: Clean your tools immediately after use to prevent joint compound from hardening. This will extend the life of your tools and make future projects easier. Don’t pour joint compound down the drain!
Taking these safety precautions seriously will not only protect you from immediate harm but also contribute to a healthier and more sustainable approach to DIY drywall repair. Remember, a safe work environment is a productive work environment.
Corner Crunch? FAQs About Drywall Corner Repair
Here are some frequently asked questions to help you tackle that damaged drywall corner and achieve a professional-looking repair.
How do I identify a "corner crunch" on my drywall?
A "corner crunch" typically refers to damage specifically affecting the corner bead (metal or plastic) protecting a drywall corner. You’ll likely see dents, cracks, or separation of the corner bead from the drywall itself. This damage often requires specific techniques to repair drywall corner effectively.
What tools are essential for repairing a drywall corner crunch?
Beyond basic tools like a utility knife, sandpaper, and a taping knife, you’ll need drywall compound, corner bead (if replacing), and potentially setting-type compound for deeper repairs. Having a hawk or mud pan makes applying compound much easier when you repair drywall corner.
Can I repair a badly damaged drywall corner myself, or should I call a professional?
Minor corner damage like small dents or cracks is often manageable with DIY methods. However, significant crushing or widespread damage is best left to a professional. They have the expertise to properly address structural issues and ensure a long-lasting repair drywall corner job.
What’s the best way to prevent future corner crunch on my drywall corners?
Consider using corner guards in high-traffic areas or locations prone to impact. Proper furniture placement also helps minimize accidental bumps. When possible, avoid leaning heavy items against drywall corners to prevent future damage and the need to repair drywall corner.
So, you’ve learned the ropes and are ready to tackle that corner crunch! Remember these tips when you need to repair drywall corner, and you’ll have those corners looking sharp again in no time. Happy patching!