Considering refinishing pine floors yourself? It’s a rewarding project! Proper sanding techniques are crucial for achieving a smooth surface. The National Wood Flooring Association (NWFA) recommends starting with a coarse grit sandpaper. Choosing the right polyurethane finish provides the durability your newly refinished floors need, protecting them from daily wear and tear. And remember, Minwax offers a wide variety of stain colors to perfectly complement your decor, ensuring that your efforts in refinishing pine floors result in a beautiful and lasting transformation.
Unleash the Beauty of Your Pine Floors with DIY Refinishing
Pine floors: they whisper stories of generations past, radiate warmth, and infuse a home with undeniable character.
But time, wear, and tear can diminish their luster, obscuring the beauty that lies beneath.
Refinishing your pine floors is more than just a home improvement project; it’s an act of restoration, a chance to revive the soul of your home.
The Allure of Pine: A Foundation of Warmth
Pine, with its distinctive grain patterns and soft hues, offers a unique aesthetic that complements a variety of interior styles.
From rustic farmhouses to contemporary apartments, pine floors create a welcoming and inviting atmosphere.
Unlike some hardwoods, pine possesses a certain inherent warmth, a quality that makes a house feel like a home.
Why DIY Refinishing is a Rewarding Endeavor
Refinishing your pine floors might seem daunting, but it’s an achievable DIY project that offers significant rewards.
Not only will you save money compared to hiring professionals, but you’ll also gain a deep sense of accomplishment.
There’s a special satisfaction in knowing you’ve personally breathed new life into a cherished element of your home.
DIY refinishing empowers you to take control of the process, customizing the stain and finish to perfectly match your vision.
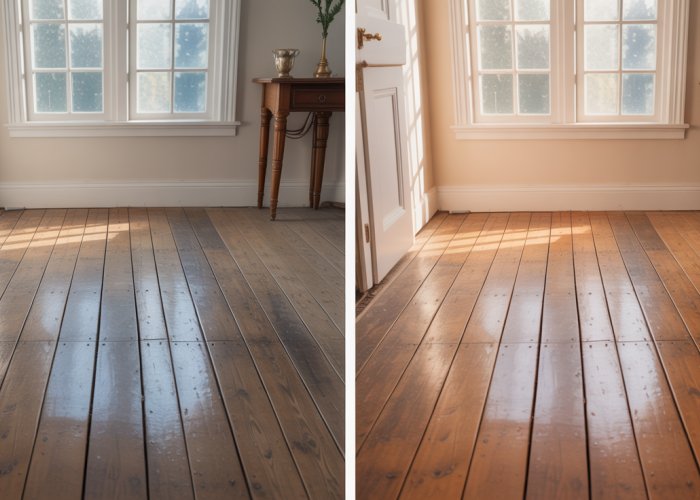
Transform Your Space, One Plank at a Time
Imagine your dull, scratched floors transformed into a gleaming expanse of restored beauty.
Refinishing can dramatically alter the feel of a room, creating a brighter, more spacious, and more inviting environment.
It’s a transformation that goes beyond aesthetics, impacting the overall ambiance and value of your home.
The Satisfaction of Restoring History
With each pass of the sander, you’re not just removing old finish; you’re uncovering the hidden potential of your pine floors.
You’re revealing the natural beauty that has been patiently waiting to be rediscovered.
This process of restoration is deeply satisfying, connecting you to the history of your home and the enduring appeal of natural materials.
Refinishing is a journey of rediscovery, revealing the inherent charm and enduring beauty of your pine floors.
That initial spark of excitement about your refinished pine floors is wonderful, but now it’s time to channel that energy into meticulous preparation. This stage is arguably the most crucial, setting the foundation for a smooth and successful project. Overlook these steps, and you risk encountering avoidable headaches down the line.
Preparing for Your Pine Floor Refinishing Adventure: A Comprehensive Guide
Refinishing pine floors is a rewarding endeavor.
However, success hinges on thorough preparation.
It’s about gathering the right tools and materials.
It also means prioritizing safety and preparing the room.
Skipping these steps can lead to frustration and subpar results.
Proper preparation ensures a smoother, more efficient process.
It also ensures a stunning final product.
Gather Your Supplies: The Arsenal for Success
Think of your supplies as your allies in this restoration journey. Having everything you need readily available will prevent frustrating interruptions and maintain your momentum.
Essential Tools
- Floor Sander: You have two main options here: drum sanders and orbital sanders. Drum sanders are more aggressive and suitable for removing old finishes quickly, but they require a steady hand to avoid gouging the floor. Orbital sanders are more forgiving and easier to control, making them a great choice for beginners or for floors in relatively good condition.
- Edging Sander: This smaller sander is designed to reach the edges and corners of the room that the larger floor sander can’t access. It’s essential for achieving a uniform finish across the entire floor.
- Sandpaper (Various Grits): You’ll need a range of sandpaper grits, from coarse (e.g., 36-grit) to strip the old finish, to medium (e.g., 60-grit or 80-grit) to smooth the surface, and finally to fine (e.g., 100-grit or 120-grit) for achieving a perfectly polished surface. Buy plenty of each grit – you’ll likely go through more than you think.
- Wood Filler: Pine floors often have imperfections, such as nail holes, gaps, or small damages. Wood filler is your go-to solution for filling these imperfections and creating a smooth, even surface for finishing. Choose a color that closely matches your pine for a seamless repair.
- Paint Brush and Roller: These are essential for applying stain and polyurethane. Opt for high-quality brushes and rollers designed for smooth application and minimal shedding.
- Tack Cloth: This sticky cloth is used to remove fine dust particles from the floor after sanding and before applying the finish. A clean surface is crucial for achieving a flawless finish.
- Mineral Spirits: Used for cleaning brushes and rollers after applying oil-based stains and finishes. Always follow safety precautions when using mineral spirits.
Finishing Materials
- Wood Stain: This is where you can truly customize the look of your pine floors. Consider the overall style of your home and choose a stain that complements it. Test the stain on a small, inconspicuous area of the floor to ensure you like the color before applying it to the entire surface.
- Polyurethane: This clear, protective coating will shield your refinished pine floors from scratches, wear, and tear. Choose either an oil-based or water-based polyurethane, considering factors like durability, drying time, and VOC content.
Protective Gear
- Dust Mask/Respirator: Sanding creates a significant amount of dust, which can be harmful to your lungs. A dust mask or, preferably, a respirator is essential for protecting your respiratory system.
- Safety Glasses: Flying debris from sanding can pose a serious risk to your eyes. Safety glasses are a non-negotiable item to protect your vision.
Safety First: Your Well-being is Paramount
Refinishing floors can introduce potential hazards. Your safety should always be the top priority.
Using the right protective gear and ensuring proper ventilation are crucial for a safe and healthy working environment.
- Always Wear Protective Gear: Throughout the entire project, consistently use your dust mask/respirator and safety glasses. Don’t compromise on this – it’s a small effort that makes a big difference.
- Ventilation is Key: Work in a well-ventilated area to avoid inhaling harmful fumes from sanding dust, stains, and finishes. Open windows and doors, and consider using a fan to circulate air.
- Handle Finishing Products with Care: Read and follow the manufacturer’s instructions for all finishing products, paying close attention to safety precautions. Wear gloves to protect your skin and avoid contact with your eyes.
- Dispose of Rags Properly: Rags soaked in oil-based stains and finishes can be a fire hazard. Allow them to dry completely outdoors, away from any flammable materials, before disposing of them properly.
Room Preparation: Setting the Stage for Refinishing
A well-prepared room will not only make the refinishing process easier but also protect your belongings from damage.
- Clear the Room Completely: Remove all furniture, rugs, curtains, and valuables from the room. This includes items stored in closets or cabinets, as dust can penetrate even closed spaces.
- Mask Off Areas: Use painter’s tape and plastic sheeting to protect walls, trim, doors, and any other areas you don’t want to be affected by sanding dust or finishes. Pay close attention to detail to ensure a tight seal.
- Protect Adjacent Rooms: Hang plastic sheeting over doorways leading to adjacent rooms to prevent dust from spreading throughout your home.
- Clean the Existing Floors: Remove as much surface-level debris as possible to make the sanding process easier.
Vacuum carefully!
That initial spark of excitement about your refinished pine floors is wonderful, but now it’s time to channel that energy into meticulous preparation. This stage is arguably the most crucial, setting the foundation for a smooth and successful project. Overlook these steps, and you risk encountering avoidable headaches down the line.
The Sanding Process: Revealing the Hidden Beauty Within Your Pine Floors
With your workspace prepped and your supplies at hand, the real transformation begins: the sanding process. This stage is where you’ll unveil the natural beauty hidden beneath layers of old finish and wear. Mastering the art of sanding is crucial for a professional-looking result. Let’s delve into the details, ensuring you achieve a flawlessly smooth canvas ready for staining and finishing.
Initial Sanding: Stripping Away the Old
The initial sanding is all about removing the existing finish and any major imperfections. This is where you’ll employ a coarse-grit sandpaper in conjunction with your floor sander. The goal is to efficiently strip away the old layers, creating a clean slate for subsequent steps.
Choosing the Right Grit
For this initial pass, opt for a coarse-grit sandpaper, typically in the range of 36 to 40 grit. This will effectively remove old varnish, paint, or stubborn stains. Remember, the lower the grit number, the coarser the sandpaper.
Proper Sanding Techniques
-
Direction: Sand in the direction of the wood grain whenever possible. This minimizes the risk of cross-grain scratches that can be difficult to remove.
-
Overlap: Overlap each pass by about 2-3 inches to ensure even removal and prevent ridges.
-
Steady Pace: Maintain a consistent walking speed while operating the sander. Avoid stopping in one place, as this can lead to uneven sanding and gouges.
-
Lift at the End: Gently lift the sander at the end of each pass to avoid creating divots.
Intermediate Sanding: Smoothing the Path
After the initial sanding, the surface will likely be rough. Intermediate sanding is about refining the surface, removing scratches left by the coarse grit, and addressing any imperfections. This step prepares the floor for the final, fine sanding.
Switching to Medium Grit
Transition to a medium-grit sandpaper, typically around 60 to 80 grit. This will smooth out the surface and remove any remaining imperfections.
Addressing Imperfections with Wood Filler
Carefully inspect the floor for any holes, gouges, or cracks. Use a high-quality wood filler that matches the color of your pine to fill these imperfections. Allow the wood filler to dry completely according to the manufacturer’s instructions before proceeding. After it’s dry, sand the filled areas flush with the surrounding wood using the medium-grit sandpaper.
Fine Sanding: Achieving Perfection
Fine sanding is the final step in preparing the floor for its new finish. This stage ensures a perfectly smooth surface, critical for achieving a professional-looking result. Any imperfections left at this stage will be magnified by the stain and polyurethane.
The Importance of a Fine Grit
Use a fine-grit sandpaper, typically between 100 and 120 grit, for this final pass. The goal is to create a velvety-smooth surface that will readily accept the stain and polyurethane.
Achieving a Smooth Surface
Take your time and ensure consistent coverage. The finer the sanding, the better the final finish will look. Don’t rush this step.
Edging and Corners: Reaching the Tight Spots
The large floor sander can’t reach the edges and corners of the room. That’s where the edging sander comes in. This tool allows you to blend the edges seamlessly with the rest of the floor, creating a uniform finish.
Using the Edging Sander
The edging sander requires a delicate touch to avoid damaging baseboards or walls. Use the same grits of sandpaper as you did with the floor sander, progressing from coarse to medium to fine.
Tips for a Consistent Finish
-
Overlap: Overlap the sanded area from the edging sander with the area sanded by the floor sander to create a seamless transition.
-
Move Slowly: Move the edging sander slowly and deliberately to avoid creating swirl marks or uneven sanding.
-
Use a Light Touch: Apply light pressure to avoid gouging the wood.
That initial sanding dust might have you feeling a bit weary, but remember that you’ve just laid the groundwork for something truly spectacular. The transformation is far from over; in fact, the next stage is where your pine floors will truly come to life. This is where color, depth, and lasting protection enter the picture.
Staining and Finishing: Protecting and Enhancing Your Pine Floors’ Natural Charm
This stage is all about bringing your vision to life. Selecting a stain, applying it with precision, and sealing it all in with durable polyurethane – these are the steps that will truly make your pine floors shine. Patience is key here, along with an eye for detail. Let’s dive in.
Choosing Your Stain: Setting the Mood
The color of your stain dictates the entire atmosphere of your room. It’s more than just a color choice; it’s a mood setter, a style definer. Before committing to a stain, take some time to consider the impact of different colors on your pine floors.
-
Light Stains: These stains accentuate the natural beauty of the wood, creating a bright, airy, and casual feel.
They’re perfect for spaces where you want to maximize light.
-
Medium Stains: Offering a balance between light and dark, medium stains provide warmth and sophistication.
They work well in a variety of décor styles, from traditional to contemporary.
-
Dark Stains: Dark stains add drama, richness, and a sense of luxury to your floors.
They’re ideal for creating a cozy, intimate atmosphere.
The Indispensable Test Patch: No matter how certain you are about a stain color, always test it on a small, inconspicuous area of your floor first. This is absolutely critical.
Why? Because the same stain can look drastically different on different types of wood, and even on different boards of the same type of wood. A test patch allows you to see the true color and how it interacts with the grain of your pine, avoiding any unpleasant surprises.
How to Perform a Test Patch
- Lightly sand a small, hidden area (like under a piece of furniture) with fine-grit sandpaper (220 grit).
- Apply the stain to the test area, following the manufacturer’s instructions.
- Allow the stain to dry completely.
- Assess the color and make sure it matches your expectations before proceeding.
Applying the Stain: Bringing Color to Life
Once you’ve selected your stain, it’s time to bring color to life. But before you start slathering stain across your entire floor, let’s cover some key techniques.
Even application is crucial for a professional-looking result. Streaks or blotches can ruin the look of your floor, so take your time and pay attention to detail.
Follow the Manufacturer’s Instructions: Always, always read and follow the stain manufacturer’s instructions. These instructions will provide specific guidance on application techniques, drying times, and safety precautions.
Key Application Tips
- Stir the stain thoroughly: Before you begin, stir the stain well to ensure that the pigment is evenly distributed.
- Use a high-quality applicator: A good quality brush, foam pad, or rag will help you apply the stain evenly.
- Apply the stain in the direction of the grain: This will help to blend the stain seamlessly into the wood.
- Work in small sections: Apply the stain to small sections at a time, working your way across the floor.
- Wipe off excess stain: After applying the stain, use a clean rag to wipe off any excess.
-
Allow proper drying time: This is one of the most critical steps. Be Patient!
Refer to the manufacturer’s instructions for the recommended drying time, and resist the urge to rush the process. Prematurely applying polyurethane can trap moisture and lead to adhesion problems.
Applying Polyurethane: The Shield of Beauty
With the stain beautifully accentuating the grain of your pine floors, it’s time to protect your hard work with polyurethane. This clear, durable finish will shield your floors from scratches, spills, and everyday wear and tear.
The Importance of Multiple Coats: Multiple coats of polyurethane are essential for providing adequate protection and durability. Aim for at least two or three coats, following the manufacturer’s instructions for drying times between coats.
Sanding Between Coats
Lightly sanding between coats of polyurethane is key to achieving a smooth, flawless finish. Use a fine-grit sandpaper (220 grit or higher) to gently scuff the surface of the dried polyurethane. This will create a better bond for the next coat.
Preventing Bubbles and Imperfections
Bubbles and imperfections can mar the surface of your polyurethane finish, so it’s important to take steps to prevent them.
- Use a high-quality applicator: A good quality brush or roller will help you apply the polyurethane smoothly.
- Apply thin, even coats: Avoid applying the polyurethane too thickly, as this can trap air and lead to bubbles.
- Avoid shaking the can: Shaking the can of polyurethane can create bubbles, so gently stir it instead.
- Work in a well-ventilated area: Good ventilation will help the polyurethane dry properly and prevent bubbles from forming.
- Keep the area clean: Dust and debris can settle on the wet polyurethane, creating imperfections.
- Consider a de-glosser: Using a de-glosser as a final coat can reduce any remaining bubbles.
By following these tips, you can achieve a beautiful, durable polyurethane finish that will protect your pine floors for years to come.
That initial sanding dust might have you feeling a bit weary, but remember that you’ve just laid the groundwork for something truly spectacular. The transformation is far from over; in fact, the next stage is where your pine floors will truly come to life. This is where color, depth, and lasting protection enter the picture.
Staining and Finishing: Protecting and Enhancing Your Pine Floors’ Natural Charm
This stage is all about bringing your vision to life. Selecting a stain, applying it with precision, and sealing it all in with durable polyurethane – these are the steps that will truly make your pine floors shine. Patience is key here, along with an eye for detail. Let’s dive in.
Choosing Your Stain: Setting the Mood
The color of your stain dictates the entire atmosphere of your room. It’s more than just a color choice; it’s a mood setter, a style definer. Before committing to a stain, take some time to consider the impact of different colors on your pine floors.
Light Stains
These stains accentuate the natural beauty of the wood, creating a bright, airy, and casual feel.
They’re perfect for spaces where you want to maximize light.
Medium Stains
Offering a balance between light and dark, medium stains provide warmth and sophistication.
They work well in a variety of décor styles, from traditional to contemporary.
Dark Stains
Dark stains add drama, richness, and a sense of luxury to your floors.
They’re ideal for creating a cozy, intimate atmosphere.
The Indispensable Test
Before you commit to staining your entire floor, testing is paramount.
Apply your chosen stain to a small, inconspicuous area to see how it looks.
A closet, or a corner that will be covered by furniture, is a great place to test.
This small step can save you from potentially regretting your choice after staining the entire floor.
Your pine floors are now beautifully refinished, a testament to your hard work. But the job isn’t quite done. The longevity and luster of your newly refinished floors depend significantly on the final touches and diligent maintenance. Taking the right steps now will ensure your floors remain a source of pride for years to come.
Patience is perhaps the most critical virtue in the final stages of refinishing. It’s tempting to rush back into enjoying your revitalized space, but allowing adequate curing time is absolutely essential for the longevity of your finish.
The curing process is where the polyurethane or other finish fully hardens and achieves its maximum durability.
Placing furniture or heavy objects on the floor before it has properly cured can lead to indentations, scratches, and even bonding of the finish to the objects.
This will ruin all your hard work.
Curing times vary depending on the type of finish you’ve used, as well as environmental factors like humidity and temperature.
Always refer to the manufacturer’s instructions for the specific product you’ve chosen.
Typically, a minimum of 72 hours is recommended before light foot traffic, with several days to a week before placing furniture back into the room.
During this period, try to ensure the room is well-ventilated and maintain a consistent temperature to facilitate even curing.
Once the curing period is complete, it’s time to start thinking about how to keep your pine floors looking their best.
Regular cleaning and preventative maintenance are key to extending the life and beauty of your refinished floors.
Avoid harsh chemicals or abrasive cleaners that can damage the finish.
Instead, opt for pH-neutral floor cleaners specifically designed for wood floors.
These can be found at most hardware stores.
For day-to-day cleaning, a lightly dampened microfiber mop is your best friend.
Ensure the mop is not soaking wet, as excess water can seep into the seams and cause damage over time.
Sweep or vacuum regularly to remove loose dirt and debris that can scratch the surface.
Prevention is always better than cure.
Here are some simple yet effective strategies to safeguard your floors:
- Use rugs and mats: Place rugs in high-traffic areas like entrances, hallways, and in front of sinks to trap dirt and moisture.
- Apply felt pads: Attach felt pads to the legs of all furniture to prevent scratches when moving chairs, tables, and sofas.
- Trim pet’s nails: Keep your pet’s nails trimmed to minimize scratching.
- Avoid high heels: Encourage household members and guests to avoid wearing high heels indoors, as they can easily dent the surface.
- Be mindful of water: Wipe up spills immediately to prevent water damage.
- Consider floor protectors: Invest in floor protectors for furniture with wheels or casters.
By following these simple maintenance tips, you can ensure that your beautifully refinished pine floors retain their luster and charm for many years to come.
FAQs: Refinishing Pine Floors
Here are some frequently asked questions about refinishing pine floors, designed to help you with your DIY project.
Is pine flooring difficult to refinish compared to other hardwoods?
Pine is a softer wood than hardwoods like oak or maple, making it more susceptible to dents and scratches during the refinishing process. Extra care is needed during sanding to avoid unevenness. However, with the right techniques and patience, refinishing pine floors is achievable for DIYers.
What grit sandpaper should I start with when sanding pine floors?
Start with a coarser grit, around 40-60, to remove the existing finish and imperfections. Progress gradually to finer grits, like 80-100 and finally 120-150, for a smooth surface ready for staining or sealing. Avoid skipping grits, as this can lead to noticeable scratches.
Can I stain my refinished pine floors a dark color?
Yes, you can stain pine floors a dark color. However, pine tends to absorb stain unevenly, resulting in a blotchy appearance. Using a wood conditioner before staining can help even out the absorption and achieve a more uniform color when refinishing pine floors.
What type of finish is best for refinished pine floors?
Polyurethane is a durable and popular choice for refinishing pine floors, offering good protection against wear and tear. Water-based polyurethane is less likely to yellow over time compared to oil-based versions. Consider the level of foot traffic in the area when selecting the sheen (matte, satin, semi-gloss, or gloss).
So there you have it! Refinishing pine floors is totally achievable with a little elbow grease and the right know-how. Now go get those floors looking amazing!