Achieving stunning results with red oak staining can feel like unlocking a closely guarded secret. But, fear not! Minwax, a trusted name in wood finishing products, offers a range of stains specifically formulated to enhance the natural grain of red oak. The key lies in understanding wood preparation; proper sanding and cleaning are crucial before applying any stain. For those looking to professionalize their red oak staining techniques, consider consulting with a local woodworking expert or referencing online forums dedicated to woodworking. With the right knowledge and approach, red oak staining can transform your project into a masterpiece.
Unlocking the Beauty of Red Oak: Your Guide to Stunning Stains
Red oak is a popular hardwood known for its prominent grain pattern and reddish hue. While beautiful on its own, staining red oak can elevate its natural beauty and complement your décor. The key is understanding the wood’s properties and selecting the right stain color and application techniques. Let’s dive into how to achieve "wow" results with your red oak staining project!
Preparing Your Red Oak for Staining
Proper preparation is paramount for a successful red oak staining project. Skipping steps here can lead to uneven color absorption and a less-than-desirable finish.
Sanding is Key
- Start with the Right Grit: Begin with a coarser grit sandpaper (around 80-100 grit) to remove any existing finish or imperfections.
- Progress to Finer Grits: Gradually move to finer grits (120-150 grit, then 180-220 grit) for a smooth, even surface.
- Sanding with the Grain: Always sand with the grain to avoid creating scratches that will be highlighted by the stain.
Cleaning and Removing Dust
- Vacuum Thoroughly: After sanding, vacuum the entire surface to remove all sanding dust.
- Tack Cloth is Your Friend: Use a tack cloth to pick up any remaining fine dust particles. This ensures a clean surface for optimal stain adhesion.
- Consider Mineral Spirits Wipe Down: Wiping the wood down with a clean cloth dampened with mineral spirits can help remove any residual oils or resins that could interfere with staining.
Choosing the Perfect Stain Color for Red Oak
The natural reddish undertones of red oak influence the final stain color. Understanding this is crucial to selecting a stain that complements the wood’s characteristics and achieves your desired aesthetic.
Understanding Red Oak’s Undertones
Red oak inherently possesses warm, reddish tones. This means:
- Cooler stain colors like grays and blues can appear muddier or less vibrant than expected.
- Warmer colors like browns, reds, and golds tend to accentuate the wood’s natural beauty.
- Neutral colors can be tricky and may lean towards the warm side due to the oak’s undertones.
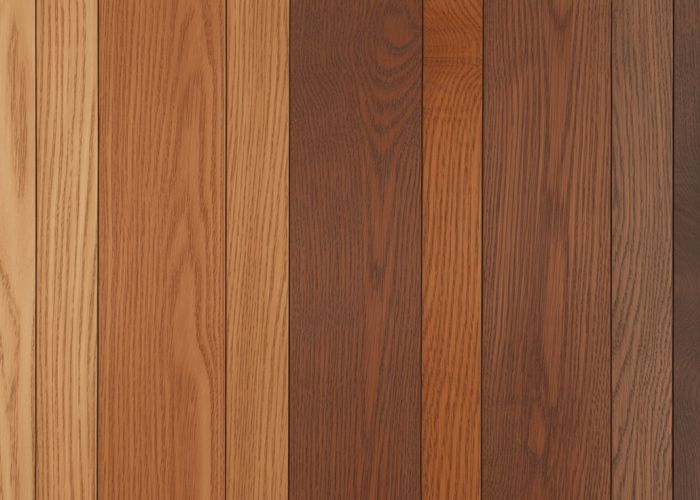
Popular Stain Color Categories for Red Oak
Here’s a breakdown of stain color categories and how they generally interact with red oak:
| Stain Color Category | Effect on Red Oak | Considerations |
|---|---|---|
| Browns | Enhances the natural warmth; classic and versatile. | Consider the specific shade of brown – from light and honeyed to dark and rich. The grain is usually prominently displayed. |
| Reds | Intensifies the red undertones; creates a bold statement. | Be mindful of how much red you want to highlight. Too much red can appear dated. |
| Grays | Creates a more modern, subdued look, but can appear muted. | Choose a gray with warm undertones to prevent a cold or lifeless appearance. Testing is highly recommended! |
| Neutrals (Beiges/Taupes) | Can offer a sophisticated, understated appearance. | Can lean warm; again, test the stain on a scrap piece to see how it interacts with your specific piece of red oak. |
| Dark Colors (Ebony/Black) | Creates a dramatic, contemporary effect. | Can obscure the grain pattern if applied too heavily. Consider a penetrating oil stain to allow the grain to show through. |
The Importance of Testing Stain Samples
- Always Test First: Before committing to a stain, test it on a scrap piece of the same red oak you’ll be staining.
- Apply a Complete Finish: Sand, clean, stain, and apply a topcoat to the test piece to see the final result.
- Observe in Different Lighting: View the stained sample in different lighting conditions (natural light, artificial light) to ensure you like the color in various settings.
Mastering the Red Oak Staining Process
The application technique is just as crucial as the stain color itself. Careful application ensures an even and beautiful finish.
Applying the Stain
- Choose Your Applicator: Use a natural bristle brush, foam brush, or lint-free cloth to apply the stain.
- Apply Evenly: Apply the stain in the direction of the grain, working in manageable sections.
- Allow Penetration: Let the stain penetrate the wood for the recommended time (specified on the stain can). Typically 5-15 minutes.
- Wipe Off Excess: Thoroughly wipe off any excess stain with a clean, lint-free cloth. Wiping against the grain is okay at this stage.
- Dry Completely: Allow the stain to dry completely according to the manufacturer’s instructions (usually 24-48 hours).
Addressing Uneven Stain Absorption (Blotching)
Red oak is prone to uneven stain absorption, also known as blotching, due to its porous grain. Here’s how to minimize this:
- Wood Conditioner: Apply a wood conditioner before staining. This helps to even out the wood’s absorbency. Follow the conditioner’s instructions carefully.
- Gel Stains: Consider using a gel stain. Gel stains sit on top of the wood surface rather than penetrating deeply, minimizing blotching. They also highlight grain patterns nicely.
- Diluted Stains: Diluting the stain with mineral spirits can help reduce its intensity and promote more even absorption. Test this method on a scrap piece first.
- Multiple Light Coats: Apply multiple thin coats of stain instead of one heavy coat. This provides better control over the color intensity and reduces blotching.
Sealing and Protecting Your Stained Red Oak
Once the stain is dry, sealing and protecting the wood is essential for durability and longevity.
Choosing the Right Topcoat
- Polyurethane: A durable, water-resistant option ideal for high-traffic areas. Available in oil-based and water-based formulas. Oil-based polyurethane tends to amber over time, adding warmth. Water-based is clearer.
- Lacquer: Dries quickly and provides a smooth finish, but is less durable than polyurethane.
- Varnish: Offers good durability and water resistance, but can be more difficult to apply.
Applying the Topcoat
- Lightly Sand Between Coats: After the first coat of topcoat is dry, lightly sand with a fine-grit sandpaper (320-400 grit) to remove any imperfections.
- Vacuum and Tack Cloth: Remove sanding dust before applying the next coat.
- Apply Thin, Even Coats: Apply thin, even coats of the topcoat, allowing each coat to dry completely before applying the next.
- Number of Coats: Apply at least two coats of topcoat for adequate protection, and three for surfaces that will see heavy use.
FAQs: Red Oak Staining Secrets
These frequently asked questions help clarify common issues when choosing colors for red oak staining.
What makes red oak staining different from staining other woods?
Red oak has prominent open pores and a warm, reddish undertone. This can influence the final color of the stain. Prepare your wood with a wood conditioner before staining! The larger pores tend to absorb more stain, which can sometimes lead to blotchiness if not properly prepared.
Which stain colors complement red oak’s natural undertones?
Colors that work well include those in the brown, amber, and gray families. They either enhance or neutralize the red. Darker colors also tend to work well, while lighter stains can sometimes appear pinkish or uneven on red oak.
How can I minimize blotchiness when staining red oak?
Using a wood conditioner or pre-stain wood conditioner is crucial. This helps seal the wood pores and ensures more even stain absorption. Apply the conditioner according to the manufacturer’s instructions before any red oak staining.
Can I achieve a modern look with red oak staining?
Yes! Gray stains and whitewash techniques are increasingly popular for modernizing red oak. Just be mindful of the red undertones possibly showing through with lighter colors, but a pre-stain conditioner will definitely help! Test your stain color on a hidden section of the wood first to ensure you like the result.
So, go ahead and experiment with those colors! With a little practice, you’ll be mastering red oak staining and creating beautiful finishes in no time. Happy staining!