Unlocking the secrets to successful plant propagation begins with understanding the often overlooked, yet crucial, node on plant. This small but mighty area, the point where leaves, stems, and aerial roots emerge, holds the key to creating new plants. Horticulturists frequently leverage their knowledge of these nodes to expand their collection via methods promoted by institutions like the Royal Horticultural Society. Specifically, understanding the role of auxin, a plant hormone concentrated at the node, is vital for root development during propagation. Techniques using tools from companies such as Fiskars, like sterilized pruning shears, ensure a clean cut just below the node, maximizing the chances of successful rooting. Mastering the art of identifying and utilizing the node on plant will empower you to propagate your favorite plants with confidence.
Unveiling the Power of Plant Nodes for Propagation
Unlock the secret to multiplying your plants and expanding your green oasis, all with a simple understanding of plant nodes! For any plant enthusiast, whether a seasoned gardener or a budding beginner, grasping the concept of plant nodes is absolutely essential. These seemingly insignificant points hold the key to successful plant propagation and contribute significantly to the overall health and vitality of your beloved plants.
What Exactly Is a Plant Node?
Imagine a plant’s stem as a roadmap. The nodes are like key intersections, marking the points where leaves, branches, and aerial roots emerge. These are not just passive connection points; they are active growth centers brimming with potential.
At each node lies meristematic tissue, a collection of undifferentiated cells capable of developing into new plant structures. It’s a plant’s hidden power source for regeneration and growth!
Think of them as tiny plant factories, ready to spring into action when given the right conditions. Understanding how to identify and utilize these nodes is the foundation of successful propagation.
Why Should You Care About Plant Nodes?
Understanding plant nodes empowers you to take control of your plant’s growth and health in several ways:
-
Propagation: Nodes are crucial for creating new plants from cuttings, offering a cost-effective way to expand your collection or share with friends.
-
Pruning: Knowing where nodes are helps you prune effectively, encouraging bushier growth and shaping your plants to your desired form.
-
Plant Health: Recognizing healthy vs. unhealthy nodes can alert you to potential problems early on, allowing for timely intervention.
Your Guide to Mastering Node-Based Propagation
This comprehensive guide is designed to equip you with the knowledge and skills necessary to harness the power of plant nodes. We’ll take you on a journey to:
- Identify nodes on various types of plants with confidence.
- Master propagation techniques, using nodes to create new plants through both water and soil methods.
- Achieve thriving plant growth by understanding the critical role nodes play in plant health and development.
Get ready to unlock the secrets of successful propagation and transform your home into a flourishing garden, all starting with a single node!
Decoding Plant Nodes: Anatomy and Identification
Now that we’ve established the importance of plant nodes and their potential for propagation, it’s time to get a closer look at these fascinating structures. Understanding their anatomy and how to identify them is key to successfully harnessing their power.
What is a Plant Node?
A plant node is more than just a bump on a stem. It’s a critical area where new growth originates.
Think of it as a plant’s command center for development. It dictates where leaves, stems, aerial roots, and even flowers will emerge.
Essentially, the node is the birthplace of a plant’s future.
The Node’s Role in Leaf and Stem Growth
At each node, you’ll find meristematic tissue. These are undifferentiated cells ready to transform into specialized plant parts.
When conditions are right, these cells differentiate and develop into new leaves, extending the plant’s reach for sunlight, or new stems, increasing its overall size and branching.
Nodes are not randomly placed. The spacing between them influences a plant’s growth habit, affecting its density and shape.
Connection to the Plant’s Vascular System
The node is also a crucial intersection point for the plant’s vascular system.
Xylem and phloem, the plant’s water and nutrient transport tissues, pass through the node, delivering the resources needed for new growth.
This direct connection to the vascular system ensures that developing leaves and stems receive the energy and hydration they need to thrive.
This connection is vital for successful propagation. When a cutting develops roots at a node, those roots quickly tap into the plant’s existing vascular network.
Where to Find Nodes: A Visual Guide
Identifying plant nodes can seem tricky at first. But with a little practice, you’ll soon be spotting them like a pro.
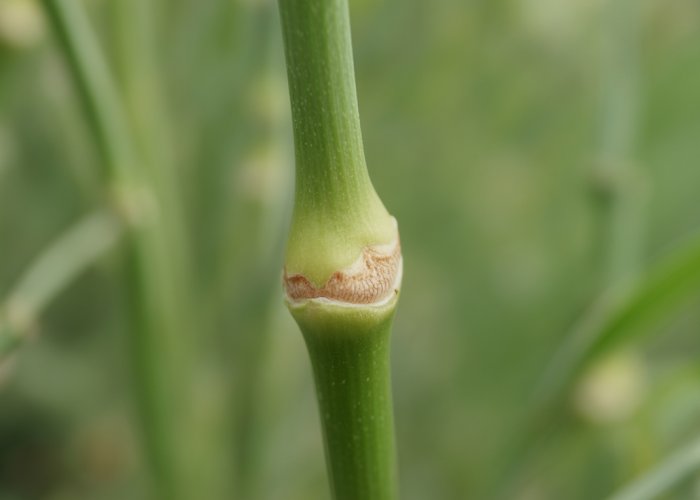
Look for slight swellings or rings around the stem. These often mark the point where a leaf or branch once was, or is currently growing.
The appearance and location of nodes can vary considerably. This depends on the plant species, its growth habit, and even its age.
Here are some examples to help you identify nodes on different types of plants:
-
Vining Plants: On vining plants like Pothos or Monstera, nodes are usually quite obvious. They appear as small bumps along the stem. Aerial roots often emerge from these nodes, ready to anchor the plant or absorb moisture.
-
Succulents: Succulent nodes can be more subtle. Look for slight indentations or scars where leaves were previously attached. These nodes can be activated to produce new growth.
-
Woody Stems: On woody stems, nodes are often marked by leaf scars. These are small, textured areas where leaves once connected to the stem. Buds, which will eventually develop into new branches, are also commonly found at nodes on woody plants.
Distinguishing Features
Sometimes, it can be challenging to differentiate nodes from other stem features. Here are some tips:
- Look for symmetrical pairs: Leaves and branches typically emerge in pairs or alternating patterns from nodes.
- Examine the texture: Nodes may have a slightly different texture than the surrounding stem. They may feel rougher or have a raised appearance.
- Observe the angle: Leaves and branches usually emerge from the stem at a distinct angle at the node.
By carefully observing these features, you can confidently identify plant nodes and unlock their potential for successful propagation.
This connection is vital for successful propagation. When a cutting develops roots at the node, it’s essentially tapping directly into the plant’s established transportation network. This gives the new plant a head start and increases its chances of survival.
Node-Based Propagation: The Art and Science
The magic truly happens when we leverage nodes for propagation. It’s a blend of understanding plant biology and applying practical techniques to encourage new life. Let’s delve into why nodes are so effective for creating new plants and explore the most common propagation methods.
Why Nodes Are Propagation Powerhouses
Nodes are not just points on a stem; they are biological goldmines for propagation. Their unique cellular composition makes them exceptionally suited for regenerating entire plants.
At each node resides meristematic tissue, a cluster of undifferentiated cells brimming with potential. These cells are essentially blank slates, capable of transforming into any type of plant tissue – roots, stems, or leaves.
This cellular plasticity is what allows a simple cutting to develop a complex root system and continue growing as an independent plant. The node provides the blueprint and the building blocks for this transformation.
Moreover, plants have a natural inclination to regenerate. When a stem is cut, the plant activates its repair mechanisms, focusing energy and resources on healing the wound and initiating new growth.
The presence of meristematic tissue at the node makes it the prime location for this regenerative process to occur, leading to the development of new roots and shoots.
Water Propagation: A Beginner’s Guide
Water propagation is a popular and straightforward method, ideal for beginners. It allows you to visually monitor root development and provides a readily available source of hydration.
Selecting Appropriate Cuttings
The key to successful water propagation is selecting healthy cuttings. Look for stems with at least one or two healthy nodes. The stem should be firm and free from signs of disease or damage.
Preparing the Cuttings
Careful preparation is crucial. Use clean, sharp scissors or pruning shears to make a clean cut just below a node.
Remove any leaves that would be submerged in water to prevent rotting. Rotting leaves can contaminate the water and hinder root development.
Best Practices for Water, Container, and Lighting
Use clean, filtered water for propagation. Tap water may contain chemicals that can inhibit root growth. Change the water every few days to keep it fresh and oxygenated.
Choose a clear glass or plastic container that allows you to observe root growth. The container should be narrow enough to support the cutting but wide enough to allow for root development.
Place the cutting in a location with bright, indirect light. Avoid direct sunlight, which can scorch the cutting and overheat the water.
Monitoring and Troubleshooting
Monitor the cutting regularly for root development. Roots typically appear within a few weeks.
If the water becomes cloudy or foul-smelling, change it immediately. If the cutting starts to rot, it may be too late to save it. Try taking a new cutting from a healthier part of the plant.
Soil Propagation: A Traditional Method
Soil propagation is another effective method, offering a more direct transition to the plant’s final growing medium.
Choosing the Right Soil Mix
Select a well-draining, sterile soil mix specifically designed for propagation. A mix of perlite and peat moss is a good option. Avoid using garden soil, which may contain pathogens that can harm the cutting.
Proper Planting Techniques
Dip the cut end of the stem in rooting hormone (optional, but recommended) and insert it into the soil mix, ensuring that at least one node is buried.
The depth of planting will depend on the size of the cutting and the plant species. Gently firm the soil around the cutting to provide support.
Maintaining Optimal Moisture and Humidity
Keep the soil consistently moist but not waterlogged. Overwatering can lead to rotting. Cover the cutting with a plastic bag or humidity dome to create a humid environment, which will help prevent the cutting from drying out.
Preventing Fungal Diseases
Fungal diseases are a common problem in soil propagation. To prevent them, use a sterile soil mix, provide good air circulation, and avoid overwatering.
If you notice signs of fungal infection, such as mold or mildew, treat the cutting with a fungicide.
Rooting Hormone: A Helping Hand
Rooting hormone can significantly increase the success rate of propagation, especially for plants that are difficult to root.
When and Why to Use It
Rooting hormone contains auxins, plant hormones that stimulate root development. It is particularly useful for woody cuttings or cuttings from plants that are slow to root.
Types of Rooting Hormone
Rooting hormone is available in several forms: powder, gel, and liquid. Powder is the most common and affordable option. Gel provides better coverage and adhesion. Liquid is typically used for soaking cuttings.
Proper Application Techniques
Moisten the cut end of the cutting and dip it into the rooting hormone. Tap off any excess powder.
Avoid getting rooting hormone on the leaves or stems, as it can cause damage. Use a separate container to pour out the rooting hormone needed, never dip the original container with the cuttings to prevent contamination.
The patient journey from a humble cutting to a thriving plant is a testament to the power of propagation. The development of roots signifies only the beginning.
The true art lies in the transition and the subsequent nurturing that transforms a fragile start into a resilient, flourishing plant.
From Cutting to Established Plant: Nurturing Your New Growth
The moment of transplanting a cutting is pivotal, akin to a graduation ceremony for your young plant.
But unlike a ceremony, it demands careful planning and execution to ensure a smooth transition.
Transplanting Your Cuttings
Timing is everything. Rushing the transplant can be detrimental, while delaying it can hinder optimal growth.
Knowing When to Transplant
The key is sufficient root development. Look for roots that are at least 1-2 inches long and show branching.
This indicates that the cutting can now support itself in soil. The cutting should also exhibit vigorous stem growth.
The Gentle Touch: Handling with Care
When removing the cutting from water, be exceedingly gentle.
The newly formed roots are delicate and easily damaged.
Gently tease the roots apart if they are tangled.
Avoid pulling or tearing them. A steady hand and patience are your best tools.
Choosing the Right Home: Pot and Drainage
Select a pot that is appropriately sized for the root system.
Too large of a pot can lead to excess moisture retention.
This increases the risk of root rot. Ensure that the pot has adequate drainage holes.
This is non-negotiable for healthy root development.
The Foundation: Selecting the Right Potting Mix
The potting mix is the foundation upon which your plant will build its life.
Do not skimp on quality.
Choose a well-draining mix that is specifically formulated for the type of plant you are growing.
A general-purpose mix often works well, but research specific plant needs.
For example, succulents require a fast-draining mix with added perlite or sand.
Ongoing Care for Thriving Plants
Transplanting is just the first step. Consistent and attentive care is essential for long-term health and vigor.
Light: The Fuel for Growth
Light is the energy source that drives photosynthesis.
Understanding your plant’s light requirements is crucial.
Some plants thrive in bright, direct sunlight. Others prefer filtered light or even shade.
Observe your plant closely.
If it is leggy or pale, it may not be receiving enough light. Scorched leaves indicate too much direct sun.
Water: The Elixir of Life
Water is essential for hydration and nutrient transport.
However, overwatering is a common mistake that can lead to root rot and other problems.
Allow the soil to dry slightly between waterings.
The frequency of watering will depend on the plant species, the pot size, and the environmental conditions.
Use your finger to test the soil moisture before watering.
Nutrients: The Building Blocks of Health
Like all living things, plants need nutrients to grow and thrive.
Fertilize your plants regularly during the growing season with a balanced fertilizer.
Follow the instructions on the fertilizer label carefully.
Over-fertilizing can be just as harmful as under-fertilizing.
Reduce or eliminate fertilization during the dormant season.
Creating the Ideal Environment: Humidity and Temperature
Consider the ideal temperature and humidity for your plants.
Most houseplants prefer temperatures between 65-75°F (18-24°C).
Avoid placing plants near drafts or heat sources.
Humidity can be increased by grouping plants together, using a humidifier, or placing pots on trays filled with pebbles and water.
Monitor your plants. Adjust environmental factors as needed.
Transplanting our precious cuttings marks a significant milestone, however, it does not always guarantee unwavering success. The journey of propagation, while rewarding, is not without its potential pitfalls. From the insidious threat of rot to the frustrating stagnation of growth, various challenges can arise, testing the patience and skills of even the most seasoned plant enthusiasts. Identifying these problems early and implementing effective solutions is crucial for maximizing your propagation success rate and ensuring the long-term health of your new plants.
Troubleshooting Propagation: Common Problems and Solutions
Even with meticulous care, propagation can sometimes present unexpected challenges. Recognizing these issues early is key to implementing effective solutions and saving your cuttings. This section will address common problems encountered during node-based propagation and provide practical advice to overcome them.
Common Propagation Problems
Several factors can derail your propagation efforts. Recognizing the symptoms and understanding the underlying causes are the first steps toward a successful recovery.
Rotting Cuttings: A Preventable Disaster
One of the most disheartening setbacks is the appearance of rot on your cuttings. This is usually indicated by a darkening or softening of the stem, often starting at the cut end or submerged portion.
Causes: Rot is primarily caused by bacterial or fungal infections, often exacerbated by poor sanitation, stagnant water, or overly humid conditions. Overwatering can lead to the propagation medium becoming waterlogged, creating an anaerobic environment conducive to rot.
Preventative Measures:
- Good sanitation is paramount. Always use sterilized tools (scissors, knives) to take cuttings. Clean propagation containers thoroughly before use.
- Ensure good air circulation around your cuttings to prevent moisture buildup. A small fan can be beneficial.
- Use fresh, clean water for water propagation, changing it every 1-2 days.
- Avoid overcrowding cuttings in the same container.
- Consider using a fungicide as a preventative measure, especially if you have a history of rot problems.
Slow Root Growth: Patience and Persistence
Sometimes, even with proper care, cuttings seem to take an extraordinarily long time to develop roots. This can be frustrating, but it doesn’t necessarily mean failure.
Potential Causes: Several factors can contribute to slow root growth.
- Inadequate light is a common culprit. Cuttings need sufficient light to photosynthesize and produce energy for root development.
- Low temperatures can significantly slow down metabolic processes. Maintain a warm environment, ideally between 65-75°F (18-24°C).
- Lack of nutrients in the propagation medium can also hinder growth. While cuttings don’t need heavy feeding, a very dilute solution of balanced fertilizer can sometimes help, especially after initial root formation.
- The plant species itself can be a factor. Some plants are simply slower to root than others.
- Using old or ineffective rooting hormone can also impede the process.
Solutions:
- Ensure cuttings receive bright, indirect light. Consider using a grow light if natural light is insufficient.
- Provide bottom heat using a heat mat designed for propagation.
- Be patient and avoid disturbing the cuttings too frequently.
- Refresh the water or propagation medium regularly.
- If necessary, reapply rooting hormone using a fresh batch.
Fungal Infections: A Silent Threat
Fungal infections can manifest in various ways, including white or gray mold on the soil surface, leaves, or stems. These infections can quickly spread and damage or kill your cuttings.
Identification and Treatment:
- Early detection is crucial. Regularly inspect your cuttings for any signs of mold or mildew.
- Improve air circulation around the cuttings.
- Reduce humidity if possible.
- Apply a suitable fungicide according to the product instructions. There are both chemical and organic options available.
- Remove and discard any heavily infected cuttings to prevent the spread of the disease.
- Ensure the potting mix is sterile to mitigate risk.
Transplant Shock: Minimizing Stress
Transplant shock occurs when a cutting experiences stress during or after being moved from its propagation environment to a new pot.
This can manifest as wilting, leaf drop, or stunted growth.
Minimizing Stress During Transplanting:
- Handle the roots gently to avoid damage.
- Maintain consistent moisture levels in the soil before and after transplanting.
- Provide shade for the first few days after transplanting to reduce stress.
- Avoid fertilizing immediately after transplanting.
- Use a rooting hormone when you transplant to encourage continued root growth.
- Acclimatize the cutting gradually to its new environment, increasing light and reducing humidity over several days.
Tips for Success
Beyond addressing specific problems, adopting proactive strategies can significantly increase your propagation success rate.
- Maintaining optimal environmental conditions: Consistent temperature, humidity, and light are crucial for successful propagation. Invest in tools like thermometers, hygrometers, and timers to monitor and control these factors.
- Regularly monitoring cuttings for signs of problems: Daily observation is key to catching problems early. Look for changes in leaf color, stem texture, and root development.
- Adjusting techniques based on plant species and environmental factors: Different plants have different needs. Research the specific requirements of the plants you are propagating and adjust your techniques accordingly. Consider factors like your local climate and the time of year. Experimentation is often necessary to find what works best for you.
Plant Node Secrets: FAQs
Hopefully, this clears up some common questions about plant nodes and propagation. Happy growing!
What exactly is a plant node?
A plant node is the point on a stem where leaves, buds, or aerial roots emerge. It’s essentially where new growth originates. Identifying the node on plant cuttings is crucial for successful propagation.
Why are plant nodes important for propagation?
Nodes contain meristematic tissue, which allows the plant to develop new roots and shoots. Without a node on plant cuttings, the cutting won’t be able to generate the necessary parts for a new plant.
How do I identify the best node for propagation?
Look for a healthy-looking node with a small bump or bud where a leaf once grew. Make sure the stem around the node on plant is also healthy and free of disease or damage.
Can I propagate a plant without a node?
Unfortunately, no. The node on plant cuttings is essential. Without it, there’s no source for new root and shoot development. The cutting will likely just rot.
So, there you have it – a peek into the power of the node on plant! Go on, take a closer look at your green friends and see what propagation possibilities you can unlock. Happy growing!