Effective painted wallpaper removal often starts with understanding the right tools; specifically, a good scoring tool and steamer can significantly ease the process. Steamers like those offered by Wagner Spray Tech, a recognized leader in DIY tools, are designed to penetrate the paint layers. Success in painted wallpaper removal also relies on proper preparation of the walls, which may involve consulting with professionals like those at the PDCA (Painting and Decorating Contractors of America) for advice on best practices. Techniques from experts such as Bob Vila can offer additional guidance for tackling stubborn spots. The goal is always to achieve damage-free removal.
Effective Article Layout: Painted Wallpaper Removal – Easy Steps & Expert Tips!
The following layout is designed to help readers effectively remove painted wallpaper using a combination of easy steps and expert tips. The structure prioritizes clarity and provides practical guidance at each stage of the process.
Introduction: Setting the Stage for Success
- Begin with a brief, engaging introduction that acknowledges the challenges of painted wallpaper removal.
- Emphasize that while challenging, it is a manageable DIY project.
- State the article’s purpose: to provide a comprehensive guide to effectively remove painted wallpaper.
- Include a short overview of what the reader can expect to learn (e.g., necessary tools, step-by-step instructions, safety precautions).
Preparing for the Project: Gathering Supplies & Assessing the Situation
Tools & Materials Checklist
Use a bulleted list or a simple table to clearly outline all necessary tools and materials. This allows readers to easily gather everything they need before starting.
- Scoring Tool: Wallpaper scoring tool or utility knife.
- Wallpaper Steamer or Spray Bottle: For applying moisture.
- Wallpaper Removal Solution: Commercially available solution or a mixture of hot water and dish soap.
- Putty Knife or Scraper: For lifting and removing wallpaper.
- Drop Cloths or Plastic Sheeting: To protect flooring and furniture.
- Painter’s Tape: To protect trim and adjacent surfaces.
- Sponges or Rags: For cleaning surfaces.
- Protective Gear: Gloves and eye protection.
- Trash Bags: For disposal.
Assessing the Wallpaper
Describe how to evaluate the type of wallpaper and the number of layers. This helps determine the best removal approach.
- Identifying Wallpaper Type: Is it paper-backed or vinyl? Vinyl is generally easier to remove.
- Number of Layers: More layers mean more effort and potentially different removal techniques. Try peeling a corner to gauge how many layers are present.
- Paint Type & Condition: Consider how many coats of paint are present and its condition. Multiple layers of paint make wallpaper removal significantly harder. Cracking or peeling paint might make scoring easier.
- Test Area: Crucially important: Emphasize the importance of testing a small, inconspicuous area first. This allows readers to experiment with different techniques and avoid damaging the wall.
Step-by-Step Removal Process: A Practical Guide
This section breaks down the removal process into clear, actionable steps.
-
Protecting the Area:
- Cover floors and furniture with drop cloths or plastic sheeting.
- Tape off trim and adjacent surfaces.
-
Scoring the Wallpaper:
- Explain the purpose of scoring: allowing moisture to penetrate the wallpaper.
- Demonstrate the proper technique: use a scoring tool to create perforations across the entire surface. Avoid applying too much pressure, which could damage the wall.
- If using a utility knife, emphasize the importance of light, controlled cuts.
-
Applying Moisture:
- Steaming: Describe how to use a wallpaper steamer, emphasizing safety precautions (e.g., avoiding burns).
- Spraying: Explain how to use a spray bottle with wallpaper removal solution or hot water/dish soap mixture. Apply liberally and allow it to soak for a specified time (e.g., 15-20 minutes).
- Alternating Methods: Indicate that some projects may benefit from a combination of both steaming and spraying, especially on difficult areas.
-
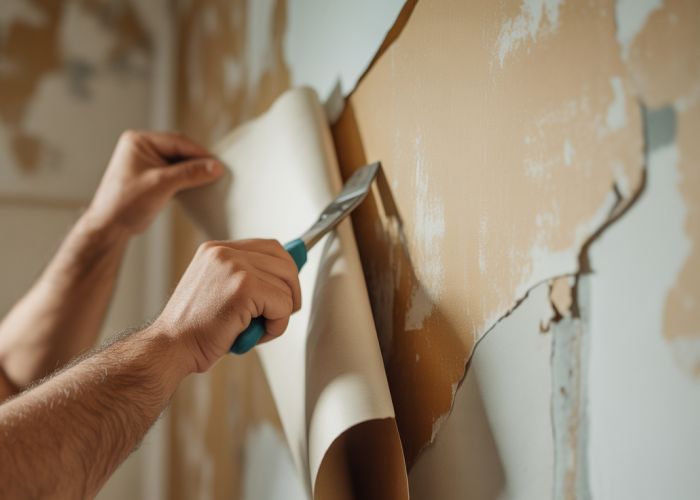
Peeling the Wallpaper:
- Using a putty knife or scraper, gently lift a corner of the wallpaper and begin peeling it away from the wall.
- Work slowly and carefully to avoid tearing the wallpaper into small pieces.
- Re-apply moisture as needed to loosen stubborn areas.
- Different peeling techniques: Mention the use of both pulling away from the wall at a low angle, and peeling back on itself to reduce tearing.
-
Removing Remaining Adhesive:
- After removing the wallpaper, adhesive residue may remain.
- Explain how to remove adhesive using a sponge, hot water, and dish soap.
- For stubborn adhesive, consider using a commercial adhesive remover.
- Rinse the wall thoroughly with clean water after removing the adhesive.
Expert Tips & Troubleshooting: Addressing Common Challenges
Dealing with Stubborn Wallpaper
Provide advice on how to tackle particularly difficult areas.
- Re-scoring: If the wallpaper is not coming off easily, try scoring it more thoroughly.
- Increased Moisture: Increase the soaking time or apply more moisture.
- Patience: Emphasize the importance of patience and avoiding excessive force, which can damage the wall.
- Specialized Solutions: Briefly mention professional-grade wallpaper removal solutions for extreme cases.
Preventing Wall Damage
Offer guidance on avoiding damage to the wall during removal.
- Gentle Scraping: Use a putty knife with rounded edges to avoid gouging the wall.
- Proper Moisture Levels: Avoid over-saturating the wall, which can weaken drywall.
- Testing: Reiterate the importance of testing in an inconspicuous area.
Safety Precautions
Highlight the importance of safety.
- Ventilation: Ensure adequate ventilation when using steamers or chemical solutions.
- Protective Gear: Wear gloves and eye protection to protect skin and eyes from chemicals and debris.
- Electrical Safety: Be cautious around electrical outlets and switches. Turn off the power to the room if necessary.
After the Removal: Preparing the Walls for Painting or New Wallpaper
- Cleaning: Thoroughly clean the walls to remove any remaining adhesive or residue.
- Repairing: Patch any holes or imperfections with spackle or drywall compound.
- Sanding: Sand the patched areas smooth.
- Priming: Apply a primer to seal the wall and create a good surface for paint or new wallpaper. Describe the best type of primer to use (e.g., stain-blocking primer).
Choosing the Right Wallpaper Removal Method
A table comparing different methods (Steaming, Spraying, Gel Solutions) based on:
| Method | Pros | Cons | Best For |
|---|---|---|---|
| Steaming | Effective, environmentally friendly (no chemicals) | Can be time-consuming, risk of burns, may damage certain wall surfaces if overused | Large areas, multiple layers of wallpaper |
| Spraying | Relatively quick, easy to apply | May not be effective on heavily painted wallpaper, requires ventilation | Lighter wallpaper, smaller areas |
| Gel Solutions | Sticks to vertical surfaces, good for targeted application | Can be expensive, requires careful application and removal | Stubborn areas, difficult-to-reach places |
FAQs: Painted Wallpaper Removal
Here are some frequently asked questions about removing painted wallpaper to help you achieve a smooth and successful project.
Will scoring the painted wallpaper always work?
Scoring painted wallpaper is crucial to allow the removal solution to penetrate, but it’s not a guaranteed fix on its own. Heavily painted or multiple layers of wallpaper might require more thorough scoring and multiple applications of the solution.
What’s the best type of removal solution for painted wallpaper?
A commercial wallpaper removal solution is typically best, especially if diluted according to the manufacturer’s instructions. You can also try a homemade solution of warm water and fabric softener, but it may not be as effective on heavily painted wallpaper.
How long should I let the removal solution soak on the painted wallpaper?
Allow the removal solution to soak for at least 15-20 minutes per application. This gives it ample time to loosen the adhesive and painted layers. For tougher painted wallpaper removal, you may need longer soak times or repeated applications.
What if the painted wallpaper is still difficult to remove after soaking?
If the painted wallpaper is stubbornly stuck, try using a steamer designed for wallpaper removal. The steam will help to further loosen the adhesive. Be patient and work in small sections to avoid damaging the wall beneath.
And that’s a wrap on painted wallpaper removal! Hopefully, you now feel ready to tackle that project. Go get ’em, and remember: patience is key! Good luck!