Selecting the right flooring for your home is a crucial decision, and medium hardwood floors offer a versatile and stylish option. Species such as Oak and Maple offer a wide range of natural tones perfect for medium hardwood floors. Installation methods, often employing techniques recommended by the National Wood Flooring Association (NWFA), directly impact the lifespan and performance of your flooring. Furthermore, coordinating the floor’s tone with your existing furniture, like a beautifully crafted dining table, elevates the overall aesthetic of your home. Understanding these factors is vital when deciding whether medium hardwood floors is right for you.
Hardwood flooring has reigned supreme in homes for centuries, a testament to its enduring beauty and inherent practicality.
From grand estates to cozy cottages, the warmth and character of real wood underfoot are universally cherished.
But within the vast spectrum of hardwood options, medium hardwood floors strike a particularly compelling balance.
They offer a sweet spot of versatility, complementing a wide range of design aesthetics while providing a welcoming and comfortable atmosphere.
This introductory section will explore the lasting appeal of hardwood, zeroing in on the unique advantages of medium-toned wood floors.
The Timeless Allure of Hardwood
The popularity of hardwood flooring stems from a multitude of factors.
Its natural beauty is undeniable, with each plank showcasing unique grain patterns and color variations.
This inherent individuality adds character and depth to any space.
Beyond aesthetics, hardwood is also incredibly durable and long-lasting.
With proper care, a hardwood floor can withstand decades of use, even generations, making it a wise investment for your home.
Moreover, hardwood contributes to a healthy indoor environment.
Unlike carpets, it doesn’t trap dust, allergens, or pet dander, making it an ideal choice for allergy sufferers.
Defining the Charm of Medium Hardwood
Medium hardwood floors occupy a unique position in the design world.
They are neither too light, which can sometimes feel stark, nor too dark, which can make a room appear smaller and more formal.
Instead, medium tones offer a warm, inviting ambiance that is both comfortable and sophisticated.
Think of the classic hues of oak or the rich amber tones of maple.
These colors create a backdrop that is both versatile and timeless.
Medium hardwood seamlessly integrates with various decorating styles, from traditional to contemporary, and everything in between.
Why Choose Medium Hardwood for Your Home?
Selecting the right flooring is a crucial decision that can significantly impact the overall look and feel of your home.
Medium hardwood offers a compelling combination of aesthetic appeal, durability, and versatility.
Its ability to complement a wide range of design styles ensures that your floors will remain stylish for years to come.
Moreover, medium tones tend to be more forgiving when it comes to dirt and scratches, making them a practical choice for busy households.
Ultimately, the best choice depends on your individual needs, preferences, and lifestyle.
This guide aims to equip you with the knowledge and resources necessary to make an informed decision.
A Comprehensive Guide to Medium Hardwood Floors
This guide provides comprehensive information on every aspect of medium hardwood flooring.
From selecting the perfect wood species and stain to understanding installation techniques and maintenance practices, we’ll cover everything you need to know to create the hardwood floor of your dreams.
Whether you’re a seasoned DIY enthusiast or a first-time homeowner, this resource will empower you to confidently navigate the world of medium hardwood and enjoy its enduring beauty for years to come.
We will explore the process of selecting, installing, maintaining, and thoroughly enjoying your medium hardwood floors for years to come.
Hardwood flooring has reigned supreme in homes for centuries, a testament to its enduring beauty and inherent practicality. From grand estates to cozy cottages, the warmth and character of real wood underfoot are universally cherished. But within the vast spectrum of hardwood options, medium hardwood floors strike a particularly compelling balance. They offer a sweet spot of versatility, complementing a wide range of design aesthetics while providing a welcoming and comfortable atmosphere. This introductory section explored the lasting appeal of hardwood, zeroing in on the unique advantages of medium-toned wood floors.
The question then becomes, what exactly defines a medium hardwood floor? It’s more than just a subjective feeling; it’s about understanding the nuances of color, tone, and how these elements contribute to a sense of timelessness in your home.
Understanding Medium Hardwood: Color, Tone, and Timelessness
Defining "medium hardwood" isn’t an exact science, but rather a spectrum. It sits comfortably between the extremes of light and dark, encompassing a range of hues that share certain characteristics.
Defining Medium: A Spectrum of Shades
At its core, medium hardwood refers to floors that aren’t overwhelmingly dark or strikingly light.
Instead, they occupy a middle ground, characterized by warm, natural tones that evoke a sense of balance and tranquility.
Think of honeyed oaks, warm maples, and subtle browns—these are the colors that typically fall into the "medium" category.
The specific color will vary depending on the wood species and finish, but the overall effect is one of warmth and approachability.
The Nuances of Tone
Beyond color, tone plays a crucial role in defining medium hardwood. Tone refers to the underlying warmth or coolness of a color.
Medium hardwoods tend to lean towards warmer tones, such as yellows, oranges, and reds.
These warm undertones contribute to the floor’s inviting and cozy feel, making a space feel instantly more welcoming.
However, some medium hardwoods may also feature neutral or slightly cooler tones, resulting in a more sophisticated and contemporary aesthetic.
Aesthetic Advantages: Versatility, Warmth, and Timelessness
Choosing medium-toned hardwood offers a wealth of aesthetic advantages.
Its versatility is perhaps its greatest strength.
Medium hardwoods seamlessly blend with a wide array of design styles, from traditional to modern, rustic to contemporary.
They provide a neutral backdrop that allows furniture and décor to take center stage, while still adding their own touch of warmth and character.
Furthermore, medium hardwood floors are incredibly welcoming. Their warm tones create a sense of comfort and relaxation, making a house feel like a home.
They are neither too stark nor too imposing, striking a perfect balance that is both inviting and sophisticated.
Timelessness: A Style that Endures
In a world of fleeting trends, medium hardwood floors offer a sense of timelessness.
They are a classic choice that transcends fashion fads, remaining stylish and relevant for years to come.
Unlike trendy colors or patterns that may quickly fall out of favor, medium hardwood offers a sense of enduring elegance.
This enduring appeal makes it a worthwhile investment for any homeowner seeking a floor that will stand the test of time.
Blending with Various Design Preferences
The adaptability of medium hardwood allows it to seamlessly integrate into different design schemes.
In traditional settings, it complements classic furniture and rich fabrics, adding warmth and character.
In modern spaces, it provides a grounding element that balances sleek lines and minimalist décor.
For rustic interiors, it enhances the natural and organic feel, creating a cozy and inviting atmosphere.
Ultimately, the beauty of medium hardwood lies in its ability to adapt and enhance any design vision, creating a space that is both stylish and timeless.
Popular Wood Species for Medium Hardwood Floors: Oak and Maple
Having established the inherent appeal and versatility of medium hardwood floors, the next step is understanding the specific wood species that best embody these qualities. Two of the most popular choices, consistently praised for their beauty, durability, and workability, are oak and maple. Let’s delve into the unique characteristics of each, exploring how their individual attributes contribute to the overall aesthetic and functionality of a medium-toned floor.
Exploring Oak: A Timeless Classic
Oak has long been a mainstay in hardwood flooring, cherished for its strength, distinctive grain patterns, and ability to accept a wide range of stains. Within the oak family, red oak and white oak stand out as the most commonly used varieties.
Red Oak vs. White Oak
Red oak is known for its reddish undertones and open grain pattern, which gives it a more textured and rustic appearance. It’s slightly softer than white oak but still offers excellent durability for residential use.
White oak, on the other hand, boasts a more subdued grain pattern and a slightly greenish-brown hue in its natural state. It’s denser and more water-resistant than red oak, making it a suitable choice for areas prone to moisture. The closed grain structure is a key differentiator.
Oak Grain Patterns
The grain pattern of oak flooring is a major factor in its visual appeal. Rift-sawn oak features a straight, linear grain, while quarter-sawn oak exhibits a more intricate and visually interesting pattern with medullary rays (sometimes called "flake"). Plain-sawn oak, the most common and affordable cut, displays a cathedral-like grain pattern.
The choice of grain pattern can significantly influence the overall aesthetic of the floor.
Staining Possibilities with Oak
One of the great advantages of oak is its ability to accept a wide range of stains, allowing you to customize the color to perfectly match your décor. From light and airy neutrals to rich, warm browns, oak can be transformed to achieve virtually any desired look.
The open grain of red oak tends to absorb stain more readily than white oak, resulting in a slightly darker and more pronounced color.
Examining Maple: Smooth and Modern
Maple is prized for its smooth, fine grain, and light color, which make it an excellent choice for contemporary and minimalist designs. Its understated elegance and clean lines offer a refreshing alternative to the more rustic charm of oak.
Maple’s Smooth Grain and Lighter Tones
Unlike the prominent grain patterns of oak, maple features a subtle, almost silky grain. This gives it a more uniform and refined appearance, creating a sense of spaciousness and calm.
The naturally light color of maple allows it to brighten up a room and complement a wide range of color palettes.
Maple’s Suitability for Modern Designs
Maple flooring is particularly well-suited for modern and contemporary interiors, where its clean lines and minimalist aesthetic can truly shine. It pairs beautifully with sleek furniture, stainless steel accents, and bold pops of color.
Maple’s subtle grain and light tone also make it a great choice for creating a Scandinavian-inspired look, emphasizing natural light and simplicity.
Having considered the spectrum of wood species available for your medium hardwood floors, the next crucial decision lies in choosing between prefinished and unfinished options. This choice impacts not only the installation process but also the final aesthetic and long-term maintenance of your flooring.
Choosing the Right Medium Hardwood: Prefinished vs. Unfinished
The decision between prefinished and unfinished hardwood flooring represents a significant fork in the road for any homeowner. Both options offer distinct advantages and disadvantages that cater to different priorities and project parameters. Understanding these differences is crucial to making an informed choice that aligns with your specific needs, budget, and aesthetic vision.
Prefinished Hardwood: Convenience and Consistency
Prefinished hardwood flooring, as the name suggests, arrives at your doorstep already sanded, stained, and sealed. This ready-to-install nature is perhaps its greatest strength.
Advantages of Prefinished Hardwood
- Faster Installation: Prefinished floors dramatically reduce installation time. Since the messy sanding and finishing processes are completed in a factory setting, you avoid the dust, fumes, and extended project timeline associated with unfinished floors.
- Consistent Finish: Factory finishing ensures a uniform and durable finish. Advanced application techniques and controlled environments result in a consistent look and a hard-wearing surface that is often more resistant to scratches and wear than site-applied finishes.
- Immediate Use: Once installed, prefinished floors are ready for immediate use. There’s no waiting period for the finish to cure, allowing you to move furniture and enjoy your new floors right away.
- Less Mess and Disruption: Eliminating on-site sanding and finishing significantly reduces mess and disruption. This is a major advantage for homeowners living in the space during renovation.
Disadvantages of Prefinished Hardwood
- Limited Customization: While a wide range of stains and finishes are available, prefinished floors offer less customization compared to unfinished options. You are limited to the manufacturer’s existing color palette.
- Beveled Edges: Many prefinished floors feature beveled edges, which can create a slightly grooved appearance. While some appreciate this look, others prefer the seamless surface of site-finished floors. These bevels can also trap dirt.
- Potential for Gaps: While less common with quality products and proper acclimation, prefinished floors can sometimes develop slight gaps between boards due to seasonal expansion and contraction.
- Repair Challenges: Spot repairs on prefinished floors can be challenging. Matching the exact color and finish can be difficult, potentially resulting in visible imperfections.
Unfinished Hardwood: Customization and Seamlessness
Unfinished hardwood flooring provides a blank canvas, allowing for complete customization of stain and finish. This option offers unparalleled control over the final look and feel of your floors.
Advantages of Unfinished Hardwood
- Unlimited Customization: Unfinished floors allow you to choose any stain color and finish you desire. This is ideal for matching existing décor or creating a truly unique and personalized look.
- Seamless Surface: Sanding and finishing on-site creates a perfectly smooth and seamless surface, eliminating the beveled edges often found in prefinished floors.
- Easier Repairs: Spot repairs are easier to blend seamlessly with the surrounding floor, as the entire surface is finished at once.
- Addresses Subfloor Imperfections: On-site sanding can help to level minor imperfections in the subfloor, resulting in a smoother and more even finished product.
Disadvantages of Unfinished Hardwood
- Longer Installation Time: The sanding, staining, and finishing processes significantly extend the installation timeline. This can be disruptive to your daily life and require careful planning.
- Mess and Fumes: On-site sanding creates a considerable amount of dust, requiring thorough preparation and cleanup. The application of stains and finishes can also produce strong fumes that require proper ventilation.
- Requires Expertise: Achieving a professional-quality finish requires expertise and specialized equipment. Hiring a skilled contractor is essential to avoid costly mistakes.
- Curing Time: After finishing, the floor requires a curing period before it can be fully used. This can range from a few days to a week or more, depending on the type of finish used.
Cost Considerations
The cost of prefinished versus unfinished hardwood flooring can vary depending on several factors, including the species of wood, the quality of the finish, and the complexity of the installation.
Generally, the material cost of unfinished hardwood is lower than prefinished. However, the added labor cost for sanding, staining, and finishing can make the overall project cost comparable, or even higher, than prefinished. DIY installation can save money, but experience and the right equipment are crucial for a successful outcome.
Making the Right Choice
Ultimately, the best choice between prefinished and unfinished hardwood flooring depends on your individual priorities.
-
Choose prefinished if you value convenience, speed, and a consistent, durable finish. This is an excellent option for those with busy lifestyles or those seeking a hassle-free installation process.
-
Opt for unfinished if you desire complete customization, a seamless surface, and are willing to invest the time and effort required for a more involved installation. This is the preferred choice for homeowners with specific design visions and those who appreciate the handcrafted look and feel of site-finished floors.
Having considered the spectrum of wood species available for your medium hardwood floors, the next crucial decision lies in choosing between prefinished and unfinished options. This choice impacts not only the installation process but also the final aesthetic and long-term maintenance of your flooring.
Stain and Finish: Achieving Your Desired Look and Protection
Beyond selecting the wood itself, the stain and finish you choose are paramount in defining the character and longevity of your medium hardwood floors. These aren’t merely cosmetic choices; they represent critical layers of protection and contribute significantly to the overall ambiance of your space.
The Art of Stain Selection
Stain is more than just color; it’s a means of enhancing the natural beauty of the wood grain, complementing your existing décor, and even subtly altering the perceived warmth or coolness of the room.
The right stain can transform a common oak floor into a statement piece that reflects your personal style.
Consider these factors when selecting a stain:
-
Matching Your Décor: Begin by assessing the existing color palette of your room. Consider the colors of your walls, furniture, and accent pieces.
- Do you want to create a harmonious blend or a striking contrast?
-
Understanding Undertones: Every stain has an undertone – warm (red, yellow, orange) or cool (blue, green, gray).
- Ensure the undertone complements the wood species and your overall design scheme.
- For example, a warm stain on red oak can amplify its natural warmth, while a cool stain can help neutralize it.
-
Sampling is Key: Never commit to a stain without testing it on a sample of your chosen hardwood.
- The same stain can appear drastically different on various wood species due to variations in grain and natural color.
- Apply the stain to a sample piece, let it dry completely, and then observe it in different lighting conditions.
-
Consider the Light: The amount of natural light in a room can dramatically affect how a stain appears.
- A dark stain might make a small, poorly lit room feel even smaller and darker.
- Lighter stains tend to brighten up spaces and enhance the feeling of openness.
The Vital Role of Finish
While stain dictates color, the finish provides the critical layer of protection against wear, moisture, and everyday damage. It also determines the sheen level, which significantly impacts the overall look and feel of your floors.
It’s important to note that the finish is not only for aesthetics but also offers protection.
Understanding Sheen Levels
Sheen refers to the amount of light reflected off the surface of your floor. Here’s a breakdown of common sheen levels:
-
Matte: Offers the least amount of shine, providing a natural, understated look. It’s excellent at concealing scratches and dirt, making it a practical choice for high-traffic areas.
-
Satin: A popular choice that strikes a balance between matte and semi-gloss. It offers a subtle sheen that enhances the wood’s natural beauty without being overly reflective.
-
Semi-Gloss: Provides a noticeable shine that reflects light well. It creates a brighter and more elegant look but can also highlight imperfections more easily.
-
Gloss: Offers the highest level of shine, creating a dramatic and luxurious appearance. However, it’s the least forgiving when it comes to scratches and dirt, requiring more frequent cleaning.
Types of Finishes and Their Benefits
-
Polyurethane: A durable and cost-effective option that provides excellent protection against scratches, stains, and water damage. Available in both oil-based and water-based formulations. Oil-based polyurethane tends to amber over time, adding warmth to the floor. Water-based polyurethane is more environmentally friendly and dries clear.
-
Moisture-Cured Urethane: The most durable finish available, typically used in commercial settings due to its high resistance to abrasion and chemicals.
-
Penetrating Oil Finishes: These finishes soak into the wood pores, hardening and protecting the wood from within. They create a natural look and feel and are easy to repair, but they offer less surface protection than polyurethane.
-
Water-Based Finishes: Low odor, fast drying, and environmentally friendlier. They’re less durable than oil-based options but are improving in quality and longevity.
The selection of the right finish is as important as the stain, impacting both the aesthetic and the lifespan of your hardwood floors. Consider your lifestyle, traffic, and desired level of maintenance when making your decision.
Stain and Finish: Achieving Your Desired Look and Protection
Beyond selecting the wood itself, the stain and finish you choose are paramount in defining the character and longevity of your medium hardwood floors. These aren’t merely cosmetic choices; they represent critical layers of protection and contribute significantly to the overall ambiance of your space.
Durability: Understanding the Janka Hardness Scale
After settling on aesthetics, it’s time to consider how your floors will hold up to the daily wear and tear of life. Choosing hardwood flooring is an investment, and understanding its durability is crucial to ensure you select a product that meets your needs for years to come.
The Janka Hardness Scale serves as an indispensable tool in this decision-making process.
What is the Janka Hardness Scale?
The Janka Hardness Scale measures the resistance of a wood sample to denting and wear. Specifically, it gauges the force required to embed a 0.444-inch steel ball to half its diameter into the wood.
The resulting value, measured in pounds-force (lbf), indicates the relative hardness of the wood. A higher Janka rating signifies a harder, more durable wood species.
This rating is not an absolute measure of overall performance but rather an indicator of its resistance to indentation.
Why is the Janka Hardness Scale Important?
The Janka Hardness Scale provides a standardized method for comparing the hardness of different wood species. This information empowers you to make informed decisions about the suitability of a particular wood for your specific needs and lifestyle.
If you have pets, children, or anticipate high foot traffic, selecting a harder wood species is highly recommended.
This can save you from premature wear and tear, excessive scratches, and costly repairs down the line.
Conversely, in low-traffic areas like bedrooms, a softer wood species may suffice and can offer unique aesthetic qualities.
Interpreting Janka Ratings: A Practical Guide
While the Janka scale provides a numerical value, understanding its practical implications is key. Here’s a general guideline:
- Below 1000 lbf: Softer woods, more susceptible to dents and scratches.
- 1000-1500 lbf: Medium hardness, suitable for average residential use.
- Above 1500 lbf: Harder woods, ideal for high-traffic areas and homes with pets or children.
Common Wood Species and Their Janka Ratings (Examples):
- Red Oak: ~1290 lbf
- White Oak: ~1360 lbf
- Maple (Hard): ~1450 lbf
- Brazilian Cherry (Jatoba): ~2350 lbf
- American Cherry: ~950 lbf
- Pine (Southern Yellow): ~870 lbf
Choosing a Species to Suit Your Lifestyle
Beyond the numbers, consider your specific lifestyle and the demands placed on your floors. Here’s how to connect the Janka rating to your everyday life:
Homes with Pets
Active dogs and cats can wreak havoc on floors. Opt for species with Janka ratings above 1300 lbf to resist scratches from claws. Consider options like Hard Maple, White Oak, or even more exotic hardwoods like Brazilian Cherry.
High-Traffic Areas
Entryways, hallways, and kitchens experience the most foot traffic. Durability is paramount in these zones. Select woods like White Oak or Maple with a rating of 1300 or higher.
Consider textured or distressed finishes, too, which can help camouflage minor scratches.
Low-Traffic Areas
Bedrooms and formal living rooms may not require the highest levels of durability. In these areas, you can explore softer species like American Cherry or Walnut, which offer distinct color and grain patterns.
Homes with Children
Kids can be tough on floors. Prioritize species with good dent resistance and a finish that can withstand regular cleaning. A minimum Janka rating of 1200 is advisable.
Beyond the Janka Rating: Other Factors to Consider
While the Janka rating is a valuable tool, it’s not the only factor determining the overall durability of your floor. Other aspects to consider include:
- Finish Quality: A high-quality finish provides a protective layer that significantly impacts scratch and stain resistance.
- Acclimation: Properly acclimating the wood to your home’s humidity levels before installation minimizes expansion and contraction, which can lead to stress and potential damage.
- Maintenance: Regular cleaning and preventive measures, such as using floor protectors under furniture, extend the life of your hardwood floors.
By considering the Janka Hardness Scale in conjunction with these other factors, you can select medium hardwood floors that not only look beautiful but also stand the test of time.
Cost Considerations: Material, Installation, and Long-Term Value
Choosing medium hardwood flooring represents a significant investment in your home. Understanding the various cost factors involved is crucial for making informed decisions and ensuring you receive optimal value for your money.
This section explores the key elements that contribute to the overall cost of medium hardwood floors, encompassing material expenses, installation fees, and the long-term benefits associated with this flooring choice.
Untangling Material Costs
The cost of the hardwood itself is a primary driver of the overall project expense. Several factors influence this aspect, including the species of wood and its grading.
Exotic species will generally command a higher price point than domestic options due to their scarcity and unique characteristics.
Species Selection and Price
The specific wood species you select significantly impacts the material cost. For instance, oak and maple, popular choices for medium hardwood, typically offer more affordable options compared to rarer woods like Brazilian Cherry or Walnut.
Researching the price ranges of different species will allow you to align your aesthetic preferences with your budget.
Grading and Quality
Hardwood flooring is graded based on its appearance, the presence of knots, variations in color, and other natural characteristics. Higher grades, such as "select" or "clear," possess a more uniform appearance and fewer imperfections, resulting in a premium price.
Conversely, lower grades, such as "common" or "rustic," will exhibit more character and color variation, making them a more cost-effective alternative.
Choosing a grade that balances visual appeal and cost is important.
Understanding Installation Costs
Beyond the cost of the materials, installation represents a substantial portion of the overall expense. These costs can vary significantly depending on factors such as the complexity of the project, the size of the area to be covered, and whether you opt for DIY or professional installation.
Subfloor Preparation
Prior to installing the hardwood, ensuring the subfloor is level, clean, and dry is crucial. Additional work may be required to prepare the subfloor, adding to the total installation cost.
This can include leveling uneven surfaces or repairing damage, all of which contribute to labor and material costs.
Labor Costs
If opting for professional installation, labor costs will depend on the contractor’s rates and the complexity of the job.
Intricate patterns or installations in challenging spaces will naturally require more time and expertise, resulting in higher labor charges. Obtain multiple quotes from reputable contractors to ensure competitive pricing.
Long-Term Value and Return on Investment
While the initial cost of medium hardwood flooring may seem substantial, it’s crucial to consider the long-term value and return on investment.
Hardwood floors are renowned for their durability and longevity, often lasting for decades with proper care. This longevity can potentially eliminate the need for frequent replacements, making it a cost-effective choice over time.
Increased Home Value
High-quality hardwood flooring can significantly increase your home’s resale value. Potential buyers are often drawn to the timeless elegance and durability of hardwood floors, making them a desirable feature that can command a higher selling price.
Reduced Allergen and Cleaning Costs
Hardwood floors also offer practical benefits that translate into cost savings. They are easier to clean than carpets and do not trap allergens, reducing the need for frequent professional cleaning or allergy treatments.
This makes hardwood a healthier and more economical flooring option in the long run.
By carefully considering these cost factors, homeowners can make informed decisions that align with their budget and aesthetic preferences, ultimately investing in a flooring option that provides lasting beauty, durability, and value.
Installation: DIY vs. Professional – Which is Right for You?
Choosing the right medium hardwood flooring is only half the battle. Proper installation is paramount to ensuring its longevity, beauty, and overall performance. A critical decision awaits: Should you tackle the installation yourself (DIY), or entrust the task to a professional? Both paths have their merits and drawbacks. Making the right choice hinges on your skill level, time commitment, budget, and tolerance for potential setbacks.
Weighing the Pros and Cons: DIY vs. Professional Installation
The allure of DIY lies primarily in cost savings. Eliminating labor expenses can significantly reduce the overall project budget. Moreover, many homeowners find satisfaction in personally crafting their living spaces. However, DIY is not without its risks.
DIY Installation: The Allure of Savings and Satisfaction
Pros of DIY Installation:
-
Cost Savings: A major advantage, cutting out potentially hefty labor costs.
-
Personal Satisfaction: Many find joy in the hands-on process and the pride of a job well done.
-
Flexibility: You control the timeline and work at your own pace.
Cons of DIY Installation:
-
Time Commitment: Hardwood installation is time-consuming, often taking several days or even weeks.
-
Skill Requirement: Requires a good understanding of carpentry, measuring, and cutting. Mistakes can be costly.
-
Tool Investment: Specialized tools like flooring nailers, saws, and measuring devices can be expensive to purchase or rent.
-
Risk of Errors: Improper installation can lead to uneven floors, gaps, or other problems that can compromise the flooring’s integrity and appearance.
-
Warranty Issues: Some manufacturers may void warranties if the flooring is not professionally installed.
Professional Installation: Expertise and Assurance
Professional installation offers peace of mind, knowing that the job is being done correctly by experienced individuals. They bring the necessary tools, skills, and knowledge to handle any challenges that may arise.
Pros of Professional Installation:
-
Expertise: Professionals have the experience and knowledge to ensure proper installation.
-
Efficiency: Professionals work quickly and efficiently, minimizing disruption to your home.
-
Warranty Protection: Professional installation often ensures that the manufacturer’s warranty remains valid.
-
Quality Assurance: Reduces the risk of errors and ensures a high-quality finished product.
Cons of Professional Installation:
-
Cost: Labor costs can significantly increase the overall project expense.
-
Finding a Reputable Contractor: Requires careful research and due diligence.
Tools and Equipment Needed for DIY
If you decide to proceed with DIY installation, gathering the necessary tools and equipment is crucial. Here’s a list of essential items:
-
Measuring Tape: Accurate measurements are essential for proper cuts and alignment.
-
Moisture Meter: To ensure the subfloor and hardwood flooring are within acceptable moisture levels.
-
Circular Saw or Miter Saw: For making precise cuts.
-
Flooring Nailer or Stapler: To securely fasten the hardwood planks to the subfloor.
-
Rubber Mallet: To gently tap the planks into place without damaging them.
-
Pry Bar: For positioning the final rows of flooring.
-
Tapping Block: Used with the mallet to avoid damaging the flooring edges.
-
Safety Glasses and Hearing Protection: To protect yourself from dust and noise.
-
Dust Mask or Respirator: To prevent inhaling harmful particles.
-
Knee Pads: To provide comfort during extended periods of kneeling.
Finding a Reputable Professional Installation Contractor
If you opt for professional installation, selecting a qualified and reputable contractor is paramount.
-
Check Online Reviews: Sites like Yelp, Google Reviews, and Angie’s List can provide valuable insights.
-
Ask for Referrals: Seek recommendations from friends, family, or neighbors who have recently had flooring installed.
-
Verify Licensing and Insurance: Ensure the contractor is properly licensed and insured.
-
Obtain Multiple Quotes: Get quotes from several contractors to compare prices and services.
-
Review the Contract Carefully: Before signing, thoroughly review the contract, paying attention to the scope of work, payment terms, and warranty information.
Preparing Your Subfloor for Installation
Regardless of whether you choose DIY or professional installation, preparing the subfloor is a crucial step. A level, clean, and dry subfloor is essential for a successful hardwood flooring installation.
-
Inspect the Subfloor: Check for any signs of damage, such as cracks, rot, or moisture.
-
Clean the Subfloor: Remove all debris, dust, and dirt.
-
Level the Subfloor: Address any unevenness or imperfections with self-leveling compound or shims.
-
Ensure Proper Moisture Levels: Use a moisture meter to verify that both the subfloor and the hardwood flooring are within acceptable moisture ranges.
By carefully weighing the pros and cons of DIY versus professional installation, gathering the necessary tools or finding a reputable contractor, and properly preparing your subfloor, you can ensure a beautiful and long-lasting medium hardwood floor that enhances the value and appeal of your home.
Maintaining Your Medium Hardwood Floors: Cleaning and Prevention
Installing beautiful medium hardwood floors is an investment, but to safeguard that investment, proper maintenance is essential. Regular cleaning and preventative measures will extend the life of your floors and preserve their exquisite look for years to come. Neglecting maintenance can lead to scratches, dents, discoloration, and ultimately, costly repairs or replacement.
Regular Cleaning: A Proactive Approach
A consistent cleaning schedule is the cornerstone of hardwood floor maintenance. The frequency will depend on foot traffic and lifestyle factors, but a general guideline is to sweep or vacuum at least once a week, and mop every one to two weeks.
Recommended Cleaning Products and Techniques
-
Sweeping and Vacuuming: Use a soft-bristle broom or a vacuum cleaner with a felt or brush attachment specifically designed for hardwood floors. Avoid vacuums with beater bars, as these can scratch the surface. Always move in the direction of the wood grain.
-
Mopping: Opt for a microfiber mop and a pH-neutral hardwood floor cleaner. Never use excessive water, as it can seep into the seams and damage the wood. Wring out the mop thoroughly, so it’s only damp, not wet. Avoid harsh chemicals, abrasive cleaners, and vinegar, as they can dull the finish or strip away protective coatings.
-
Spot Cleaning: Clean spills immediately with a soft, damp cloth. For sticky messes, use a recommended hardwood floor cleaner. Avoid letting spills sit for extended periods, as they can stain the wood or damage the finish.
Preventing Scratches and Dents: A Shield Against Damage
Prevention is just as important as regular cleaning. By taking a few proactive steps, you can significantly reduce the risk of scratches, dents, and other damage.
Practical Prevention Strategies
-
Area Rugs and Mats: Place area rugs in high-traffic areas, such as entryways, hallways, and under furniture. Use mats at doorways to trap dirt and debris before they can be tracked onto the floors.
-
Furniture Protection: Attach felt pads to the legs of all furniture to prevent scratches when moving chairs or tables. Use wide furniture coasters under heavy items like sofas and bookcases to distribute weight and prevent dents.
-
Pet Care: Keep pets’ nails trimmed to minimize scratching. Provide designated scratching posts for cats. Clean up pet accidents immediately to prevent staining and odors.
-
Shoe Policy: Implement a "no shoes" policy or encourage the use of soft slippers indoors. High heels and other footwear can easily dent or scratch hardwood floors.
-
Proper Humidity Control: Maintain a consistent humidity level in your home, ideally between 30% and 50%. Extreme fluctuations in humidity can cause wood to expand or contract, leading to warping or cracking. Use a humidifier or dehumidifier as needed.
The Importance of Professional Advice
While these tips provide a solid foundation for maintaining your medium hardwood floors, it’s always a good idea to consult with a flooring professional for specific recommendations tailored to your particular flooring type and finish. They can offer valuable insights into the best cleaning products and techniques to use, as well as advice on how to address any specific concerns you may have.
Refinishing: Restoring Your Hardwood Floors to Their Former Glory
Even with diligent care, hardwood floors can show signs of wear and tear over time. Scratches accumulate, the finish dulls, and the overall appearance loses its luster. When regular cleaning and maintenance are no longer sufficient, refinishing becomes the key to breathing new life into your medium hardwood floors.
Recognizing the Need for Refinishing
Several telltale signs indicate that your hardwood floors are ready for refinishing. Obvious surface scratches and dents, especially those that penetrate the finish, are clear indicators. A worn or faded finish, often noticeable in high-traffic areas, is another sign.
If your floors have lost their sheen, appear dull, or have noticeable discoloration, refinishing is likely the best course of action.
Furthermore, if you’re looking to update the color of your floors to match a new décor, refinishing provides the perfect opportunity to apply a new stain.
The Refinishing Process: A Step-by-Step Overview
Refinishing hardwood floors is a multi-step process that requires careful execution. It involves sanding away the old finish and any surface imperfections, followed by applying a new stain and protective finish.
Preparation is Key
The first step involves preparing the room. All furniture must be removed, and the area should be thoroughly cleaned. Cover any fixtures or areas that you don’t want to get dust on.
Protecting yourself is also paramount. Use safety glasses and a respirator.
Sanding: Achieving a Smooth Surface
Sanding is the most critical part of the refinishing process. It removes the old finish, levels the floor, and prepares the surface for staining and finishing.
Start with a coarse-grit sandpaper to remove the existing finish and any imperfections. Progress to finer grits to smooth the surface, ensuring a uniform and even appearance.
Pay close attention to edges and corners, using an edge sander to reach areas the larger drum sander can’t. Vacuum dust frequently between each sanding pass.
Staining (Optional): Customizing the Color
Once the floor is sanded smooth, you have the option to apply a stain to change its color. This step is optional, but it can dramatically alter the look of your floors to better match your desired aesthetic.
Apply the stain evenly, following the manufacturer’s instructions. Allow the stain to dry completely before proceeding to the next step.
Applying the Finish: Protection and Sheen
The final step is applying a protective finish. This coat safeguards the wood from scratches, dents, and moisture while also determining the floor’s sheen level.
Choose a finish based on your desired level of durability and appearance (matte, satin, semi-gloss, or gloss). Apply multiple coats, allowing each coat to dry completely before applying the next. Lightly sand between coats to ensure a smooth, even surface.
Professional vs. DIY Refinishing: Making the Right Choice
Refinishing hardwood floors can be a DIY project, but it requires skill, patience, and the right equipment. Renting sanding equipment can be costly, and mistakes can be difficult to correct.
Professional refinishers have the experience and expertise to ensure a flawless finish, minimizing the risk of damage and maximizing the lifespan of your floors. While professional refinishing is more expensive, it can be a worthwhile investment for achieving optimal results.
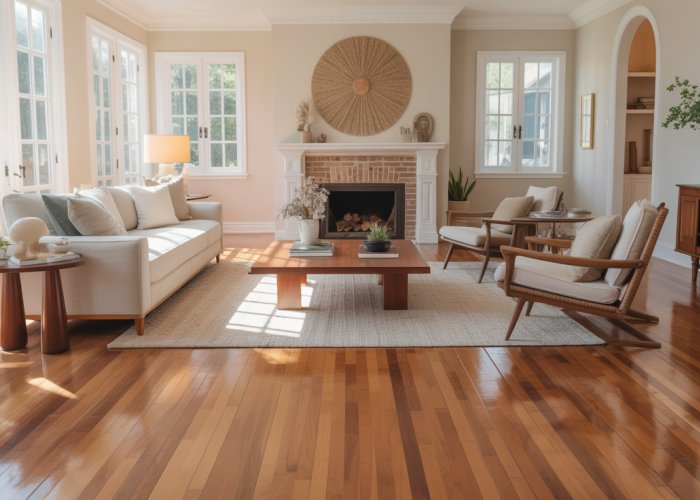
Design Inspiration: Medium Hardwood in Various Settings
Now that we’ve explored the practical aspects of medium hardwood floors – from selection and installation to maintenance and refinishing – let’s delve into the exciting world of design. Understanding how to integrate medium hardwood into various interior styles is key to unlocking its full potential and creating a truly harmonious living space.
The Versatility of Medium Hardwood: A Canvas for Creativity
Medium hardwood flooring acts as a versatile foundation for a multitude of interior design styles. Its inherent warmth and neutral tone allows it to seamlessly blend with both traditional and contemporary aesthetics. It offers a backdrop that enhances, rather than dictates, the overall design.
From the rustic charm of farmhouse to the sleek lines of modern minimalism, medium hardwood proves to be a remarkably adaptable choice.
Medium Hardwood in Classic and Traditional Styles
In traditional settings, medium hardwood floors exude a sense of timeless elegance.
Pair with rich, dark wood furniture, ornate detailing, and warm, inviting colors like deep reds, greens, and golds.
Think classic Persian rugs, antique furniture pieces, and intricate moldings.
The natural grain of the wood complements these elements, creating a cohesive and sophisticated look.
Consider a semi-gloss finish to enhance the wood’s natural luster.
Embracing Modern and Contemporary Aesthetics
Medium hardwood isn’t confined to traditional designs. Its adaptability shines in modern and contemporary spaces.
Opt for cleaner lines, minimalist furniture, and a neutral color palette with pops of vibrant accent colors.
The warmth of the wood softens the potentially stark feel of modern designs.
Lighter shades of medium hardwood, coupled with a matte finish, create a relaxed, understated elegance.
Consider pairing with metallic accents, such as stainless steel or brushed nickel, for a touch of contemporary flair.
Medium Hardwood in Farmhouse and Rustic Settings
For those drawn to the cozy and inviting charm of farmhouse or rustic styles, medium hardwood is an ideal choice.
Its natural imperfections and warm tones perfectly complement the raw, organic elements characteristic of these designs.
Think reclaimed wood furniture, exposed beams, and natural textures like linen and burlap.
Distressed finishes and wider planks can further enhance the rustic appeal.
Pair with comfortable, overstuffed seating and warm, earthy colors for a welcoming and relaxed atmosphere.
Highlighting Current Color Trends and Pairing Options
Staying up-to-date with current color trends is essential for creating a stylish and contemporary living space. Medium hardwood floors offer a neutral base that allows you to easily incorporate these trends without overwhelming the space.
Currently, warm and earthy tones are incredibly popular, reflecting a desire for comfort and connection to nature. Think shades of terracotta, olive green, and warm grays.
These colors pair beautifully with medium hardwood, creating a harmonious and inviting atmosphere.
Consider incorporating these colors through paint, upholstery, and accessories.
The Power of Contrast: Creating Visual Interest
Don’t be afraid to play with contrast when designing with medium hardwood floors.
Pairing lighter walls with darker furniture, or vice versa, can create visual interest and depth.
Consider using area rugs in contrasting colors or patterns to define different zones within a room.
Experiment with different textures to add another layer of visual appeal.
For example, pair smooth hardwood floors with a chunky knit throw or a velvet armchair.
Lighting: Illuminating the Beauty of Medium Hardwood
The right lighting can significantly enhance the beauty and warmth of medium hardwood floors.
Natural light is always ideal, but artificial lighting can also be used to create a desired mood and highlight specific features.
Consider using a combination of ambient, task, and accent lighting to create a layered and inviting space.
Warm-toned light bulbs can enhance the natural warmth of the wood, while cooler tones can create a more modern and sophisticated look.
Strategically placed spotlights can highlight the grain and texture of the flooring.
Beyond the Floor: Extending the Hardwood Aesthetic
Consider extending the medium hardwood aesthetic beyond the floor.
Hardwood can be incorporated into other elements of the room, such as wall paneling, furniture, or even decorative accessories.
This creates a sense of cohesion and unity within the space.
A hardwood accent wall can add warmth and texture to a room.
Hardwood shelves or coffee tables can complement the flooring and create a harmonious look.
Even small details, like hardwood picture frames or decorative bowls, can contribute to the overall aesthetic.
FAQs About Medium Hardwood Floors
Here are some frequently asked questions about medium hardwood floors to help you make the best decision for your home.
What are the advantages of choosing a medium shade for hardwood floors?
Medium hardwood floors offer a great balance. They’re lighter than dark floors, hiding dust and scratches better, but darker than light floors, providing warmth and sophistication. This makes them incredibly versatile and suitable for various design styles. They also complement a wide range of furniture and wall colors.
Are medium hardwood floors more prone to fading than other shades?
All hardwood floors are susceptible to fading from prolonged sun exposure. However, medium hardwood floors generally show fading less dramatically than darker stains. Using UV-protective window films and strategically placing rugs can help minimize any potential fading.
What are some popular wood species for medium hardwood floors?
Many wood species work well with medium stains. Oak (both red and white oak) is a classic choice due to its durability and grain pattern. Maple is another option, offering a smoother, more uniform look. Consider the hardness of the wood and its suitability for your lifestyle.
How do I clean and maintain medium hardwood floors to keep them looking their best?
Regular sweeping or vacuuming is crucial to remove dirt and debris. Use a wood floor cleaner specifically designed for hardwood and avoid harsh chemicals or excessive water. Promptly clean up spills to prevent staining or damage to your medium hardwood floors.
So, there you have it – your go-to guide on medium hardwood floors! Hopefully, this helps you make the best choice for your space. Good luck, and happy flooring!