Achieving a flawless finish with maple wood stain is within your reach, and this guide will show you how. Minwax, a leading organization in wood finishing products, offers a variety of maple wood stain options known for their quality. Proper surface preparation is crucial, so understanding techniques like sanding ensures the maple wood stain adheres correctly. A high-quality brush significantly impacts the final outcome, as it allows for even application of the maple wood stain. With the right knowledge and tools, your maple wood stain project will be a resounding success!
Unlocking the Beauty of Stained Maple: A Comprehensive Guide
Maple. The very word conjures images of graceful trees, flowing sap, and, for woodworkers, a canvas of unparalleled potential. Its light, creamy color and fine grain make it a favorite for furniture, cabinetry, and countless other projects.
Yet, this very beauty can be deceptive. Staining maple evenly presents a unique challenge, a hurdle that has frustrated many a woodworker.
Maple’s density and tight grain often lead to blotchy, uneven stain absorption, turning a dream finish into a disheartening mess. But fear not! Achieving a professional-looking, flawlessly stained maple surface is within your reach.
This isn’t just another article offering vague tips.
We’re diving deep into a step-by-step, guaranteed method, meticulously crafted to tame maple’s inherent quirks and unlock its true potential.
The Allure and Challenge of Maple
Maple wood possesses a distinctive aesthetic appeal. Its natural luminosity reflects light beautifully, creating a sense of warmth and spaciousness.
From sleek, modern designs to classic, rustic pieces, maple adapts effortlessly, offering a versatile foundation for any style.
However, its closed-pore structure, while contributing to its hardness and durability, is also the source of its staining woes.
Unlike more porous woods that readily soak up stain, maple resists penetration.
This resistance leads to uneven absorption, resulting in unsightly blotches and an overall unprofessional appearance.
A Guaranteed Method for a Perfect Stain
The key to success lies not just in applying stain, but in understanding how maple interacts with it.
This guide unveils the secrets to achieving a consistent, even stain, regardless of your experience level.
We’ll break down each step, from meticulous preparation to the final topcoat, ensuring you have the knowledge and confidence to tackle your maple project head-on.
Your Roadmap to Success: A Thesis Statement
This guide provides a complete approach to staining maple, from surface preparation to stain and topcoat application, ensuring a professional, beautiful, and lasting result.
We’ll equip you with the right techniques, the necessary materials, and the crucial insights to transform your maple from a staining challenge into a stunning masterpiece.
Let’s embark on this journey together and unlock the true beauty hidden within your maple wood.
The previous section highlighted the inherent challenges of staining maple. We now shift our focus to understanding the wood itself, recognizing that this understanding is not just helpful, but absolutely essential for achieving a flawless finish.
Understanding Maple: The Key to Stain Success
Maple isn’t like other woods. To master staining it, we need to delve into its unique characteristics. This deeper knowledge underscores why meticulous preparation becomes non-negotiable. Let’s explore the particularities of this popular hardwood.
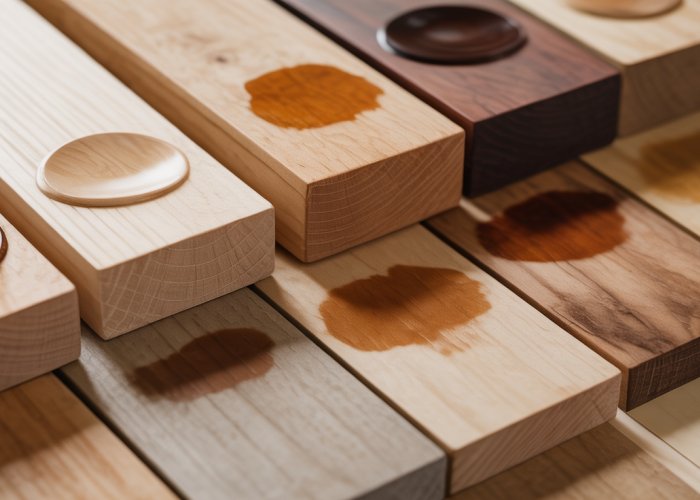
Decoding Maple’s Unique Properties
Maple’s appeal lies in its inherent beauty. Its tight grain, impressive hardness, and bright, light color contribute to its versatility and desirability in woodworking.
But these very qualities that make it attractive also contribute to the challenges in staining. Let’s examine each factor:
-
Tight Grain: Unlike open-pored woods like oak or ash, maple possesses a remarkably fine, closed grain structure.
This restricts the wood’s ability to readily absorb stain, leading to uneven penetration and the dreaded blotchiness.
-
Exceptional Hardness: Maple’s density gives it strength and durability, making it ideal for furniture and flooring.
However, this also makes it more resistant to stain absorption. The stain tends to sit on the surface rather than penetrating deeply.
-
Luminous Light Color: Maple’s pale, creamy hue is a blank canvas, ready to receive color.
However, any imperfections in the staining process are immediately apparent. There’s little room for error as unevenness stands out starkly against the light backdrop.
The Imperative of Preparation
Given these challenges, proper preparation isn’t just a suggestion. It is the cornerstone of a successful maple staining project.
Think of it as laying the groundwork for a flawless finish; without it, the end result is almost certain to be disappointing.
Skipping or skimping on preparation is a recipe for blotchiness, uneven color, and ultimately, frustration.
Meticulous sanding, appropriate use of pre-stain conditioners, and careful attention to detail are not optional extras. They are essential steps to unlocking maple’s true potential.
Remember, understanding maple is the first step. Meticulous preparation is the second, equally vital step. Together, they pave the way for a stunning, professional-looking finish.
The previous section highlighted the inherent challenges of staining maple. We now shift our focus to understanding the wood itself, recognizing that this understanding is not just helpful, but absolutely essential for achieving a flawless finish.
Gathering Your Arsenal: Essential Materials and Tools
Before even thinking about touching stain to wood, assembling the right tools and materials is paramount. This isn’t about skimping; it’s about investing in quality for a professional outcome. Using the right "arsenal" will set you up for success.
Let’s break down each essential item and its role in achieving that coveted even, rich stain on maple.
High-Quality Wood Stain: The Heart of the Matter
The stain is the star of the show, so choose wisely. There are several types available, each with its own characteristics.
Consider these factors: ease of use, drying time, and the final look you desire.
Oil-based stains are known for their rich color and longer working time, allowing for greater control during application.
However, they require mineral spirits for cleanup and can have a stronger odor.
Water-based stains are lower in VOCs (volatile organic compounds), making them a more environmentally friendly choice.
They also dry faster than oil-based stains and clean up with water. But, they can raise the wood grain, requiring extra sanding.
Gel stains are thicker and sit on top of the wood, making them a good option for vertical surfaces or when you want to minimize penetration.
They are also ideal for non-porous surfaces. Experimentation can reveal which type you prefer.
Pre-Stain Conditioner: The Blotchy Maple’s Kryptonite
Don’t even think about skipping this step! Pre-stain conditioner is absolutely crucial for preventing blotchiness on maple.
It works by partially sealing the wood pores, promoting more even stain absorption.
Think of it as creating a uniform canvas for the stain. Apply it generously and evenly, following the manufacturer’s instructions carefully.
Allow it to penetrate for the recommended time, and then thoroughly wipe off any excess.
This step alone can make a world of difference in the final result.
Sandpaper (Various Grits): Smoothness is Next to Godliness
Sanding is not just about making the wood smooth; it’s about preparing the surface to receive the stain.
Start with a coarser grit, such as 120, to remove any imperfections or previous finishes.
Then, gradually move to finer grits like 220 and 320 to create a silky-smooth surface.
Always sand with the grain to avoid scratches that will be magnified by the stain.
After each sanding, thoroughly remove the sanding dust with a tack cloth or vacuum.
This step is crucial for achieving a flawless finish.
Topcoat (Polyurethane, Lacquer, Varnish): Sealing in the Beauty
The topcoat is the final layer of protection, adding durability and enhancing the beauty of the stained wood.
Polyurethane is a popular choice for its durability and resistance to water and scratches, making it ideal for furniture and flooring.
Lacquer dries quickly and provides a smooth, glossy finish.
It is best suited for decorative items or surfaces that won’t see heavy use.
Varnish offers good protection and comes in a variety of sheens, from matte to gloss.
Choose a topcoat that is compatible with your chosen stain and project requirements.
Other Essential Supplies: The Supporting Cast
Don’t overlook these seemingly minor, but nonetheless vital, supplies:
- A tack cloth ensures a dust-free surface.
- Stir sticks are needed for proper stain mixing.
- Lint-free rags are essential for stain application and wipe-off.
- Gloves and safety glasses are non-negotiable for personal protection.
Having these items on hand will make the staining process smoother and safer. With the proper arsenal assembled, you’re well on your way to achieving a stunning stained maple finish.
The previous section highlighted the inherent challenges of staining maple. We now shift our focus to understanding the wood itself, recognizing that this understanding is not just helpful, but absolutely essential for achieving a flawless finish.
Step-by-Step: Achieving a Flawless Maple Stain
Now that we’ve laid the groundwork, it’s time to get our hands dirty. This section provides a detailed, step-by-step guide to staining maple wood, transforming it from a blank canvas into a piece with a rich, professional-looking finish.
Each step is crucial, and skipping or rushing can compromise the final result. Remember, patience and attention to detail are your allies in this process.
Step 1: Sanding – The Foundation of a Perfect Finish
Sanding is not just about making the wood smooth; it’s about preparing the surface to receive the stain evenly. This step is absolutely critical for preventing blotchiness and ensuring consistent color absorption.
-
Start with Coarser Grit: Begin with 120-grit sandpaper to remove any imperfections or existing finishes.
Always sand with the grain to avoid creating unsightly scratches that the stain will accentuate. -
Gradually Move to Finer Grit: Progress to 220-grit and then finally to 320-grit sandpaper.
Each step refines the surface, creating a progressively smoother texture.
Avoid skipping grits, as this can leave behind subtle scratches. -
Thoroughly Remove Sanding Dust: This is non-negotiable.
Use a tack cloth, vacuum cleaner with a soft brush attachment, or even a slightly damp (not wet!) rag to remove every trace of sanding dust.
Any remaining dust will interfere with the stain’s ability to penetrate the wood, leading to an uneven finish.
Step 2: Applying Pre-Stain Conditioner – Your Secret Weapon
Maple’s density can lead to uneven stain absorption.
Pre-stain conditioner is the key to overcoming this challenge.
It partially seals the wood pores, creating a more uniform surface for the stain to adhere to.
-
Apply Evenly: Using a brush, foam applicator, or lint-free rag, apply the pre-stain conditioner evenly across the entire surface of the wood.
Follow the manufacturer’s instructions regarding application technique and quantity. Avoid applying too much, which can prevent stain absorption altogether. -
Allow Penetration: Let the conditioner penetrate the wood for the recommended time (usually 5-15 minutes). This allows it to properly seal the pores.
-
Wipe Off Excess: After the penetration time, use a clean, lint-free rag to wipe off any excess conditioner.
This step is crucial to prevent a sticky or uneven finish. Make sure to wipe in the direction of the grain.
Step 3: Applying Wood Stain – Bringing Color to Life
This is where the magic happens!
Choosing the right stain color and applying it correctly will determine the final aesthetic of your project.
Choosing the Right Color: Color Variations
Selecting a stain color is a personal choice, but consider the overall aesthetic you’re aiming for. Sample stains on scrap pieces of maple (prepared identically to your project piece) to see how the color will look on the actual wood.
Remember that maple tends to lighten the color slightly, so you might want to go a shade darker than you initially intended.
Application Methods: Brushing, Wiping, and Spraying
-
Brushing: A brush is ideal for applying stain to detailed areas or intricate carvings. Use a high-quality brush with natural or synthetic bristles, depending on the type of stain you are using.
-
Wiping: Wiping stain on with a lint-free rag provides excellent control and is ideal for achieving a consistent color across large surfaces.
-
Spraying: Spraying offers the most even application, especially for large or complex pieces.
However, it requires specialized equipment and a well-ventilated space.
Whether you choose brushing, wiping, or spraying, practice on scrap wood.
Consider the pros and cons of each method to suit your needs. -
Apply Thin, Even Coats: Regardless of the application method, apply the stain in thin, even coats.
Avoid applying too much stain at once, as this can lead to blotchiness and uneven drying. -
Wipe Off Excess Stain: After allowing the stain to penetrate for the recommended time (usually a few minutes), use a clean, lint-free rag to wipe off any excess stain.
Wipe with the grain to avoid streaking. The longer you leave the stain on before wiping, the darker the color will be. Experiment on your scrap pieces to find the perfect timing.
Step 4: Drying and Curing – Patience is a Virtue
-
Drying Time: This step is often overlooked, but it’s essential for achieving a durable and beautiful finish.
Allow the stain to dry completely according to the manufacturer’s instructions.
Do not rush this process! -
Importance of Sufficient Drying Time: Insufficient drying time can lead to several problems, including a cloudy topcoat, adhesion issues, and a soft, easily damaged finish.
Step 5: Applying Topcoat – Protection and Enhancement
The topcoat protects the stained wood from scratches, moisture, and UV damage. It also enhances the beauty of the stain, adding depth and sheen.
-
Apply Thin, Even Coats: Use a high-quality brush, spray gun, or lint-free rag to apply the topcoat in thin, even coats.
Avoid applying too much topcoat at once, as this can lead to drips, runs, and bubbles. -
Lightly Sand Between Coats: After each coat of topcoat has dried completely, lightly sand the surface with 320-grit or higher sandpaper.
This will create a smooth, even surface for the next coat to adhere to.
Be sure to remove all sanding dust before applying the next coat.
Consider applying multiple thin coats for enhanced protection.
Beyond the Basics: Customizing Your Maple Finish
With a solid foundation in the fundamentals of maple staining, the door opens to a world of customization. This is where your creativity can truly flourish, allowing you to move beyond simply applying color and venture into crafting unique and personalized finishes. Let’s explore some advanced techniques that will empower you to achieve stunning aesthetic effects, overcome common challenges, and ultimately elevate your woodworking projects.
Emphasizing the Natural Beauty: Highlighting Wood Grain
Maple, while presenting staining challenges, possesses a subtle yet captivating grain pattern. Instead of fighting its nature, techniques exist to celebrate and amplify this inherent beauty.
Graining enhances the natural character of the wood. This transforms a simple surface into a visually striking feature.
The Art of Glazing
Glazing involves applying a thin layer of tinted finish over the base stain. This technique is particularly effective for accentuating the pores and grain patterns in maple.
The glaze settles into the recessed areas, creating depth and contrast. Experiment with different glaze colors to achieve subtle or dramatic effects.
Wire Brushing: Texture and Depth
For a more rustic and tactile finish, consider wire brushing. This technique removes the softer wood fibers, leaving the harder grain raised and prominent.
Always work with the grain and exercise caution to avoid excessive material removal. This technique adds dimension and character to your piece.
Dye Staining: Bringing Out the Best
Dye stains penetrate the wood more deeply and evenly than pigmented stains. When used strategically, dye stains can enhance the natural variations in maple’s grain.
This technique is particularly effective for creating a subtle, almost three-dimensional effect. Dyes allow you to showcase the inherent beauty of the wood.
The Alchemist’s Palette: Custom Color Mixing
Why settle for pre-packaged colors when you can create your own? Mixing stains is a fantastic way to achieve a truly unique hue that perfectly complements your vision.
This is where you can experiment and unlock a world of possibilities.
Understanding Color Theory Basics
Before diving in, a basic understanding of color theory is beneficial. Knowing how primary colors interact and how to adjust hues with tints and shades will prevent muddy or undesirable results.
Invest some time in color theory and understand how it applies to wood stains. This knowledge is very valuable as it allows to create predictable, reliable, and beautiful results.
Start Small, Experiment Safely
Always mix small batches of stain first and test them on scrap pieces of maple. Document your ratios and combinations so you can replicate your desired color.
This approach avoids wasting stain and allows you to fine-tune your formula. It is crucial to test stain and observe how it reacts on the surface of your project.
Layering Stains: Creating Depth and Complexity
Consider layering different stain colors to achieve a more complex and nuanced finish. Apply a lighter stain first, followed by a darker stain to highlight the grain.
This technique creates a sense of depth and dimension that a single stain color cannot achieve. Layering stains helps to create a unique sense of depth and interest.
Conquering Common Challenges: Troubleshooting
Even with meticulous preparation and technique, staining maple can sometimes present challenges. Let’s address some common problems and explore effective solutions.
Battling Blotchiness
Blotchiness is perhaps the most frustrating issue when staining maple. This can occur even when using a pre-stain conditioner.
If blotchiness persists, try applying a very thin coat of shellac as a sealer before staining. This provides an extra barrier against uneven stain absorption.
Uneven Color Absorption
Uneven color can happen if the wood wasn’t sanded uniformly, or the pre-stain conditioner wasn’t applied properly. Careful preparation is key.
Consider re-sanding the affected areas and re-applying the pre-stain conditioner before attempting to stain again.
The Bubble Trouble
Bubbles in the finish can occur if the stain is applied too thickly or if the wood is not properly sealed.
Ensure proper ventilation and apply thin, even coats of stain. If bubbles appear, gently brush them out with a clean, soft brush while the stain is still wet.
By embracing these advanced techniques and proactively addressing potential problems, you can transform your maple projects from ordinary to extraordinary. Don’t be afraid to experiment, explore, and let your creativity guide you!
Sealing the Deal: Long-Term Protection
With your chosen stain expertly applied, the final step – sealing – is what secures your hard work, offering lasting protection and enhancing the beauty of your maple piece. A sealant acts as a shield, defending against scratches, moisture, and the wear and tear of daily life. Selecting the right sealant and applying it correctly are crucial for preserving your project for years to come.
Choosing the Right Sealer: Matching the Product to the Project
The selection of your sealant should be dictated by the intended use and environment of your finished maple piece. There’s no one-size-fits-all solution; each type offers distinct advantages for specific applications.
Polyurethane: The Durable Workhorse
Polyurethane is known for its exceptional durability and resistance to water, chemicals, and abrasion. It’s an excellent choice for high-use surfaces like tabletops, countertops, and flooring. Polyurethane is available in both oil-based and water-based formulations. Oil-based polyurethanes offer a warmer tone and are typically more durable, while water-based options are lower in VOCs (volatile organic compounds) and dry faster.
Lacquer: The Fast-Drying Elegant Choice
Lacquer provides a smooth, elegant finish and is prized for its fast drying time. It’s a good option for decorative items, furniture, and projects where speed is essential. However, lacquer is less resistant to scratches and chemicals than polyurethane, making it less suitable for high-wear surfaces. It’s also important to note that lacquer fumes are highly flammable, requiring careful ventilation and safety precautions during application.
Varnish: The Traditional Protector
Varnish offers good protection against moisture and UV light, making it a suitable choice for both interior and exterior projects. Spar varnish, a specific type of varnish, is formulated to withstand the harsh marine environment, making it ideal for outdoor furniture or projects exposed to significant moisture. Varnish provides a traditional look and feel, often enhancing the natural warmth of the wood.
Other Options: Wax and Oil Finishes
While not technically sealants in the same vein as polyurethane or lacquer, wax and oil finishes can provide a degree of protection and enhance the wood’s natural beauty. These finishes are easy to apply and maintain but offer less durability than the film-forming sealants mentioned above. They are best suited for low-traffic items or projects where a natural, matte finish is desired.
Mastering the Application: Achieving a Flawless Seal
Proper application is just as important as choosing the right sealant.
Preparation is Key
Before applying any sealant, ensure that your stained maple surface is clean, dry, and free from dust or debris. Lightly sand with a fine-grit sandpaper (320 grit or higher) to create a smooth, even surface for the sealant to adhere to. Remove all sanding dust with a tack cloth.
Application Techniques
Apply the sealant in thin, even coats, following the manufacturer’s instructions. Use a high-quality brush, foam applicator, or spray gun, depending on the type of sealant and the size of your project. Avoid applying too much sealant at once, as this can lead to drips, runs, and uneven drying.
Sanding Between Coats
Lightly sanding between coats of sealant is crucial for achieving a smooth, professional finish. Use a fine-grit sandpaper (400 grit or higher) and gently sand the surface to remove any imperfections or dust nibs. Be careful not to sand through the sealant layer. Remove all sanding dust before applying the next coat.
Drying and Curing Times
Allow each coat of sealant to dry completely before applying the next. Follow the manufacturer’s recommended drying times. Keep in mind that drying times can be affected by temperature and humidity. After the final coat has dried, allow the sealant to fully cure before putting your project into use. Curing times can vary from several days to a few weeks, depending on the type of sealant.
Safety First
Always work in a well-ventilated area when applying sealants, especially those containing solvents. Wear appropriate safety gear, such as gloves and a respirator, to protect yourself from harmful fumes. Dispose of used rags and applicators properly, as some sealants are flammable.
Maple Wood Stain: Frequently Asked Questions
Here are some common questions about staining maple wood to help you achieve a perfect finish.
Why is staining maple wood so challenging?
Maple is a hardwood with tight, closed pores. This makes it difficult for maple wood stain to penetrate evenly, often resulting in blotchiness. Proper preparation is key to a uniform color.
What type of wood conditioner should I use before staining maple?
Use a pre-stain wood conditioner specifically designed for hardwoods. This helps to control the maple’s absorption rate, allowing the maple wood stain to soak in more evenly.
How many coats of stain should I apply to maple?
Typically, one coat of maple wood stain is sufficient if you’ve properly prepared the wood. Applying multiple coats can actually exacerbate blotchiness on maple, so start with a single, even coat.
How do I prevent blotching when staining maple wood?
Thorough sanding, using a pre-stain wood conditioner, and applying the maple wood stain in thin, even coats will significantly reduce the risk of blotching. Consider using a gel stain, as they tend to blotch less.
So, ready to give your project that perfect touch of maple wood stain? Go get ’em! We know you can do it.