The Kennedy classification rpd, a cornerstone in removable partial denture design, allows dentists to precisely categorize partially edentulous arches. Understanding this classification system is crucial for effective treatment planning. Applegate’s Rules refine the Kennedy classes and guide clinical decisions regarding support and retention. Different major connectors, such as lingual bars or palatal straps, are selected based on the specific Kennedy classification rpd and arch characteristics. Mastering this knowledge unlocks the ability to select the most appropriate design and deliver successful partial denture outcomes, thereby enhancing a patient’s occlusion and overall quality of life.
Kennedy RPD Class: Optimizing Article Layout for Clarity
The goal of an article targeting "kennedy classification rpd" and aiming to help readers "master it in minutes" is to provide a concise, clear, and readily understandable explanation of the Kennedy Classification system for removable partial dentures (RPDs). The layout should facilitate rapid learning and easy recall.
I. Introduction and Defining the "Kennedy Classification RPD"
This section serves to orient the reader and clearly define the key terms.
- Opening Statement: A brief, engaging statement highlighting the importance of understanding the Kennedy Classification in RPD design and communication. For example: "Accurately classifying a partially edentulous arch using the Kennedy system is fundamental to effective RPD design. This guide provides a clear and concise overview."
- What is the Kennedy Classification RPD? This subsection should define the "Kennedy Classification RPD" by:
- Explicitly stating that it’s a system used to classify partially edentulous arches.
- Briefly mentioning why this classification is important (e.g., facilitates communication, guides design principles).
- Visual Aid: Include a simple, illustrative diagram of a partially edentulous arch to visually represent the concept of missing teeth.
II. The Four Kennedy Classes Explained
This is the core of the article. The layout must facilitate easy differentiation between the classes.
- Heading: Clearly state "The Four Kennedy Classes".
- Introductory Paragraph: Briefly explain that there are four main classes based on the location of the edentulous areas relative to the remaining teeth.
-
Individual Class Sections: Each class should have its own dedicated section.
A. Kennedy Class I
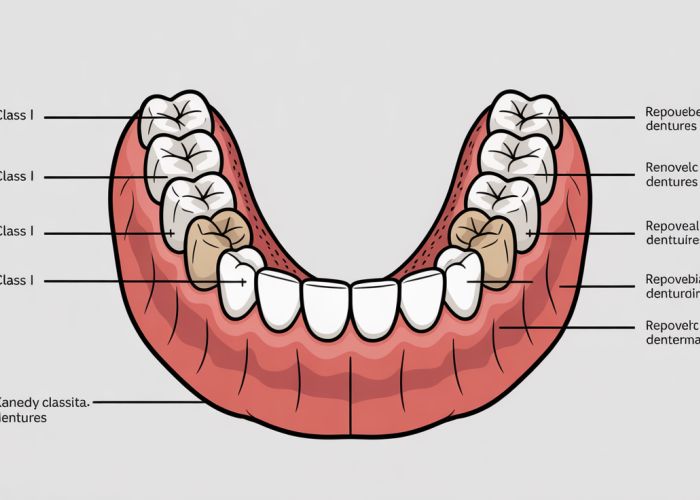
- Definition: A short, precise definition of Class I: "Bilateral edentulous areas located posterior to the remaining natural teeth."
- Visual Representation: A clear diagram showcasing a Kennedy Class I arch. The diagram should be simple and easy to interpret, using color or shading to emphasize the edentulous areas. Consider providing examples of multiple variations (e.g., long span, short span).
- Key Characteristics (Bullet Points):
- Bilateral edentulous areas are present.
- These areas are located posterior to the remaining teeth.
- (Optional) Mention that this class is often associated with a tooth-borne RPD design.
- Common Mistakes (Optional): A brief note on common errors in identifying this class, such as confusing it with Class II if the edentulous areas are nearly terminal.
B. Kennedy Class II
- Definition: A short, precise definition of Class II: "A unilateral edentulous area located posterior to the remaining natural teeth."
- Visual Representation: A clear diagram showcasing a Kennedy Class II arch. As with Class I, variations should be considered for visual representation.
- Key Characteristics (Bullet Points):
- Unilateral edentulous area is present.
- This area is located posterior to the remaining teeth.
- (Optional) Mention the potential for torque on the abutment teeth.
- Common Mistakes (Optional): Address common misidentifications, such as confusing it with Class III if the edentulous area is small and bounded by teeth.
C. Kennedy Class III
- Definition: A short, precise definition of Class III: "A unilateral edentulous area with teeth both anterior and posterior to it."
- Visual Representation: A clear diagram showcasing a Kennedy Class III arch.
- Key Characteristics (Bullet Points):
- Unilateral edentulous area is present.
- The edentulous area is bounded anteriorly and posteriorly by teeth.
- (Optional) Note the potential for a tooth-borne RPD design.
- Common Mistakes (Optional): Highlight the importance of proper abutment tooth assessment.
D. Kennedy Class IV
- Definition: A short, precise definition of Class IV: "A single, but bilateral (crossing the midline) edentulous area located anterior to the remaining natural teeth."
- Visual Representation: A clear diagram showcasing a Kennedy Class IV arch.
- Key Characteristics (Bullet Points):
- Edentulous area crosses the midline.
- Edentulous area is located anterior to the remaining teeth.
- (Optional) Highlight the aesthetic considerations in RPD design for this class.
- Common Mistakes (Optional): Emphasize that it must be the only edentulous area to be classified as Class IV.
III. Applegate’s Rules: Modifying Kennedy Classification
This section clarifies the modification concept.
-
Heading: Clearly state "Applegate’s Rules for Modifications".
-
Introduction: Explain that Applegate provided rules to further refine the Kennedy Classification by accounting for additional edentulous areas (modifications).
-
The Rules (Numbered List): Present the rules in a clear, numbered list format:
- Classification should be made after extractions.
- Missing third molars are not considered.
- Missing second molars are not considered if unopposed.
- The most posterior edentulous area always determines the classification.
- Edentulous areas other than those determining the classification are referred to as "modification spaces" or "modifications" and are designated by their number.
- The extent of the modification is not considered, only the number of additional edentulous areas.
- A Kennedy Class IV cannot have modifications.
-
Example: Provide a clear example illustrating the application of Applegate’s rules. For instance: "A patient has a Kennedy Class II arch with an additional edentulous area in the anterior. This would be classified as Kennedy Class II, Modification 1." A corresponding visual diagram would be beneficial.
IV. Quick Reference Chart: Consolidating the Information
This section provides a table for easy reference and rapid recall.
- Heading: Clearly state "Kennedy Classification RPD: Quick Reference Chart".
-
Table: Create a table summarizing each class with key features and a small representative image.
Class Definition Key Feature Image (Small Thumbnail) I Bilateral edentulous areas posterior to the remaining natural teeth. Bilateral posterior edentulous areas [Image of Class I] II Unilateral edentulous area posterior to the remaining natural teeth. Unilateral posterior edentulous area [Image of Class II] III Unilateral edentulous area with teeth both anterior and posterior to it. Bounded edentulous area [Image of Class III] IV Single, but bilateral, edentulous area located anterior to the remaining teeth. Anterior edentulous area crossing the midline (no other areas) [Image of Class IV] V. Practice Questions: Test Your Knowledge
Include a few practical questions to reinforce learning. Present a scenario or a diagram of an edentulous arch and ask the reader to classify it according to Kennedy’s system. Provide the answers at the end of the section.
Kennedy RPD Class: FAQs
Here are some frequently asked questions to help you master the Kennedy classification of removable partial dentures (RPDs).
What is the purpose of the Kennedy classification system?
The Kennedy classification is a widely used method to categorize partially edentulous arches. It helps dentists communicate clearly about the type of kennedy classification rpd being considered, which is vital for treatment planning and laboratory communication.
How does the Kennedy classification system work?
The system divides partially edentulous arches into four main classes based on the location of the edentulous areas relative to the remaining teeth. Further modifications are added to these classes to describe additional edentulous areas that don’t determine the primary class.
What are the four main Kennedy classes?
Class I features bilateral edentulous areas located posterior to the remaining natural teeth. Class II features a unilateral edentulous area located posterior to the remaining natural teeth. Class III features a unilateral edentulous area with teeth both anterior and posterior to it. Class IV features a single, but bilateral (crossing the midline) edentulous area located anterior to the remaining natural teeth.
How do you determine the Kennedy classification when multiple edentulous areas are present?
The most posterior edentulous area always determines the kennedy classification rpd class. Other edentulous areas are then noted as modifications to the main class (e.g., Class I, Modification 1).
Alright, that wraps up our dive into the Kennedy classification rpd! Hopefully, you now feel ready to tackle those cases with confidence. Keep practicing, and remember, a solid understanding of Kennedy classification rpd is your key to happy patients and predictable results. Good luck!