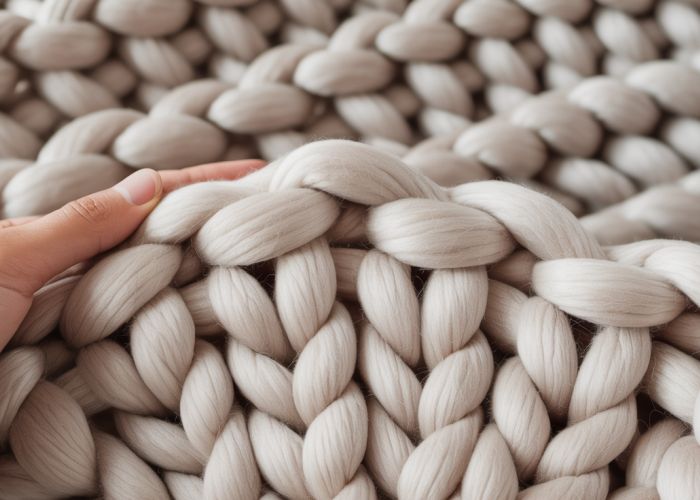
Comfort, a feeling often associated with home, can be handcrafted through skills like finger knitting. Yarn, the essential material for this craft, transforms readily into cozy creations. A beginner’s mind, willing to learn simple techniques, unlocks the potential for incredible projects. With just your hands and soft yarn, create a magnificent finger knitting blanket – it’s much easier than you think, and this guide will show you how!
Finger Knitting Blanket: The EASIEST How-To Guide! – The Perfect Article Layout
Let’s create the best article layout to teach anyone how to make a beautiful finger knitting blanket. This guide will break down each step in a clear, easy-to-follow way so even complete beginners can succeed!
Section 1: Introduction – Welcome to the World of Finger Knitting!
-
Purpose: This section serves to hook the reader and introduce the project in an exciting way. It will also address the reader’s potential hesitations and build confidence.
-
Content:
- Start with an enthusiastic greeting and highlight the simplicity of making a finger knitting blanket. "Welcome! Get ready to create your own cozy masterpiece! You won’t believe how easy it is to finger knit a blanket!"
- Briefly explain what finger knitting is and why it’s so beginner-friendly: "No needles required! Just your fingers and some chunky yarn!"
- Emphasize the benefits: Quick, relaxing, and creates a stunning, practical item.
- Address potential concerns: "Think you can’t knit? Think again! This technique is so simple, even kids can do it. We’ll guide you through every step."
- Include a captivating image of a finished finger knitting blanket to showcase the potential results.
Section 2: Gathering Your Supplies – Setting You Up for Success
-
Purpose: Clearly and concisely list all the necessary materials.
-
Content:
-
Start with a subheading: "What You’ll Need"
-
Use a bulleted list for clarity:
- Chunky Yarn: (Approximately X amount, depending on blanket size – we’ll cover sizing later) – Recommend specific yarn types known to be good for finger knitting, e.g., roving yarn, super bulky chenille yarn. Provide an approximate amount needed for common blanket sizes, e.g., "For a small throw blanket (30" x 50"), you’ll need approximately 6-8 skeins of super chunky yarn."
- Scissors: For cutting the yarn.
- Your Hands! The most important tool!
-
Add a brief note about yarn selection: "Choosing the right yarn is key! Look for super bulky or jumbo yarn, as this creates a beautiful, chunky texture and knits up quickly."
-
Section 3: Understanding the Basics – Preparing to Knit
-
Purpose: Lay the groundwork for the actual knitting process by explaining key terms and concepts.
-
Content:
3.1: What is a Loop?
- Explain what a "loop" is in the context of finger knitting, using clear and simple language. "A loop is simply a circle of yarn around your finger. It’s the building block of your finger knitting blanket!"
- Include a visual – a close-up photo or diagram showing a loop on a finger.
3.2: The Slip Knot – Getting Started
- Explain how to create a slip knot.
-
Provide step-by-step instructions with accompanying images:
- "Make a loop with your yarn." (Image showing the initial loop)
- "Reach through the loop and pull a strand of yarn through." (Image demonstrating pulling the yarn through)
- "Tighten the knot, but not too tight! You need to be able to slide it onto your finger." (Image of a completed slip knot on a finger).
Section 4: Step-by-Step Finger Knitting Instructions – The Heart of the Guide
-
Purpose: This is the most crucial section, providing detailed, easy-to-follow instructions for the entire finger knitting process.
-
Content:
4.1: Creating the First Row
- "Place the slip knot on your index finger of your non-dominant hand." (Image)
- "Hold the yarn tail with your dominant hand." (Image)
- "Wrap the yarn around your next finger (middle finger), going from back to front." (Image)
- "Continue wrapping the yarn around your remaining fingers (ring and pinky finger), always going from back to front." (Image showing yarn wrapped around all four fingers).
- "Now, with your dominant hand, pull the bottom loop on your index finger over the yarn and off your finger." (Image clearly showing this step).
- "Repeat this process for each finger, pulling the bottom loop over the yarn and off the finger." (Image series).
- "You now have one loop on each finger – congratulations, you’ve completed your first row!" (Image).
4.2: Knitting Subsequent Rows
- "With the loops still on your fingers, turn your hand over." (Image).
- "Wrap the yarn around your fingers again, just like you did in step 4.1 (back to front)." (Image).
- "Repeat the process of pulling the bottom loop over the yarn and off each finger." (Image series).
- "Keep knitting! Each time you wrap the yarn and pull the loops over, you’re creating a new row of your finger knitting blanket." (Image of several rows knitted).
4.3: Maintaining Tension
- "It’s important to keep consistent tension as you knit. Don’t pull too tight, or your finger knitting blanket will be stiff. Don’t pull too loose, or it will be floppy. Aim for a nice, even tension."
- Include a visual illustrating good and bad tension.
Section 5: Finishing Your Blanket – Securing Your Masterpiece
-
Purpose: To explain how to bind off the loops and secure the blanket to prevent unraveling.
-
Content:
5.1: Binding Off
- "Knit one row as normal, leaving one loop on each finger." (Image).
- "Take the loop from your pinky finger and place it onto your ring finger." (Image).
- "Pull the bottom loop (the original loop from your ring finger) over the new loop and off your finger." (Image).
- "Now you have one loop on your ring finger. Transfer it to your middle finger and repeat." (Image series).
- "Continue this process until you have one loop left on your index finger." (Image).
5.2: Securing the End
- "Cut the yarn, leaving a tail of about 12 inches." (Image).
- "Pull the yarn tail through the last loop." (Image).
- "Tighten the knot to secure it." (Image).
5.3: Weaving in the Ends
- "Use your fingers (or a large-eyed needle) to weave the yarn tail into the back of your finger knitting blanket, hiding the end securely." (Image showing how to weave in the ends).
- "Repeat this process with the yarn tail from the beginning slip knot."
- "Trim any excess yarn." (Image).
Section 6: Blanket Size and Yarn Requirements – Planning Your Project
-
Purpose: Provide guidelines for calculating the amount of yarn needed for different blanket sizes.
-
Content:
-
Use a table to clearly present the information:
Blanket Size Approximate Dimensions Estimated Yarn Needed (Super Bulky) Notes Baby Blanket 30" x 30" 4-5 skeins Perfect for cribs and strollers Lap Blanket/Small Throw 30" x 50" 6-8 skeins Ideal for snuggling on the couch Standard Throw 50" x 60" 10-12 skeins Great for beds and sofas Large Throw 60" x 80" 14-16 skeins Extra cozy! -
Add a disclaimer: "These are just estimates. The actual amount of yarn needed may vary depending on your tension and the specific yarn you use."
-
Section 7: Troubleshooting – Common Issues and Solutions
-
Purpose: To help readers overcome any challenges they may encounter while making their finger knitting blanket.
-
Content:
-
Use a question-and-answer format:
-
Q: My blanket is getting wider/narrower. What am I doing wrong?
- A: You might be accidentally adding or dropping loops. Carefully count your loops on each row to ensure you have the same number of loops on each finger.
-
Q: My blanket is too tight/loose.
- A: Adjust your tension. Try knitting a row a little looser or tighter to see what works best.
-
Q: My yarn keeps breaking.
- A: Some chunky yarns, especially roving yarns, are prone to breaking. Be gentle when pulling the loops over, and avoid excessive tension. Consider using a more durable yarn if breakage is a persistent problem.
-
-
Section 8: Care Instructions – Keeping Your Blanket Cozy
-
Purpose: Provide guidance on how to properly care for the finished finger knitting blanket.
-
Content:
- "Your finger knitting blanket is a delicate creation! To keep it looking its best, follow these care instructions:"
- Recommend gentle hand washing or spot cleaning.
- Advise against machine washing or drying, unless the yarn label specifically allows it.
- Explain how to reshape the blanket while it’s drying.
- Suggest storing the blanket folded or rolled up to prevent stretching.
This layout, with its clear instructions, supportive tone, and helpful visuals, will ensure that readers can confidently create their own beautiful finger knitting blanket!
FAQs About Finger Knitting Your Own Blanket
Here are some frequently asked questions to help you master the art of finger knitting a cozy blanket.
How much yarn do I need for a finger knitting blanket?
The amount of yarn needed depends on the desired size of your finger knitting blanket. A small throw might require around 6-8 skeins of super bulky yarn, while a larger blanket could need 10 or more. Always overestimate a bit to avoid running short mid-project.
What’s the best type of yarn for finger knitting a blanket?
Super bulky or jumbo yarn is ideal for finger knitting blankets. This thicker yarn creates large, soft stitches quickly, making the process faster and the finished blanket extra cozy. Look for yarns specifically designed for arm knitting, as these often work well for finger knitting too.
Can I wash a finger knitting blanket?
Washing depends on the yarn used. Always check the yarn label for care instructions. Many super bulky yarns are hand-wash only and require air drying to prevent felting or shrinking. Some synthetic yarns might be machine washable on a delicate cycle.
How long does it take to make a finger knitting blanket?
One of the best things about finger knitting a blanket is the speed. Depending on the blanket size and your experience, you can typically complete a finger knitting blanket in just a few hours. The ease of the technique contributes to the quick completion time.
So there you have it! You’ve officially conquered the basics of finger knitting a blanket. Now go get those fingers moving and make yourself something warm and wonderful. We can’t wait to see your cozy finger knitting blanket!