Achieving flawless results when drilling through marble requires a strategic approach, one that leverages expertise and precision. Marble, a metamorphic rock known for its beauty and delicate composition, demands the use of specialized diamond core bits, a tool designed to minimize chipping and cracking. Understanding the nuances of cooling techniques, such as constant water application, is crucial for managing heat and extending the life of your equipment. Furthermore, consulting resources from organizations like the Marble Institute of America (MIA) can provide invaluable insights into best practices for drilling through marble and ensuring the longevity of your projects.
Drilling Marble: The Pro’s Guide for Perfect Holes!
This guide provides detailed instructions for successfully drilling through marble, minimizing the risk of cracks, chips, and frustration. We’ll cover everything from choosing the right tools and bits to executing the perfect drilling technique.
Understanding Marble
Marble is a beautiful and durable material, but its crystalline structure makes it prone to chipping and cracking if not handled carefully. Proper technique and the right tools are essential for achieving clean, precise holes.
Marble’s Composition
Knowing the composition of marble helps understand why it reacts the way it does to drilling. Marble is primarily composed of calcite or dolomite crystals. These crystals, while strong, can fracture along their grain boundaries.
Common Issues When Drilling Marble
- Chipping: Fragments breaking away from the surface of the marble around the drilled hole.
- Cracking: Linear fractures radiating outwards from the hole.
- Bit Wander: The drill bit drifting from the intended drilling location.
- Overheating: Excessive heat build-up that can damage the marble and the drill bit.
Essential Tools and Materials
Using the right tools drastically increases your chances of success when drilling through marble.
Drill Types
- Cordless Drill/Driver: Suitable for smaller holes and general drilling tasks. Ensure it has variable speed settings.
- Corded Drill: Offers more power for larger holes or thicker marble slabs.
- Drill Press (Optional): Provides the most control and accuracy for precise drilling, particularly for repetitive tasks.
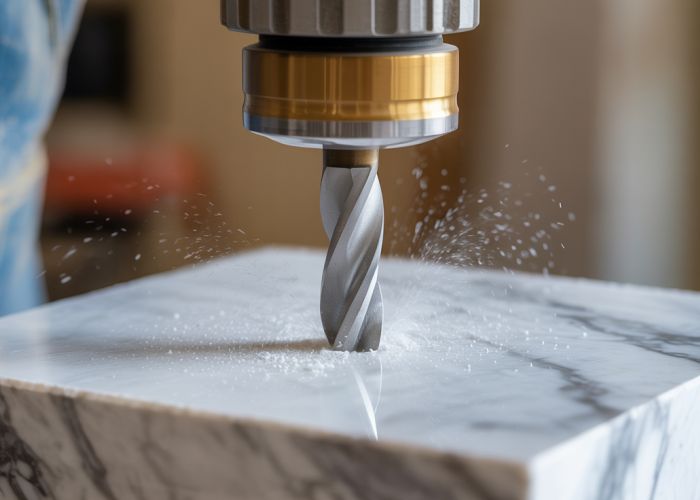
Drill Bits
The key to successful marble drilling lies in using the correct type of drill bit.
- Diamond Hole Saw: Ideal for creating larger diameter holes (e.g., for plumbing or electrical wiring).
- Diamond Core Bits: Similar to hole saws but often used for thicker materials and can be easily fitted to SDS drills for faster drilling speeds.
- Carbide-Tipped Drill Bits: Can be used for smaller holes, but require extremely slow speeds and constant cooling. Diamond bits are generally preferred.
-
Glass and Tile Drill Bits: Specialized bits designed for brittle materials; a viable option for smaller holes in thin marble tiles.
Drill Bit Type Best Use Pros Cons Diamond Hole Saw Large diameter holes Clean cuts, minimal chipping Can be expensive Diamond Core Bit Medium to Large diameter holes, thick slabs Faster drilling, durable Requires water cooling, can be aggressive if not controlled Carbide-Tipped Drill Bit Small holes (use as a last resort) Readily available, inexpensive Prone to chipping, requires very slow speed and constant cooling, short lifespan Glass and Tile Drill Bit Small holes in thin tiles Designed for brittle materials, relatively inexpensive Limited to smaller diameters, may not be durable enough for thicker marble
Safety Gear
Prioritizing safety is crucial.
- Safety Glasses: Protect your eyes from marble dust and debris.
- Dust Mask: Prevents inhalation of marble dust.
- Gloves: Provide a better grip and protect your hands.
- Hearing Protection (Optional): Especially important when using power tools for extended periods.
Other Essential Materials
- Water or Cutting Fluid: Essential for cooling the drill bit and lubricating the drilling process.
- Spray Bottle or Sponge: For applying water or cutting fluid.
- Clamps: Securely hold the marble in place during drilling.
- Painter’s Tape: Protects the surrounding marble surface from scratches and can help prevent chipping.
- Center Punch & Hammer: For creating a starting point and preventing bit wander (use gentle taps).
- Soft Cloths: For cleaning and wiping up spills.
Preparing to Drill
Careful preparation is key to a successful drilling experience.
Marking the Hole Location
- Measure and mark the exact location of the desired hole using a pencil or marker.
- Apply a layer of painter’s tape over the marked area to protect the surface from scratches and potential chipping.
- Use a center punch and hammer to create a small indentation at the marked point. This will provide a starting point for the drill bit and prevent it from wandering. Use very light taps.
Securing the Marble
- Place the marble on a stable, flat surface.
- Use clamps to firmly secure the marble to the work surface. Avoid over-tightening the clamps, as this could damage the marble. Use padding (e.g., soft cloths or rubber pads) between the clamps and the marble to prevent scratches or pressure points.
Setting Up Your Drill
- Insert the appropriate drill bit into the drill chuck and tighten it securely.
- Adjust the drill’s speed setting to the lowest possible speed. Marble requires slow and controlled drilling.
- If using a drill press, ensure the table is properly adjusted and the marble is securely clamped.
Drilling Techniques
Slow and steady wins the race when drilling through marble.
Starting the Hole
- Position the drill bit on the marked indentation.
- Apply gentle, consistent pressure. Let the drill bit do the work. Avoid forcing the bit.
- Start drilling at the slowest speed setting.
Maintaining Water/Cutting Fluid Application
- Continuously apply water or cutting fluid to the drilling area. This helps to cool the drill bit, lubricate the drilling process, and prevent overheating, which can damage the marble and the drill bit.
- Use a spray bottle or sponge to apply the water or cutting fluid directly to the drilling area.
- Ensure there is a continuous flow of coolant throughout the drilling process.
Drilling Through the Marble
- Maintain a slow and steady drilling speed.
- Apply consistent pressure, but avoid forcing the bit.
- As the drill bit begins to break through the other side of the marble, reduce the pressure slightly to minimize chipping on the exit side.
- If the bit starts to bind or overheat, stop drilling immediately and allow the bit and marble to cool down. Reapply water or cutting fluid and continue drilling at a slower speed.
Preventing Chipping on the Exit Side
- Backing Board: Place a piece of scrap wood or another piece of marble behind the marble being drilled to provide support and prevent chipping on the exit side.
- Slowing Down: Drastically reduce the pressure and speed as you near the exit.
- Flip the Marble: Once you’ve drilled partially through the marble, flip it over and continue drilling from the opposite side, aligning the holes carefully. This technique can minimize chipping on both sides.
Post-Drilling
Cleaning and inspecting the drilled hole.
Cleaning the Hole
- Carefully remove any marble dust or debris from the drilled hole using a soft brush or cloth.
- Wipe down the surrounding marble surface with a damp cloth.
Inspecting the Hole
- Carefully inspect the drilled hole for any cracks, chips, or imperfections.
- If necessary, use a fine-grit sandpaper to smooth out any rough edges.
Drilling Marble: Your FAQ Guide
Here are some frequently asked questions to help you achieve perfect holes when drilling marble.
Why is drilling marble considered difficult?
Marble is a relatively soft stone, making it prone to chipping and cracking. Drilling through marble requires a slow, steady approach with the correct tools and techniques to avoid damaging the material. Using excessive pressure or the wrong drill bit can easily ruin your project.
What type of drill bit is best for drilling through marble?
Diamond-tipped hole saws or diamond core drill bits are generally considered the best choice for drilling marble. They provide clean, precise holes without excessive chipping. Carbide-tipped drill bits can also work, but they may not last as long or produce as clean of a hole as a diamond bit.
What is the importance of water lubrication when drilling marble?
Water acts as a coolant, preventing the drill bit and marble from overheating. Overheating can lead to cracking and chipping. Additionally, water helps flush away debris, improving cutting efficiency and extending the life of the drill bit when drilling through marble.
How slow should I drill when making holes in marble?
Drilling speed is crucial. Start slowly and maintain a low RPM to avoid chipping. Applying too much pressure at a high speed can crack the marble. Be patient and let the drill bit do the work. Increase the speed gradually if necessary while carefully monitoring the cut, but never force it.
So, you’re armed with the knowledge to tackle drilling through marble like a pro! Now get out there, grab your drill, and make some beautiful holes (carefully, of course!). Happy drilling!