Achieving a stunning washed concrete finish yourself is more attainable than you might think! The aggregate exposure, a key characteristic of this technique, is directly influenced by the timing of the wash. Mastering this DIY project often involves selecting the right concrete mix, a crucial decision dependent on factors such as climate and desired aesthetic. While specialized tools and equipment, like a concrete mixer and pressure washer, can streamline the process, resourceful homeowners have found innovative ways to adapt common household items. With careful planning and the right approach, you can transform your outdoor spaces with a beautiful and durable washed concrete finish.
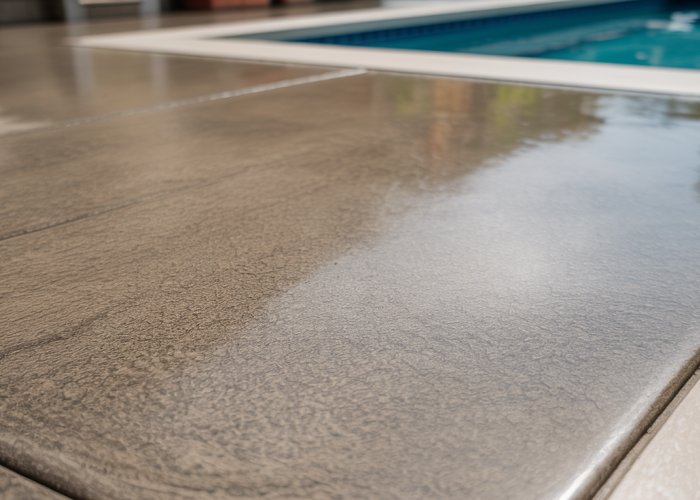
Washed concrete offers a unique blend of visual appeal and practical functionality, making it an increasingly popular choice for driveways, patios, walkways, and other exterior surfaces. Its textured surface, achieved by removing the top layer of cement paste to reveal the aggregate beneath, provides a distinct aesthetic that sets it apart from traditional concrete finishes.
More than just visually pleasing, washed concrete boasts exceptional durability and slip resistance, ensuring long-lasting performance and enhanced safety, especially in wet conditions. Its versatility allows it to complement a wide range of architectural styles and landscape designs.
The beauty of washed concrete extends beyond its aesthetic and functional qualities. For the dedicated DIYer, it presents an opportunity to create a professional-looking result with your own two hands, adding a touch of personal craftsmanship to your property. With careful planning, attention to detail, and the right techniques, achieving a stunning washed concrete finish is well within reach.
What is Washed Concrete?
Washed concrete is a decorative concrete finish where the surface cement paste is removed before it fully hardens.
This process exposes the underlying aggregate, which can be anything from small pebbles to larger stones, depending on the desired look.
The exposed aggregate creates a textured surface that is both visually interesting and slip-resistant. This distinguishes it from smoother, more conventional concrete finishes.
The Advantages of Washed Concrete
Washed concrete’s popularity stems from its distinct advantages over other surfacing options:
-
Durability: Washed concrete is incredibly durable and can withstand heavy foot traffic, vehicle weight, and harsh weather conditions. When properly installed and sealed, it can last for decades with minimal maintenance.
-
Safety: The textured surface provides excellent slip resistance, making it a safer option for walkways, patios, and pool decks, particularly in areas prone to moisture.
-
Aesthetics: Washed concrete offers a wide range of design possibilities. The choice of aggregate—from smooth river stones to crushed granite—allows for customization to complement any architectural style. Furthermore, the exposed aggregate adds a natural, organic touch that can enhance the overall visual appeal of your outdoor spaces.
Embrace the DIY Approach
Embarking on a DIY washed concrete project can be a rewarding experience. While it requires careful planning and execution, the satisfaction of creating a beautiful and functional surface yourself is unmatched. This guide will equip you with the knowledge and techniques needed to confidently tackle this project.
By taking a DIY approach, you gain complete control over the design and execution of your washed concrete project. This allows you to tailor the finish to your exact preferences and create a truly unique outdoor space. With dedication and the right guidance, you can achieve professional-quality results and transform your property with the timeless beauty of washed concrete.
Washed concrete offers a unique blend of visual appeal and practical functionality, making it an increasingly popular choice for driveways, patios, walkways, and other exterior surfaces. Its textured surface, achieved by removing the top layer of cement paste to reveal the aggregate beneath, provides a distinct aesthetic that sets it apart from traditional concrete finishes.
More than just visually pleasing, washed concrete boasts exceptional durability and slip resistance, ensuring long-lasting performance and enhanced safety, especially in wet conditions. Its versatility allows it to complement a wide range of architectural styles and landscape designs.
The beauty of washed concrete extends beyond its aesthetic and functional qualities. For the dedicated DIYer, it presents an opportunity to create a professional-looking result with your own two hands, adding a touch of personal craftsmanship to your property. With careful planning, attention to detail, and the right techniques, achieving a stunning washed concrete finish is well within reach.
What exactly is washed concrete, though, and what elements come together to create this distinctive surface? Let’s delve into the fundamental aspects that define this popular decorative concrete finish. Understanding these essentials is key to achieving a successful DIY washed concrete project.
Understanding the Essentials of Washed Concrete
To truly appreciate the artistry and durability of washed concrete, it’s important to understand its core components and how they interact. This isn’t just about mixing cement and water; it’s about creating a carefully balanced composition that yields a beautiful and long-lasting surface.
Washed Concrete Defined: More Than Just a Surface
Washed concrete is a decorative concrete finish achieved by carefully removing the surface cement paste before it fully hardens.
This crucial step exposes the underlying aggregate, revealing its natural color, texture, and shape.
The result is a unique, textured surface that offers both visual appeal and enhanced slip resistance compared to traditional concrete.
Think of it as a controlled unveiling, where the hidden beauty within the concrete mix is brought to the forefront.
The Aggregate: Nature’s Palette
The aggregate is the star of the show in washed concrete. It constitutes the bulk of the concrete mix and significantly influences the final aesthetic.
Aggregate refers to the particulate material within the concrete mix: sand, gravel, crushed stone, recycled concrete, or even decorative glass.
The size, color, and type of aggregate dramatically impact the appearance of the finished surface.
-
Size Matters: Larger aggregates create a bolder, more rustic look, while smaller aggregates provide a subtler, more refined finish.
-
Color Palette: The natural color of the aggregate determines the overall hue of the washed concrete. Consider the surrounding landscape and architectural style when selecting your aggregate.
-
Type Variety: From smooth river pebbles to angular crushed granite, the type of aggregate adds another layer of texture and visual interest.
Careful selection of the aggregate is paramount to achieving the desired aesthetic for your project. Experiment with different combinations to find the perfect blend that complements your design vision.
The Concrete Mix: The Foundation for Success
While the aggregate provides the visual character, the concrete mix provides the structural integrity and workability necessary for a successful washed concrete project.
The concrete mix is a blend of cement, water, and, of course, aggregate. The ratio of these components is critical for achieving the desired strength, workability, and finish.
Crucial Properties for a Washed Finish
-
Workability: The mix must be workable enough to pour, level, and consolidate properly.
A mix that is too stiff will be difficult to work with, while a mix that is too wet will be prone to segregation (separation of the aggregate from the cement paste).
-
Setting Time: The setting time must be carefully considered, as it determines the window of opportunity for the washing process. The mix must set slowly enough to allow for the removal of the surface paste, but quickly enough to prevent the aggregate from dislodging during washing.
-
Strength: The mix must provide sufficient strength to withstand traffic, weather, and other environmental factors. A well-proportioned mix ensures the longevity of your washed concrete surface.
By understanding the role of each component and how they interact, you can create a concrete mix that is perfectly tailored to your specific project. Paying close attention to these details will ensure a beautiful, durable, and long-lasting washed concrete finish.
Understanding the essentials gives you the knowledge, but translating that knowledge into a tangible project requires careful preparation. The success of your washed concrete finish hinges not only on technique but also on having the right materials and tools readily available. Proper preparation prevents poor performance.
Gathering Your Materials and Tools: Setting Up for Success
A successful washed concrete project demands meticulous preparation, and at the heart of this preparation lies the careful selection of materials and tools. This isn’t merely about gathering items; it’s about understanding the specific role each plays in achieving your desired aesthetic and ensuring the longevity of your finished surface. Let’s examine the essentials, from the concrete mix itself to the seemingly simple, yet crucial, brush.
Choosing the Right Concrete Mix
The foundation of any concrete project is, of course, the concrete mix itself. However, not all concrete mixes are created equal, especially when it comes to washed concrete. You’ll need to consider factors such as aggregate size, cement type, and the presence of additives.
-
Aggregate Size and Type: The aggregate you choose dramatically affects the final look. Larger aggregates create a bolder, more textured surface, while smaller aggregates offer a more subtle effect. Consider local availability, cost, and the overall aesthetic you’re aiming for. Local stone yards are your best friend here.
-
Cement Type: Type I/II Portland cement is generally suitable for most applications, offering a good balance of strength and workability. However, consider using a white cement for a brighter, more vibrant washed concrete finish, especially if using colored aggregates.
-
Mix Design Considerations: Pre-mixed concrete blends offer convenience and consistency. Look for mixes specifically designed for decorative concrete applications. Alternatively, you can create your own mix, carefully controlling the ratio of cement, aggregate, sand, and water. For DIY mixtures, ensure accurate measurement and thorough mixing for consistent results.
The Importance of a Retarder
A surface retarder is arguably the most crucial, and most often overlooked, ingredient in achieving the washed concrete look. This chemical compound slows down the hydration process of the cement paste on the surface of the concrete, allowing you to wash away the top layer and expose the aggregate while the underlying concrete hardens normally.
-
How Retarders Work: Retarders prevent the surface from hardening too quickly. This gives you the window of time needed to wash away the outer layer of cement paste.
-
Choosing the Right Retarder: Retarders are available in various strengths, dictating the depth of retardation. Select a retarder appropriate for the size of your aggregate. Always follow the manufacturer’s instructions carefully.
-
Application is Key: Apply the retarder evenly across the surface of the freshly poured concrete. Uneven application will result in inconsistent aggregate exposure.
The Underestimated Role of Water Quality
While often taken for granted, the quality of the water you use in your concrete mix and washing process can significantly impact the final outcome. Impurities in the water can affect the concrete’s setting time, strength, and even its color.
-
Potable Water is Best: Use clean, drinkable water for mixing and washing. Avoid using water from ponds, streams, or wells unless it has been tested and deemed suitable for concrete work.
-
Rinsing and Aggregate Clarity: Clean water is especially important for the washing process. It ensures you remove all the loosened cement paste and reveal the true color and texture of the aggregate.
Sealing for Protection and Longevity
Once the washed concrete surface has cured, applying a sealer is essential to protect it from the elements, stains, and abrasion. A good sealer will enhance the color of the aggregate, prevent water penetration, and make the surface easier to clean.
-
Choosing the Right Sealer: Acrylic sealers are a popular choice for washed concrete, offering good UV resistance and a natural-looking finish. Penetrating sealers, such as silane or siloxane, penetrate the concrete pores, providing excellent water repellency without altering the surface appearance.
-
Application Techniques: Apply the sealer according to the manufacturer’s instructions. Ensure the surface is clean and dry before application. Multiple thin coats are generally better than one thick coat.
The Right Brush for the Job
The type of brush you use to expose the aggregate is more important than you might think. A brush that is too soft will be ineffective at removing the cement paste, while a brush that is too stiff can damage the aggregate or leave unsightly scratches.
-
Stiff-Bristled Brushes are Key: A stiff-bristled nylon or synthetic brush is generally recommended. These brushes are abrasive enough to remove the cement paste without damaging the aggregate.
-
Brush Size and Shape: The size and shape of the brush will depend on the size of the area you are working on. A smaller brush is ideal for detailed work, while a larger brush is more efficient for larger surfaces. Power washers can also be used but may require practice.
-
Consider a Concrete Scrub Brush: Concrete scrub brushes offer a larger surface area and are specifically designed for removing stubborn materials from concrete. They are a worthwhile investment for larger projects.
Gathering the materials and tools sets the stage, but the real magic happens when you translate that preparation into action. The following steps will guide you through the entire process, transforming your vision into a tangible, beautiful washed concrete finish. Remember, patience and attention to detail are your allies in this endeavor.
Step-by-Step Guide: Achieving a Professional Washed Concrete Finish
Creating a washed concrete finish isn’t just about slapping down some concrete and hosing it off. It’s a carefully orchestrated process that demands attention to detail and adherence to best practices. From the initial groundwork to the final seal, each step plays a crucial role in achieving a professional and durable result. Let’s break down the process into manageable steps.
Preparation is Key
Like any successful construction project, the foundation of exceptional washed concrete lies in meticulous preparation. Rushing this stage can lead to costly mistakes and a compromised final product.
Preparing the Base
A stable and properly prepared base is essential for preventing cracking and ensuring the longevity of your washed concrete surface.
- Excavation: Begin by excavating the area to the desired depth, typically 4-6 inches, depending on the intended use and local building codes.
- Compaction: Thoroughly compact the soil using a plate compactor. This creates a solid foundation and prevents settling.
- Gravel Base: Add a layer of gravel, usually 4 inches thick, and compact it as well. The gravel provides drainage and further stabilizes the base.
- Formwork: Construct sturdy formwork using wood or metal to contain the concrete and define the shape of your finished surface. Ensure the forms are level and securely anchored.
- Reinforcement (Optional): For added strength and crack resistance, consider adding rebar or wire mesh reinforcement, especially for larger areas or heavy-duty applications.
Mixing the Concrete
Achieving the right concrete consistency is critical for a successful washed finish.
- Use the Right Ratio: Adhere to the concrete mix manufacturer’s recommended water-to-cement ratio. Adding too much water weakens the concrete.
- Mix Thoroughly: Use a concrete mixer or, for smaller batches, a mixing tub and shovel, to ensure the concrete is thoroughly mixed and homogenous.
- Consider Admixtures: Incorporate admixtures like air-entraining agents to improve workability and freeze-thaw resistance, especially in colder climates.
- Consistency is Key: The ideal consistency is similar to a thick oatmeal—workable but not too runny.
Pouring and Leveling
With the base prepared and the concrete mixed, it’s time to bring the vision to life. Pouring and leveling require a steady hand and a keen eye.
Pouring the Concrete
Pouring the concrete evenly and efficiently is crucial for a smooth and level surface.
- Pour in Sections: Pour the concrete in manageable sections, working your way across the entire area.
- Avoid Segregation: Pour from a low height to prevent the aggregate from separating from the cement paste.
- Work Quickly: Concrete begins to set relatively quickly, so work efficiently to ensure the entire area is poured before the initial set.
Using a Retarder
A surface retarder is what allows the aggregate to be exposed.
- Apply Evenly: Apply the surface retarder evenly over the freshly poured concrete, following the manufacturer’s instructions for application rate and coverage. The timing of the retarder application is critical; apply it immediately after screeding.
- Choose the Right Retarder: Select a retarder that is appropriate for the type of aggregate and the desired depth of exposure.
- Consider Environmental Factors: Temperature and humidity can affect the retarder’s performance. Adjust the application rate accordingly.
The Washing Process
This is where the magic happens, revealing the beauty hidden within the concrete.
Timing the Wash
Knowing when to wash is an important factor.
- Monitor the Concrete: Regularly check the concrete’s surface to determine when it has reached the optimal stage for washing.
- The "Thumb Test": A good indicator is when you can press your thumb into the surface and leave a slight indentation without the concrete being too soft or too hard. Do not wait until the concrete is fully cured or it will be too late to wash.
- Consider Environmental Factors: Hot weather accelerates the setting process, while cooler weather slows it down.
Exposing the Aggregate
The goal here is to wash away the top layer of cement paste, revealing the aggregate beneath.
- Use a Garden Hose: Use a garden hose with a spray nozzle to gently wash away the surface cement paste.
- Start with Low Pressure: Begin with low pressure to avoid dislodging the aggregate.
- Work in Sections: Wash in small, manageable sections, working your way across the entire surface.
- Use a Brush: Use a soft-bristled brush to help remove any stubborn cement paste and expose the aggregate evenly.
Rinsing the Surface
Rinsing ensures the aggregate is clean and free of debris.
- Rinse Thoroughly: Rinse the entire surface thoroughly to remove any remaining cement paste and debris.
- Check for Uniformity: Inspect the washed surface to ensure the aggregate is uniformly exposed.
- Adjust Pressure as Needed: Adjust the water pressure and brushing technique as needed to achieve the desired level of exposure.
Curing and Sealing
Curing ensures the concrete reaches its full strength and durability, while sealing protects the surface from stains and damage.
Proper Curing Techniques
Curing is key to achieving strong and durable concrete.
- Keep it Moist: Keep the washed concrete surface moist for at least 3-7 days after washing.
- Use a Curing Compound: Apply a curing compound to help retain moisture and promote proper hydration.
- Cover with Plastic: Cover the surface with plastic sheeting to prevent evaporation, especially in hot or windy conditions.
- Sprinkle with Water: Sprinkle the surface with water regularly to keep it moist.
Applying the Sealer
Sealing enhances the beauty and protects the surface.
- Clean the Surface: Ensure the washed concrete surface is clean and dry before applying the sealer.
- Choose the Right Sealer: Select a sealer that is specifically designed for concrete and is compatible with a washed finish.
- Apply Evenly: Apply the sealer evenly using a roller, brush, or sprayer, following the manufacturer’s instructions.
- Apply Multiple Coats: Apply multiple thin coats rather than one thick coat for better penetration and protection.
- Allow to Dry Completely: Allow the sealer to dry completely before allowing traffic on the surface.
Gathering the materials and tools sets the stage, but the real magic happens when you translate that preparation into action. The following steps will guide you through the entire process, transforming your vision into a tangible, beautiful washed concrete finish. Remember, patience and attention to detail are your allies in this endeavor.
Pro Tips and Tricks: Elevating Your Washed Concrete Finish
Achieving a standard washed concrete finish is one thing, but creating a truly exceptional surface requires a deeper understanding of the nuances involved. These pro tips and tricks will help you refine your technique, avoid common pitfalls, and ultimately achieve a result that stands out from the crowd. It’s about moving beyond the basics and mastering the subtle art of washed concrete.
Aggregate Selection: Beyond the Basics
The aggregate is the star of the show in washed concrete, and its selection is paramount to achieving the desired aesthetic. Don’t just settle for the first option you see.
Consider the following:
-
Color Harmony: Choose aggregates that complement the surrounding environment or create a striking contrast, depending on your design vision. Explore locally sourced options for a unique and natural feel.
-
Size and Shape Variation: A mix of different sizes and shapes can add visual interest and texture. Angular aggregates offer a more rugged look, while rounded pebbles provide a smoother, more refined appearance.
-
Material Matters: Different materials, such as quartz, granite, or river rock, offer unique colors and textures. Consider the durability and weather resistance of each material in your specific climate.
-
Sample and Test: Always create a small sample area with your chosen aggregate and concrete mix before committing to the entire project. This allows you to assess the aesthetic and make necessary adjustments.
-
Local Availability: Take advantage of local aggregate suppliers for cost-effective options. You can also find unique and interesting aggregate types that are specific to your region.
Mastering the Retarder: The Key to Perfect Timing
The retarder is your ally in controlling the concrete’s setting time, but it requires a delicate touch. Understanding how to use it effectively is crucial for a successful wash.
-
Dosage is Everything: Carefully follow the manufacturer’s instructions for the retarder dosage. Too little, and the surface will set too quickly. Too much, and you risk weakening the concrete.
-
Environmental Factors: Temperature and humidity significantly affect the concrete’s setting time. Adjust the retarder dosage accordingly, using less in warmer weather and more in cooler conditions.
-
Even Application: Ensure the retarder is applied evenly across the entire surface. Uneven application can lead to inconsistent aggregate exposure. Use a sprayer for optimal coverage.
-
Test Patches: Before applying the retarder to the entire project, test it in a small, inconspicuous area. This allows you to fine-tune the dosage and application technique.
-
Observe Closely: Keep a close eye on the concrete’s setting time. The ideal washing window is when the surface mortar is soft enough to remove easily, but the underlying concrete is still firm.
Water Pressure Precision: Achieving a Clean Wash
The water pressure you use during the washing process is critical for exposing the aggregate without damaging the concrete. Finding the right balance is key.
-
Start Low, Increase Gradually: Begin with a low-pressure nozzle and gradually increase the pressure until you achieve the desired aggregate exposure. Avoid using excessive pressure, which can erode the concrete and dislodge the aggregate.
-
Nozzle Selection: Experiment with different nozzle types to find the one that works best for your specific aggregate and concrete mix. Fan nozzles provide a wider coverage area, while pinpoint nozzles offer more concentrated cleaning power.
-
Consistent Distance: Maintain a consistent distance between the nozzle and the concrete surface. This will ensure even aggregate exposure across the entire area.
-
Circular Motion: Use a circular motion when washing the concrete. This helps to prevent streaking and ensures that all of the surface mortar is removed.
-
Clean Water: Always use clean water for the washing process. Dirty water can stain the concrete and leave behind unwanted residue.
Concrete Mix Mastery: Tailoring Your Blend
The concrete mix is more than just cement, sand, and aggregate. Understanding how to tailor it to your specific needs can significantly impact the final result.
-
Water-Cement Ratio: Pay close attention to the water-cement ratio. A lower ratio will result in stronger concrete, but it will also set more quickly. A higher ratio will make the concrete easier to work with, but it will also be weaker.
-
Admixtures: Consider using admixtures to improve the concrete’s workability, durability, or setting time. Plasticizers can increase workability without adding extra water, while air-entraining agents can improve freeze-thaw resistance.
-
Fiber Reinforcement: Add fiber reinforcement to the concrete mix to increase its strength and reduce the risk of cracking. Synthetic fibers are a good option for most washed concrete projects.
-
Mix Design: Experiment with different mix designs to find the one that works best for your specific aggregate and climate. Consult with a concrete supplier for recommendations.
-
Consistent Batching: Ensure that each batch of concrete is mixed consistently. Variations in the mix can lead to uneven setting and aggregate exposure.
Gathering the materials and tools sets the stage, but the real magic happens when you translate that preparation into action. The following steps will guide you through the entire process, transforming your vision into a tangible, beautiful washed concrete finish. Remember, patience and attention to detail are your allies in this endeavor.
Troubleshooting Common Issues: Solving Problems Like a Pro
Even with meticulous planning, DIY projects can present unexpected challenges. Washed concrete is no exception. Knowing how to troubleshoot common issues will empower you to navigate potential pitfalls and achieve a professional-quality result. This section serves as your guide to resolving problems that may arise during the washed concrete process, ensuring your project stays on track.
Addressing Uneven Aggregate Exposure
One of the most common frustrations is uneven aggregate exposure, where some areas showcase the aggregate beautifully while others remain largely covered by the concrete matrix. This can stem from several factors, each requiring a targeted solution.
Inconsistent Retarder Application: A patchy or uneven application of the surface retarder will lead to variations in the depth of the set. Ensure uniform coverage by using a sprayer with consistent output and overlapping your passes slightly.
Uneven Concrete Thickness: If the concrete pour isn’t perfectly level, the washing process will naturally expose more aggregate in thinner areas and less in thicker areas. Prioritize careful leveling during the pouring stage, using a screed board and level to ensure a consistent surface.
Variations in Washing Technique: Applying inconsistent pressure or dwelling too long in some areas during the washing process can lead to uneven exposure. Use a consistent sweeping motion with your brush and maintain a uniform distance from the surface with your pressure washer.
Delayed Washing: Waiting too long to begin the washing process allows the surface to harden excessively, making it difficult to remove the top layer of cement paste and expose the aggregate. Monitor the concrete’s setting progress closely and begin washing at the optimal time, when the surface is firm enough to walk on but still pliable enough to remove. Perform a small test area to gauge the ease of aggregate exposure.
Solving Concrete Setting Too Quickly
Concrete setting too quickly can be a race against time, making it challenging to properly wash and expose the aggregate. Several factors can contribute to this accelerated setting, demanding swift and effective action.
High Temperatures: Hot weather significantly speeds up the hydration process. When working in high temperatures, take precautions such as pouring in the early morning or late evening when it’s cooler. Add ice to the mixing water to lower the concrete temperature, and consider using a hydration-stabilizing admixture.
Incorrect Concrete Mix: Using a concrete mix with a high cement content or the addition of accelerators can drastically shorten the working time. Opt for a mix specifically designed for longer working times, or consult with a concrete supplier to adjust the mix proportions.
Rapid Evaporation: Windy conditions and low humidity can cause rapid evaporation of moisture from the concrete surface, accelerating the setting process. Use a windbreak or mist the surface with water to slow down evaporation. Cover the concrete with plastic sheeting immediately after pouring to retain moisture.
Over-Vibration: While vibration is necessary to consolidate the concrete, excessive vibration can cause the cement paste to rise to the surface and accelerate setting. Vibrate only long enough to remove air pockets, and avoid overworking the concrete.
Preventing and Treating Staining and Discoloration
Staining and discoloration can mar the appearance of your washed concrete finish, detracting from its aesthetic appeal. Preventing these issues is always preferable, but effective treatment options exist for addressing existing stains.
Preventative Measures:
- Protect from Contaminants: Shield the fresh concrete from potential staining agents like oil, grease, leaves, and rust. Use drop cloths or plastic sheeting to cover vulnerable areas.
- Proper Curing: Adequate curing is crucial for preventing efflorescence, a white powdery deposit that can appear on the surface of concrete. Keep the concrete moist during the curing process by covering it with plastic or applying a curing compound.
- Prompt Sealing: Applying a high-quality concrete sealer creates a protective barrier against stains and discoloration. Choose a sealer specifically designed for exterior concrete surfaces.
Treatment Options:
- Efflorescence: Scrub the affected area with a solution of water and white vinegar, followed by a thorough rinse. In severe cases, a commercial efflorescence remover may be necessary.
- Organic Stains (Leaves, etc.): Clean the area with a solution of water and mild detergent, followed by a thorough rinse. For stubborn stains, try a poultice made from diatomaceous earth and hydrogen peroxide.
- Oil and Grease Stains: Absorb the excess oil with cat litter or sawdust. Then, scrub the area with a degreasing cleaner and a stiff brush, followed by a thorough rinse.
- Rust Stains: Apply a commercial rust remover according to the manufacturer’s instructions. Be sure to test the product in an inconspicuous area first to ensure it doesn’t discolor the concrete.
By proactively addressing these potential issues and implementing the appropriate solutions, you can confidently overcome challenges and achieve a stunning washed concrete finish that enhances your outdoor space.
FAQ: Washed Concrete Finish
Here are some frequently asked questions about creating a washed concrete finish to help you get started.
What exactly is a washed concrete finish?
A washed concrete finish is a decorative technique where the top layer of cement paste is removed from freshly poured concrete. This exposes the aggregate (stones, gravel, sand) beneath, resulting in a textured, slip-resistant, and visually appealing surface.
How soon after pouring do I need to wash the concrete?
Timing is critical for a good washed concrete finish. You need to wait until the concrete has set enough to support your weight but is still soft enough for the cement paste to be washed away. Usually, this is within 4-24 hours after pouring, depending on the weather and concrete mix. Test a small area first!
What tools do I need for the washing process?
Essential tools include a hose with an adjustable nozzle, a stiff-bristled brush, and potentially a concrete retarder (applied during the pouring process if you want more working time). Safety glasses and gloves are also recommended.
Is a washed concrete finish suitable for driveways?
Yes, a washed concrete finish can be excellent for driveways. The exposed aggregate provides good traction, making it less slippery than smooth concrete. Just ensure the concrete is properly reinforced to handle vehicle weight and that you select a durable aggregate mix for heavy traffic.
So, go ahead and give that washed concrete finish project a try! We’re confident you can create something amazing. Good luck, and happy DIY-ing!