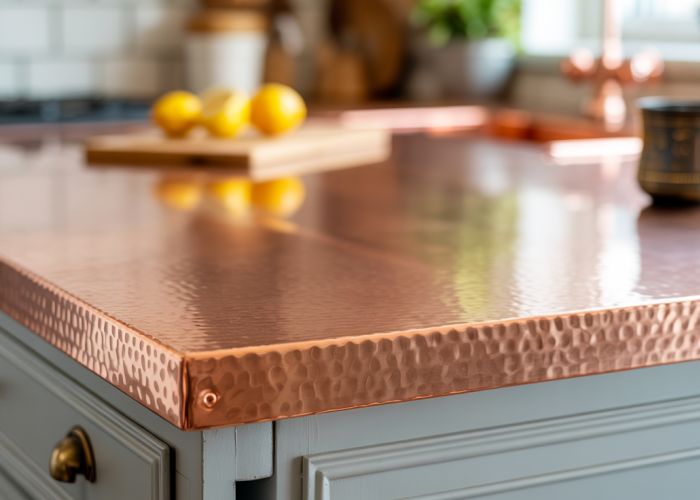
Embarking on a copper countertops diy project can truly revolutionize your kitchen, offering a unique blend of rustic charm and modern elegance. The allure of artisanal craftsmanship attracts many homeowners seeking personalized designs. Using a durable sealant ensures your newly crafted countertop withstands daily use, maintaining its beauty for countless meals. Moreover, consider the transformative influence Montana Bronze can have on the overall aesthetic, adding a touch of sophistication. This empowering journey to create copper countertops diy promises to be both rewarding and straightforward with the proper tools and guidance.
DIY Copper Countertops: Your Kitchen’s Stunning Transformation Awaits!
Ready to give your kitchen a wow-factor upgrade? Installing your own copper countertops isn’t as daunting as you might think! This guide breaks down the process into manageable steps, focusing on creating beautiful and durable "copper countertops diy" projects.
Planning Your Copper Countertops DIY Project
Before you even touch a sheet of copper, careful planning is essential. A well-thought-out design saves you time, money, and potential headaches down the line.
Measuring and Calculating Copper Needs
Accurate measurements are critical.
- Measure Twice, Cut Once: This old saying holds true. Measure the existing countertop space you want to cover, noting any angles, curves, or cutouts for sinks and appliances. Create a detailed diagram.
- Consider Overhangs: Decide how much overhang you want beyond your cabinets. Typical overhangs are 1-2 inches. Add this to your measurements.
- Account for Seams: Larger countertops will require multiple sheets of copper joined together. Plan for seams and add extra material for overlaps (more on this later). Add at least 2 inches of overlap to your measurements per seam.
- Copper Sheet Size: Research available copper sheet sizes from your supplier. This will help you minimize waste and seam requirements. Common sizes are 3ft x 8ft, 4ft x 8ft and 4ft x 10ft.
- Calculate Total Copper Needed: Based on your measurements and sheet sizes, calculate the total square footage of copper you’ll need. It’s always a good idea to order slightly more than you need to account for errors or design changes.
Choosing the Right Copper
The type and gauge (thickness) of copper you select will impact the look, durability, and cost of your "copper countertops diy" project.
- Copper Gauge: Thicker gauges are more durable and dent-resistant but are also more expensive. 16-gauge (0.0625 inches) is generally recommended for countertops. 20-gauge (0.032 inches) can be used but is more prone to dents. Avoid thinner gauges unless you are adhering them to a very strong underlayment.
- Copper Type:
- New Copper: Shiny and bright. Will develop a patina over time (more on that below).
- Patina Copper: Pre-treated to have an aged, weathered look. Eliminates the waiting time for natural patination.
- Reclaimed Copper: Sourced from old roofing or other applications. Adds character but may have imperfections. Requires careful cleaning and inspection.
- Consider the Finish:
- Polished: Reflective and smooth.
- Brushed: Matte and textured.
- Hammered: Adds visual interest and hides imperfections.
- Sourcing Copper: Find a reputable supplier specializing in metal. Ask about available gauges, types, and finishes. Local metal supply companies often provide cutting services and helpful advice.
Essential Tools and Materials
Gather all the necessary tools and materials before starting your project. This will streamline the process and minimize interruptions.
- Tools:
- Tape measure
- Pencil or marker
- Straight edge or level
- Tin snips or metal shears (for cutting copper)
- Jigsaw with metal-cutting blade (for cutouts)
- Rubber mallet
- Seam roller or sturdy rolling pin
- Safety glasses
- Gloves
- Sandpaper (various grits)
- Clamps
- Caulk gun
- Materials:
- Copper sheets (correct gauge and type)
- Wood underlayment (plywood or MDF) – at least 3/4 inch thick
- Construction adhesive (compatible with copper and wood)
- Seam filler (if using multiple sheets)
- Copper rivets (optional, for decorative seams)
- Caulk (silicone or polyurethane)
- Sealer (optional, to protect the copper)
- Cleaning supplies (degreaser, copper cleaner)
- Rags
Step-by-Step Installation Guide for Copper Countertops
Follow these steps carefully to achieve professional-looking results in your "copper countertops diy" endeavor.
Preparing the Underlayment
The underlayment provides a solid and level surface for the copper. Proper preparation is crucial for a smooth and durable countertop.
- Cut the Underlayment: Cut the plywood or MDF to the exact dimensions of your existing countertop, including overhangs. Use the measurements from your planning stage.
- Sand the Surface: Sand the underlayment smooth to remove any imperfections. This will ensure good adhesion with the copper.
- Clean the Surface: Thoroughly clean the underlayment with a degreaser to remove dust, dirt, and oil.
- Optional: Seal the Edges: Sealing the edges of the underlayment will prevent moisture from seeping in.
Applying the Copper Sheeting
This is where your "copper countertops diy" project really comes to life!
- Cut the Copper: Carefully cut the copper sheets to size using tin snips or metal shears. Allow for overlap at seams (if any). Remember to cut slightly larger and trim as needed.
- Apply Construction Adhesive: Apply a generous, even layer of construction adhesive to the underlayment. Follow the manufacturer’s instructions for application and drying time. Use a notched trowel for even spreading.
- Position the Copper: Carefully position the copper sheet onto the adhesive-covered underlayment. Start at one edge and gradually lower the sheet, ensuring even contact.
- Smooth and Secure: Use a rubber mallet to gently tap the copper sheet, ensuring it is fully adhered to the underlayment. Pay special attention to edges and corners.
- Weight it down: Place heavy objects on the copper sheet for several hours (or overnight) while the adhesive dries. This will ensure a strong bond.
Creating Seams (if necessary)
If your countertop requires multiple copper sheets, creating smooth and durable seams is essential.
- Overlap: Overlap the copper sheets by at least 2 inches.
- Adhesive: Apply construction adhesive to the overlapping area.
- Roll the Seam: Use a seam roller or sturdy rolling pin to press the seam firmly together. This will create a tight and even bond.
- Optional: Rivets: For a decorative touch and added strength, consider using copper rivets along the seam. Drill pilot holes and secure the rivets with a rivet gun.
- Seam Filler: If desired, use a seam filler to fill any gaps in the seam. Sand smooth after it dries.
Cutouts for Sinks and Appliances
Cutouts require precision and care to avoid damaging the copper.
- Mark the Cutout: Accurately mark the location of the cutout on the copper. Use the sink or appliance as a template.
- Drill Pilot Holes: Drill pilot holes inside the marked area.
- Cut with a Jigsaw: Use a jigsaw with a metal-cutting blade to carefully cut along the marked lines.
- Sand the Edges: Sand the edges of the cutout smooth to remove any burrs or sharp edges.
Finishing Touches: Protecting Your Copper
Sealing and protecting your new copper countertops is important for long-term durability and aesthetics.
- Clean the Surface: Thoroughly clean the copper surface with a copper cleaner to remove any fingerprints, dirt, or residue.
- Apply Caulk: Apply caulk around the edges of the countertop and around any sinks or appliances to create a watertight seal. Use a caulk that is compatible with copper.
- Optional: Apply Sealer: Applying a sealer will protect the copper from tarnishing and staining. Choose a sealer specifically designed for copper countertops. Follow the manufacturer’s instructions for application. Note: Sealers may change the way the copper patinas over time.
- Embrace the Patina: Copper naturally develops a patina (a greenish or brownish film) over time. This is a natural process and adds to the character of the countertop. You can control the patina by applying waxes or sealers, but many people appreciate the natural aging process.
- Ongoing Care: Clean your copper countertops regularly with mild soap and water. Avoid abrasive cleaners, which can scratch the surface. Use a copper cleaner occasionally to remove stubborn stains.
This detailed guide provides the knowledge and steps needed for creating beautiful and unique "copper countertops diy"! Enjoy the process and the stunning results!
DIY Copper Countertops FAQ
Here are some frequently asked questions about installing your own DIY copper countertops, helping you achieve a beautiful and unique kitchen transformation.
Are copper countertops DIY-friendly for beginners?
Yes, with careful planning and patience, DIY copper countertops are manageable for beginners. Our guide simplifies the process, breaking it down into manageable steps. Remember that prep and accuracy in measurements are key to a successful project. Consider practicing your patina technique on a scrap piece of copper first.
How much do DIY copper countertops cost compared to other materials?
While the initial cost of copper sheeting can be higher than laminate, DIY copper countertops can still be more affordable than professional installation of granite or quartz. The savings come from avoiding labor costs. Factor in the cost of sealant, adhesive, and tools when calculating your budget.
What kind of maintenance do DIY copper countertops require?
Copper is naturally antimicrobial and relatively easy to maintain. Regular cleaning with mild soap and water is usually sufficient. Avoid abrasive cleaners that can scratch the surface. You may also need to reapply sealant periodically to protect the finish and maintain the patina. Remember to dry the countertops after cleaning.
Will my DIY copper countertops develop a patina over time?
Yes, one of the defining characteristics of copper is its natural patina development. This is a gradual oxidation process that results in a beautiful, evolving color change. You can control the patina process to some degree using different techniques, but expect your copper countertops diy project to become even more unique over time.
So, feeling inspired to tackle those copper countertops diy? Go for it! You’ll be amazed at what you can create.