Successful construction hinges on solid foundations, and properly installed concrete sole plates are vital for achieving this. A reputable concrete supplier, such as Cemex, provides materials crucial for the project’s structural integrity. Contractors often use power tools like a Hilti hammer drill to ensure accurate and secure anchor placement. By understanding ACI guidelines and employing precise installation techniques, professionals can ensure concrete sole plates create durable and resilient building frameworks.
Crafting the Perfect "Concrete Sole Plates Install Guide" Article
This outline details the ideal structure for an article focused on installing concrete sole plates, ensuring clarity, readability, and a user-friendly experience. The core principle is to guide the reader from foundational knowledge through the practical installation process.
Understanding Concrete Sole Plates
Before diving into installation, readers need a clear understanding of what concrete sole plates are and why they’re used.
Defining Concrete Sole Plates
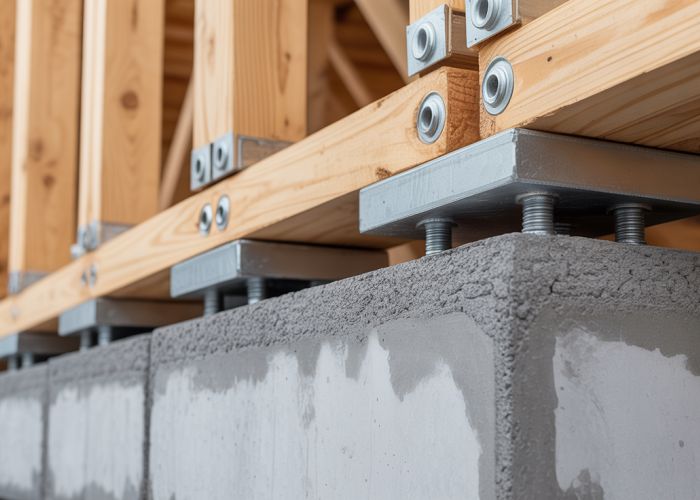
- Begin with a concise and accessible definition of concrete sole plates. Describe them as the horizontal structural members that are attached to the concrete foundation and support the wall framing.
- Emphasize their role in transferring the weight of the building to the foundation.
Advantages of Using Concrete Sole Plates
- Use bullet points to highlight the benefits:
- Durability: Explain how concrete sole plates resist rot, insect infestation, and fire damage compared to traditional wood alternatives.
- Stability: Detail how they provide a solid and level surface for framing.
- Longevity: Explain the long-term cost savings due to reduced maintenance and replacement needs.
- Moisture Resistance: Highlight concrete’s ability to withstand moisture, preventing warping and decay.
When to Consider Using Concrete Sole Plates
- Outline specific scenarios where concrete sole plates are a particularly good choice:
- High-moisture environments (e.g., coastal areas, basements).
- Buildings requiring enhanced fire resistance.
- Projects prioritizing long-term durability and minimal maintenance.
Preparing for Installation
This section is crucial for setting the stage for a successful installation.
Tools and Materials Checklist
-
A comprehensive list of all necessary tools and materials is essential.
Tool/Material Purpose Concrete Sole Plates The primary structural component Anchor Bolts/Embedded Straps To secure the sole plate to the concrete foundation Level Ensuring a level surface Drill with Concrete Bits For drilling pilot holes in the concrete Hammer Drill (optional) For faster drilling in concrete, especially for larger projects Impact Driver/Wrench Tightening fasteners Shims Leveling the sole plate if necessary Measuring Tape Accurate measurements Pencil/Marker Marking drill locations and reference points Safety Glasses Eye protection Work Gloves Hand protection Dust Mask Protection from concrete dust Waterproof Sealant Sealing the gap between the sole plate and the concrete foundation
Inspecting the Concrete Foundation
- Emphasize the importance of a clean and level foundation surface.
- Provide instructions on how to:
- Remove any debris, dust, or loose concrete.
- Identify and address any cracks or imperfections in the concrete.
- Ensure the foundation is level using a level and shims if necessary.
Locating and Marking Anchor Bolt Positions
- Detail the process of accurately locating the embedded anchor bolts or straps within the concrete.
- Explain how to use a measuring tape and marker to transfer these positions onto the concrete sole plate.
- If anchor bolts aren’t pre-existing, explain how to calculate the correct spacing for drilling and inserting them.
- Recommend checking local building codes for specific spacing requirements.
Step-by-Step Installation Guide
This is the core of the article, providing detailed instructions.
Drilling Pilot Holes in the Concrete Sole Plate
- Precision is Key: Emphasize the importance of accurate drilling to align with the anchor bolts.
- Choosing the Right Drill Bit: Specify the appropriate type and size of drill bit for concrete.
- Drilling Technique: Guide the reader on how to drill straight and clean holes, avoiding splintering.
Positioning the Concrete Sole Plate
- Alignment: Explain how to carefully align the drilled holes in the sole plate with the anchor bolts in the foundation.
- Lowering the Plate: Provide instructions on gently lowering the sole plate onto the anchor bolts.
Securing the Sole Plate
- Tightening Fasteners: Detail the process of tightening the nuts/washers on the anchor bolts to securely fasten the sole plate.
- Ensuring a Tight Fit: Describe how to check for a snug and level fit between the sole plate and the foundation.
- Using Shims (if necessary): Explain how to use shims to level the sole plate if any gaps exist between it and the foundation.
Sealing the Sole Plate
- Choosing the Right Sealant: Recommend a high-quality, waterproof sealant specifically designed for concrete.
- Applying the Sealant: Provide instructions on applying a bead of sealant along the perimeter of the sole plate where it meets the foundation.
- Smoothing the Sealant: Explain how to smooth the sealant for a clean and professional finish.
Post-Installation Checks
This section covers essential steps to ensure the installation is sound.
Leveling Verification
- Reiterate the importance of verifying the levelness of the installed sole plate using a level.
- Describe how to make adjustments using shims if needed.
Tightness of Fasteners
- Instruct the reader to re-check the tightness of all fasteners after a short period (e.g., 24 hours) to account for any settling.
Visual Inspection
- Encourage a thorough visual inspection for any signs of gaps, cracks, or other imperfections.
- Provide guidance on addressing any issues that are identified.
Troubleshooting Common Issues
This section anticipates potential problems and offers solutions.
Misaligned Anchor Bolts
- Discuss strategies for dealing with misaligned anchor bolts, such as:
- Slightly enlarging the holes in the sole plate.
- Using shims to compensate for minor misalignments.
- Considering alternative anchoring methods if necessary.
Uneven Foundation Surface
- Provide advice on leveling an uneven foundation surface using self-leveling concrete or shims.
Damaged Concrete Sole Plate
- Offer guidance on repairing minor damage to the concrete sole plate using concrete patching compounds.
- Explain when replacement is necessary.
Safety Precautions
Throughout the article, integrate safety reminders.
- Wear appropriate safety gear (safety glasses, gloves, dust mask).
- Use power tools responsibly and follow manufacturer’s instructions.
- Be aware of potential hazards and take precautions to avoid injury.
Concrete Sole Plates Installation FAQs
These frequently asked questions address common points of confusion related to installing concrete sole plates.
What are the key advantages of using concrete sole plates?
Concrete sole plates offer exceptional durability and resistance to moisture, decay, and pests. This makes them ideal for direct contact with concrete foundations, providing a stable and long-lasting base for framing. They also minimize the risk of rot compared to traditional wood sole plates.
What is the best way to ensure concrete sole plates are properly aligned?
Accurate measurements are crucial. Use a laser level or string line to establish a consistent plane across the foundation. When setting the concrete sole plates, employ shims as needed to achieve perfect level before anchoring. Double-check all alignments before securing them permanently.
What type of fasteners should I use to attach concrete sole plates?
Use concrete anchors specifically designed for attaching wood to concrete. Wedge anchors, sleeve anchors, or expansion anchors are typically recommended. Follow the manufacturer’s instructions for proper drilling and installation depths to ensure a secure and reliable connection for your concrete sole plates.
Do I need to treat concrete sole plates before installation?
While concrete inherently resists rot and pests, applying a waterproofing membrane or sealant to the bottom of the concrete sole plates can further enhance protection against moisture wicking from the concrete foundation. This is particularly useful in areas with high humidity or where the foundation is prone to dampness.
Alright, that’s a wrap on the concrete sole plates install guide! Go get ‘em! And remember, a little prep work and the right techniques go a long way. Good luck with your project!