Achieving optimal audio fidelity from your cassette player hinges on one critical factor: clean cassette heads. The accumulation of oxide debris, a common byproduct of tape playback, directly impacts audio quality. Understanding the mechanics of your tape transport mechanism, like those expertly maintained at the National Audio Company, is crucial for effective cleaning. Neglecting this essential maintenance, a task often championed by audio engineers such as Rupert Neve (though perhaps not specifically for cassettes!), can lead to muffled sound and even damage to your precious tapes. Therefore, learning how to clean cassette heads is essential.
Rediscovering Audio Perfection: The Key to Clean Cassette Heads
The humble cassette tape, once relegated to attics and thrift stores, has staged a remarkable comeback. In a world saturated with digital music, the warmth and tangible nature of analog audio are drawing a new generation of listeners, as well as reigniting the passion of seasoned audiophiles. Central to experiencing this analog renaissance is the cassette deck – and at the heart of every deck lies the often-overlooked, yet crucially important, cassette head.
To truly unlock the potential of your cassette collection and your deck, you must understand the vital role that clean cassette heads play in delivering exceptional sound quality. Regular maintenance, primarily focusing on cleaning, is not just a suggestion; it’s an absolute necessity for preserving the integrity of your listening experience.
The Cassette Revival: A Modern Renaissance
What explains this resurgence? Perhaps it’s a yearning for something real in a digital world. Cassette tapes offer a tactile experience, a physical connection to the music that streaming services simply can’t replicate. The ritual of carefully inserting a tape, pressing play, and listening to an album from start to finish is a deliberate act of engagement.
This resurgence is not just nostalgia. Artists are releasing new music on cassette, independent labels are embracing the format, and vintage cassette decks are becoming increasingly sought after. This revival underscores a desire for a richer, more authentic listening experience.
The Head-Sound Connection: A Matter of Fidelity
The cassette head is the component that reads the magnetic information on the tape.
It’s where the magic of analog audio truly happens. But it’s also a point of vulnerability. As the tape passes over the head, microscopic particles of oxide and debris inevitably accumulate.
This buildup acts as a barrier, preventing the head from accurately reading the magnetic signals on the tape. The result is a degradation of audio fidelity. You might notice a muffled sound, a loss of high frequencies, or even noticeable distortion.
Clean heads ensure that you are hearing the music as it was intended to be heard. They allow the full range of frequencies to be reproduced with clarity and accuracy.
Setting the Stage for Sonic Clarity
This guide is designed to equip you with the knowledge and skills necessary to keep your cassette heads clean and functioning optimally. We will walk you through the essential tools and materials, provide a step-by-step cleaning process, and offer tips for preventing future build-up.
Whether you’re a seasoned audiophile or a newcomer to the world of cassette tapes, mastering the art of cassette head cleaning is essential for achieving audio perfection. This guide will empower you to unlock the full potential of your cassette collection and enjoy the unique warmth and character of analog sound.
The cassette head is the component that makes the magic happen, transforming the magnetic information on the tape into the music we hear. But this delicate component is vulnerable. Over time, it becomes a magnet for debris that insidiously degrades sound quality.
The Silent Killer of Sound: Why Dirty Heads Matter
While the cassette revival brings the warmth of analog back into our lives, it also brings the responsibility of caring for the technology that makes it possible. The cassette head, the unsung hero of your deck, is particularly susceptible to the ravages of time and use. Understanding the impact of dirty heads is the first step in preserving the integrity of your analog listening experience.
The Buildup: A Gradual Assault on Audio Quality
Tape oxide, shed from the magnetic tape as it glides across the head, is the primary culprit. This fine, powdery substance clings to the head’s surface, acting as an insulator.
Think of it like dust on a vinyl record; it creates a barrier between the head and the tape. The result is a weakened signal and compromised audio fidelity.
This buildup isn’t sudden; it’s a gradual process. Each play adds another microscopic layer, compounding the problem over time.
Regular cleaning is essential to prevent this insidious accumulation from robbing you of the full potential of your cassette collection.
Sound Degradation: The Audible Consequences
Dirty cassette heads don’t just diminish the signal; they actively distort it. The effects are often subtle at first, easily dismissed as the natural limitations of the cassette format. However, as the oxide buildup intensifies, the degradation becomes increasingly noticeable.
Muffled sound is a common symptom. The higher frequencies are the first to suffer, losing their clarity and sparkle. This can leave your music sounding dull and lifeless.
The overall sonic landscape lacks definition, creating a muddy soundstage.
The bass response can also be affected, losing its punch and becoming indistinct. In severe cases, you might even experience dropouts or inconsistent playback volume.
Loss of high frequencies is especially noticeable. This is what gives music its clarity and detail, and when it’s compromised, your music can sound dull and lifeless. The subtle nuances of instruments and vocals are lost.
Head Wear: The Inevitable Decline
Beyond the immediate effects of oxide buildup, head wear poses a long-term threat to audio quality. The constant friction between the tape and the head gradually erodes the head’s surface, altering its shape and alignment.
This wear is inevitable, but it can be accelerated by abrasive tapes or neglecting regular cleaning.
As the head wears down, its ability to accurately read and write the magnetic signal diminishes. This manifests as a gradual decline in audio quality, even after cleaning. High frequencies suffer, and stereo separation becomes less defined.
In extreme cases, head wear can render the cassette deck unusable, requiring costly repairs or replacement. Proper cleaning is preventative – it minimizes friction and prolongs the life of your cassette heads.
The buildup isn’t sudden; it’s a gradual process. Each play adds another microscopic layer, compounding the problem over time and leading to sound degradation.
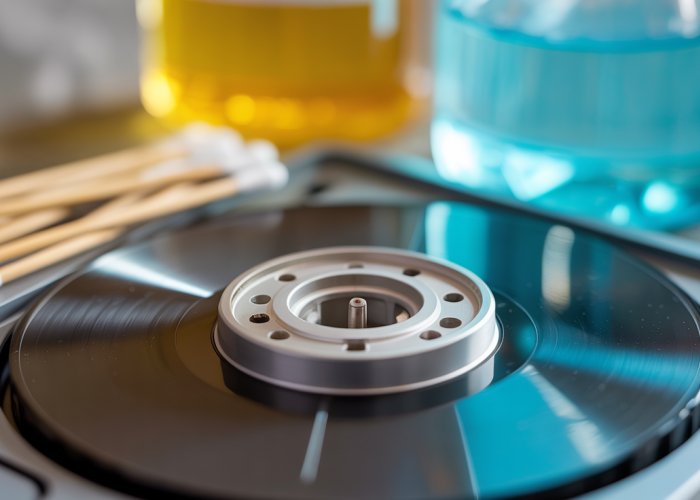
To effectively combat this audio decay, you’ll need the right equipment. Assembling your cleaning arsenal is a crucial step towards restoring and maintaining the pristine sound of your cassette collection.
Your Cleaning Arsenal: Essential Tools and Materials
Cleaning cassette heads isn’t a complicated process, but it does require the right tools and materials to ensure both effectiveness and safety. Using the wrong products can damage the delicate components of your deck. Here’s a breakdown of what you’ll need:
The Right Swabs: Precision Cleaning
The choice of cleaning swabs is more important than you might think. Standard cotton swabs, while readily available, can shed fibers that get caught on the cassette head, potentially exacerbating the problem.
Instead, opt for lint-free swabs. These are specifically designed not to leave behind any residue.
Swabs with wooden or sturdy plastic handles are also preferable. They provide better control and prevent the handle from bending or breaking during cleaning. Avoid flimsy plastic handles, as these can easily snap under pressure, potentially damaging the delicate components of your deck.
Pointed swabs can be particularly useful for reaching tight corners and crevices around the head.
Isopropyl Alcohol: The Cleaning Solution
Isopropyl alcohol (IPA) is the gold standard for cleaning cassette heads. It’s an effective solvent that dissolves tape oxide and other debris without damaging the delicate components.
However, not all isopropyl alcohol is created equal. You should aim for a concentration of 90% or higher.
Lower concentrations contain more water, which can potentially cause corrosion or leave behind residue.
Safety First: Handling Isopropyl Alcohol
While isopropyl alcohol is an effective cleaning agent, it’s also flammable and can be harmful if ingested or inhaled in large quantities. Always take the following precautions:
- Work in a well-ventilated area. Open a window or turn on a fan to ensure adequate airflow.
- Avoid contact with skin and eyes. Wear gloves if necessary.
- Keep away from open flames and heat sources. Isopropyl alcohol is highly flammable.
- Store in a cool, dry place away from children and pets.
Head Demagnetizer: Removing Residual Magnetism
Over time, the cassette head can become magnetized. This residual magnetism can degrade the audio signal, leading to increased noise and distortion.
A head demagnetizer, also known as a degausser, is a tool that removes this unwanted magnetism.
It works by creating a strong, alternating magnetic field that randomizes the magnetic domains in the head, effectively neutralizing any residual magnetism.
Using a head demagnetizer is a simple process.
You simply turn it on and slowly move it around the cassette head, following the manufacturer’s instructions. It’s important not to touch the head directly with the demagnetizer.
Benefits of Demagnetization
Demagnetizing your cassette heads offers several benefits:
- Reduced noise and distortion. Removing residual magnetism eliminates unwanted noise and distortion, resulting in a cleaner, clearer audio signal.
- Improved high-frequency response. Magnetized heads can attenuate high frequencies, leading to a dull or muffled sound. Demagnetization restores the full frequency range.
- Extended head life. Residual magnetism can attract more tape oxide and debris, accelerating wear and tear on the head. Demagnetization helps to prevent this.
Demagnetizing your cassette heads every 20-40 hours of use can significantly improve the performance and longevity of your cassette deck.
Step-by-Step Guide: Mastering the Art of Cassette Head Cleaning
Having assembled your cleaning kit, you’re now ready to embark on the process of restoring your cassette deck’s audio fidelity. Follow these instructions carefully for effective cleaning, ensuring you avoid damage to delicate components.
Preparation is Key: Powering Down and Setting the Stage
Safety First. Before you even think about touching the cleaning supplies, the very first step is paramount: Power off and unplug the cassette deck.
This is not merely a suggestion, but a safety imperative. Unplugging the unit completely eliminates any risk of electrical shock during the cleaning process.
It also prevents any accidental activation of the mechanism while you’re working inside. Trust us; you do not want that to happen.
Once unplugged, find a well-lit workspace. Good visibility is essential for meticulous cleaning.
The Main Event: Cleaning the Cassette Heads
This is where precision and a gentle touch come into play. Dampen your lint-free swab with isopropyl alcohol. Remember, less is more. You want the swab damp, not dripping.
Gentle Strokes: The Golden Rule
The key to effective cleaning lies in gentle, unidirectional strokes. Move the swab across the surface of the cassette head in a single direction, avoiding back-and-forth scrubbing.
Scrubbing can dislodge oxide particles and grind them into the head, potentially causing scratches or other damage. One smooth pass is far more effective than multiple aggressive ones.
A Word of Caution: Pressure Control
Resist the urge to apply excessive pressure. The heads are delicate components, and forcing them can lead to misalignment or even breakage.
Let the isopropyl alcohol do the work of dissolving the oxide buildup. If a spot proves stubborn, reapply a small amount of alcohol and try again with a gentle stroke. Patience is key.
Monitor the Swab
As you clean, keep a close eye on the swab. You’ll likely notice it turning brown or black as it picks up the accumulated tape oxide.
Continue cleaning with fresh swabs until they come away clean. This indicates that you’ve successfully removed the majority of the debris.
Beyond the Heads: Cleaning the Pinch Roller and Capstan
While you’re at it, don’t forget about the pinch roller and capstan. These components also come into direct contact with the tape and accumulate oxide and grime.
The cleaning method is the same as for the heads: dampen a lint-free swab with isopropyl alcohol and gently wipe the surfaces clean.
The pinch roller, in particular, can benefit from a bit of extra attention, as it tends to collect more debris due to its rubber composition.
Rotate the pinch roller as you clean to ensure you cover its entire surface.
The Final Step: Patience is a Virtue
Once you’ve cleaned all the relevant components, the final step is to allow them to dry completely. Isopropyl alcohol evaporates quickly, but it’s still important to give it ample time to dissipate.
Reassembling and using the deck before everything is completely dry can lead to smearing of any remaining residue and potentially damage the tape.
Wait at least 15-20 minutes, or even longer in humid environments, to ensure everything is bone dry before you load a cassette and press play.
Having meticulously cleaned the cassette heads, pinch roller, and capstan, you’ve addressed the most common causes of audio degradation. But what happens when, despite your best efforts, those persistent pops, crackles, or uneven channel balances refuse to disappear? It’s time to delve into advanced cleaning and maintenance, exploring techniques that go beyond the everyday routine and keep your cassette deck in prime condition.
Beyond the Basics: Advanced Cleaning and Maintenance Techniques
Sometimes, a standard cleaning isn’t enough. Lingering audio imperfections may indicate deeper issues that require a more specialized approach. This section delves into identifying persistent problems, understanding azimuth alignment, and establishing a maintenance schedule tailored to your deck’s usage.
Identifying and Addressing Persistent Playback Issues
After a thorough cleaning, listen critically to your cassette deck. Are there still noticeable audio flaws? Consider these troubleshooting steps:
-
Persistent Distortion or Muffled Sound: If the audio remains distorted or muffled, even after cleaning, the issue might not be surface-level. Look for signs of head wear (more on that later) or consider the tape itself.
-
Channel Imbalance: One channel significantly louder or weaker than the other can point to alignment problems or even internal amplifier issues.
-
Consistent Dropouts: Brief moments of silence or significant volume reduction could indicate a problem with the tape path or the head’s ability to maintain contact with the tape.
-
Excessive Wow and Flutter: Noticeable variations in playback speed, beyond the natural characteristics of cassettes, can signal problems with the motor or drive belts.
If basic cleaning hasn’t resolved these issues, avoid further amateur repairs that could lead to irreversible damage and instead it’s time to explore advanced solutions.
Understanding Azimuth Alignment
Azimuth alignment refers to the angle of the tape head relative to the tape path. Even a slight misalignment can drastically affect stereo separation and high-frequency response.
Think of it like aiming a flashlight: If the beam is perfectly aligned, you get a clear, bright spot. But if it’s slightly off, the light becomes diffuse and less focused.
The Impact on Stereo Separation
When the azimuth is misaligned, the left and right channels are no longer perfectly synchronized. This leads to a blurring of the stereo image, making instruments and vocals sound less distinct and the overall soundstage less defined.
Recognizing Azimuth Misalignment
A telltale sign of azimuth misalignment is a loss of high frequencies and a general "muddiness" to the sound. You might also notice that the stereo image seems unstable or shifts from side to side.
When to Seek Professional Help
Adjusting azimuth alignment is a delicate procedure that requires specialized tools and knowledge. Attempting to adjust it without proper equipment can easily damage the tape head. If you suspect azimuth misalignment, it’s best to consult a qualified technician.
Establishing a Regular Maintenance Schedule
Preventative care is key to extending the life of your cassette deck and maintaining optimal audio performance. A regular maintenance schedule will help you avoid future issues.
Tailoring the Schedule to Your Usage
The frequency of cleaning depends on how often you use your deck and the condition of your tapes.
-
Light Use (a few hours per week): Clean the heads, pinch roller, and capstan every 2-3 months.
-
Moderate Use (several hours per week): Clean these components monthly.
-
Heavy Use (daily): Clean weekly or even after every 10-20 hours of playback.
Additional Maintenance Tips
-
Inspect and Clean Tape Guides: Periodically check the tape guides for any build-up of oxide or debris and clean them gently.
-
Check and Replace Belts: Over time, belts can stretch or become brittle, affecting playback speed. Inspect them regularly and replace them as needed.
-
Lubricate Moving Parts: Apply a small amount of lubricant to moving parts, such as the capstan bearing, to ensure smooth operation. Use a lubricant specifically designed for electronics.
By adopting these advanced cleaning and maintenance techniques, you can ensure that your cassette deck continues to deliver high-quality audio for years to come. Remember, a little extra care goes a long way in preserving your analog investment.
Having addressed advanced cleaning and maintenance, it’s time to move beyond preventative care and tackle active issues. Sometimes, despite your best efforts, audio gremlins persist. Recognizing the subtle nuances of these audio ailments is key to accurately diagnosing the root cause and applying the right solution. Let’s explore how to differentiate between problems stemming from dirty heads and other potential culprits.
Troubleshooting Audio Woes: Diagnosing and Solving Common Problems
Even with diligent cleaning, issues can plague your cassette deck. Knowing how to pinpoint the source of these problems—whether it’s dirty heads, wear, or something else entirely—is critical for effective troubleshooting. This section focuses on common audio problems associated with cassette heads, helping you distinguish between various causes and find appropriate solutions.
Decoding Distortion: Dirty Heads or Deeper Issues?
Distortion is a common complaint, but it’s not always a straightforward indicator of dirty heads.
Differentiating the cause requires careful listening and a process of elimination.
Dirty heads typically produce a fuzzy, crackling distortion that worsens over time as more debris accumulates. The distortion will be more prominent in the higher frequencies.
However, distortion can also stem from several other factors:
-
Tape saturation: Recording at too high a level can overload the tape, causing clipping and distortion.
-
Amplifier problems: Issues within the deck’s amplifier circuitry can introduce distortion.
-
Worn tapes: Old or damaged tapes can exhibit distortion due to physical degradation.
-
Azimuth misalignment: As mentioned earlier, an incorrect azimuth can cause severe distortion, especially in the higher frequencies.
To isolate the cause, try playing a known good cassette. If the distortion persists, the problem likely lies within the deck itself (amplifier, alignment). If the distortion disappears, the issue is likely with the original cassette.
Thoroughly cleaning the heads is always the first step, but if the distortion remains, investigate these other potential sources.
Identifying Audio Quality Degradation: Symptoms and Solutions
Dirty cassette heads don’t just cause distortion; they can also lead to a general decline in audio quality. Be alert for these signs:
-
Loss of high frequencies: This is one of the most common symptoms. High-end details like cymbal shimmer or the airiness of vocals become muted or disappear altogether.
-
Muffled sound: The overall audio becomes dull and indistinct, lacking clarity and definition.
-
Weak bass response: Although less common, severe head contamination can sometimes affect the lower frequencies as well.
-
Increased background noise: Dirty heads can amplify tape hiss and other unwanted noise.
These symptoms can be gradual, making them easy to overlook. Regularly comparing the playback of a well-maintained cassette deck with a suspect one can reveal subtle but significant differences.
If cleaning doesn’t restore the audio quality, it’s time to consider other factors. Are the tapes themselves in good condition? Are the heads properly aligned? Is there any visible head wear? Addressing these will help you isolate the problem.
Spotting the Signs of Head Wear: When Replacement Becomes Necessary
Cassette heads are durable, but they aren’t indestructible. Over time, friction from the tape can cause wear, ultimately impacting audio performance.
Identifying head wear early can prevent further damage and ensure optimal sound quality.
Look for these telltale signs:
-
Visible grooves or flat spots: Examine the head surface closely, using a magnifying glass if needed. Grooves worn into the head indicate significant wear.
-
Changes in the head contour: The smooth, rounded profile of the head may become flattened or asymmetrical.
-
Increased tape shedding: Excessive oxide buildup on the heads after only a short playback time can indicate accelerated wear.
-
Continued audio degradation after cleaning: If cleaning consistently fails to restore audio quality, even with different tapes, head wear is a likely culprit.
If you observe these signs, particularly grooves or flat spots, it’s time to consider head replacement. Replacing cassette heads requires specialized skills and equipment; it’s generally best left to a qualified technician. Ignoring head wear can lead to permanent damage to your cassette tapes and continued subpar audio quality.
Having addressed advanced cleaning and maintenance, it’s time to move beyond preventative care and tackle active issues. Sometimes, despite your best efforts, audio gremlins persist. Recognizing the subtle nuances of these audio ailments is key to accurately diagnosing the root cause and applying the right solution. Let’s explore how to differentiate between problems stemming from dirty heads and other potential culprits.
Preventing Future Build-Up: Proactive Measures for Long-Term Performance
While diligent cleaning is essential, preventing the excessive build-up of tape oxide and debris is the key to ensuring consistently great audio quality and extending the life of your cassette deck. A proactive approach, focusing on tape quality, proper storage, and a regular maintenance schedule, will significantly reduce the need for frequent deep cleans and minimize potential damage.
The Crucial Role of Tape Quality
The quality of the cassette tape itself has a profound impact on the cleanliness of your cassette heads and the overall health of your deck. Inferior tapes, often characterized by a lower-quality binder and magnetic coating, tend to shed more oxide. This shedding directly translates to increased debris build-up on the heads, pinch roller, and capstan, accelerating wear and degrading audio performance.
Selecting High-Quality Tapes
Investing in reputable brands known for their higher-quality formulations is a worthwhile investment. Look for tapes specifically designed for optimal performance and minimal shedding. Chrome and metal tapes, while requiring appropriate deck settings, generally exhibit better longevity and produce less debris compared to basic ferric oxide tapes.
Avoiding Problematic Tapes
Be wary of excessively cheap or generic tapes, especially those of unknown origin. These tapes often lack the quality control measures necessary to ensure consistent performance and minimal shedding. Similarly, older tapes, particularly those that have been stored improperly, are more prone to degradation and should be handled with extra care or avoided altogether.
Optimizing Tape Storage for Longevity
Proper storage is paramount in preserving the integrity of your cassette tapes and minimizing the potential for future problems. Environmental factors like temperature, humidity, and physical orientation can all significantly impact tape condition.
Temperature and Humidity Control
Store your tapes in a cool, dry environment, away from direct sunlight and extreme temperature fluctuations. High temperatures can soften the tape binder, leading to increased shedding and potential warping. Excessive humidity can promote mold growth and damage the magnetic coating. A stable temperature between 60-75°F (15-24°C) and a relative humidity level of 40-50% is ideal.
Orientation and Physical Protection
Store cassettes vertically in their cases to prevent uneven pressure on the tape pack. Avoid stacking tapes horizontally, as this can lead to deformation and playback issues over time. Keep tapes in their cases to protect them from dust, dirt, and physical damage. Consider using storage containers or shelves to further shield your tapes from the elements.
The Importance of a Consistent Maintenance Routine
While high-quality tapes and proper storage minimize debris build-up, a regular cleaning schedule remains essential for optimal performance.
Establishing a Cleaning Schedule
The frequency of cleaning depends on your usage habits. If you use your cassette deck frequently, a weekly or bi-weekly cleaning routine is recommended. For occasional use, a monthly cleaning may suffice. The key is to be proactive and prevent excessive build-up rather than react to noticeable audio degradation.
Regular Inspection and Maintenance
In addition to cleaning, periodically inspect your cassette deck for signs of wear or damage. Check the condition of the pinch roller and capstan, and ensure that all moving parts are functioning smoothly. Addressing minor issues promptly can prevent more significant problems down the road and ensure the long-term health of your cassette deck.
Having addressed advanced cleaning and maintenance, it’s time to move beyond preventative care and tackle active issues. Sometimes, despite your best efforts, audio gremlins persist. Recognizing the subtle nuances of these audio ailments is key to accurately diagnosing the root cause and applying the right solution. Let’s explore how to differentiate between problems stemming from dirty heads and other potential culprits.
Unlocking the Full Potential: The Rewards of Pristine Heads
Maintaining pristine cassette heads is not merely a chore; it’s an investment. It’s an investment in the longevity of your equipment and, more importantly, in the quality of your listening experience. The benefits extend beyond simply "fixing" a problem; they unlock the full potential of your cassette deck and tape collection.
Audio Fidelity Restored: A Clearer Listening Experience
Clean cassette heads have a profound impact on audio fidelity. The difference between a neglected deck and one with meticulously cleaned heads can be truly striking.
Muffled sounds become crisp and clear. The full spectrum of frequencies is restored. Highs sparkle, lows resonate, and the overall listening experience is elevated.
A clean head allows the tape to make proper contact, ensuring optimal signal transfer. This translates directly into improved stereo separation, more accurate reproduction of instruments, and a far more immersive soundstage.
Extending the Life of Your Analog Investment
Beyond sonic improvements, regular cleaning significantly extends the lifespan of both your cassette deck and your tape collection.
Tape oxide and debris, if left unchecked, act as abrasives. They gradually wear down the delicate heads of your deck. This wear degrades performance over time and can eventually lead to costly repairs or even the need for a replacement.
Similarly, dirty heads can damage your tapes. Abrasive build-up can scratch the magnetic coating. This degrades the audio information stored on the tape. Consistent cleaning prevents this damage. It preserves your valuable tape collection for years to come.
Recording Excellence: Capturing Audio at Its Best
For those who use their cassette decks for recording, clean heads are absolutely essential. Dirty heads impede the recording process. They introduce unwanted noise, distortion, and a general lack of clarity.
A clean head ensures that the recorded signal is captured accurately. This results in pristine recordings that truly reflect the source material. Whether you’re creating mixtapes, archiving precious audio, or experimenting with analog recording techniques, clean heads are the foundation of exceptional results.
By maintaining clean cassette heads, you’re not just cleaning a machine. You’re unlocking its full potential. You’re preserving the quality of your audio, extending the life of your equipment, and ensuring that every listening and recording experience is as rewarding as possible.
Clean Cassette Heads: Frequently Asked Questions
Here are some common questions about cleaning your cassette heads to maintain optimal audio quality.
How often should I clean my cassette heads?
It depends on how often you use your cassette player. If you use it daily, clean the heads weekly. If you use it infrequently, clean them every few months. Listen for muffled or distorted sound, which indicates a need to clean cassette heads.
What should I not use to clean cassette heads?
Avoid using abrasive materials like sandpaper or metal tools. Also, avoid harsh chemicals like bleach or strong solvents as they can damage the delicate heads. Always use isopropyl alcohol and cotton swabs specifically for cleaning.
Can a dirty cassette head actually damage my tapes?
Yes, a dirty cassette head can absolutely damage your tapes. Accumulated oxide and debris can act like sandpaper, gradually wearing down the tape surface and leading to irreversible audio degradation. Regular cleaning of cassette heads prevents this.
What happens if I don’t clean my cassette heads?
If you don’t clean your cassette heads, you’ll likely experience degraded audio quality. This can manifest as muffled sound, decreased high-frequency response, increased hiss, and volume inconsistencies. You may also shorten the lifespan of both your tapes and your cassette player.
So there you have it! Hopefully, this guide has given you everything you need to keep your clean cassette heads sounding their best. Happy listening!