Cement ceilings, often installed for their durability, are susceptible to cracking, particularly in areas with high humidity. Addressing these issues promptly using materials like joint compound is crucial to prevent further damage and maintain structural integrity. Many homeowners, after consulting with a professional contractor, undertake cement ceiling repair as a cost-effective solution to avoid expensive replacements and preserve the aesthetic appeal of their homes.
Cement Ceiling Repair: Article Layout for Optimal Impact
Here’s a suggested article layout designed to maximize readership and provide comprehensive, actionable advice on "cement ceiling repair". It focuses on addressing the readers’ needs regarding stopping cracks and saving money.
Introduction: Hooking the Reader and Setting Expectations
- Start with a relatable scenario: Open with a sentence or two painting a picture of cracked or damaged cement ceilings. For example, "Are unsightly cracks marring the appearance of your cement ceiling? Don’t despair; effective and affordable cement ceiling repair is within reach."
- Briefly introduce the problem: Clearly state that cracked cement ceilings are common and can be addressed without breaking the bank.
- Outline the article’s purpose: Briefly explain what the reader will learn, emphasizing DIY solutions and cost-saving strategies. For example, "This guide provides step-by-step instructions and expert tips on how to perform cement ceiling repair yourself, saving you time and money on professional services."
- Include the primary keyword: Naturally incorporate "cement ceiling repair" within the first paragraph or two.
Understanding Cement Ceiling Cracks: Causes and Implications
- Explain why cement ceilings crack:
- Movement in the building’s structure (settling).
- Temperature fluctuations and expansion/contraction.
- Excessive moisture.
- Poor initial construction or materials.
- Vibrations from traffic or nearby construction.
- Highlight potential problems if cracks are ignored:
- Worsening cracks leading to larger repairs.
- Water damage and mold growth if the roof above has issues.
- Compromised structural integrity (though rare, mention it briefly for awareness).
- Decreased property value.
- Different types of cracks to consider:
- Hairline cracks: Superficial and usually not a major concern.
- Structural cracks: Wider and potentially indicate a more significant problem – advise consulting a professional.
- Map cracking: Interconnected, irregular cracks resembling a map.
Preparing for Cement Ceiling Repair: Tools and Materials
- Essential tools:
- Scraper or putty knife
- Wire brush
- Dust mask and eye protection
- Gloves
- Mixing bucket
- Trowel or pointing tool
- Sponge
- Sandpaper (various grits)
- Ladder or scaffolding (if needed)
- Necessary materials:
- Cement patching compound (specifically designed for ceilings)
- Water
- Cement primer (optional, but recommended for better adhesion)
- Paint (matching the existing ceiling color)
- Safety Precautions:
- Wear appropriate safety gear (mask, eye protection, gloves).
- Ensure adequate ventilation.
- If working at height, use a stable ladder or scaffolding.
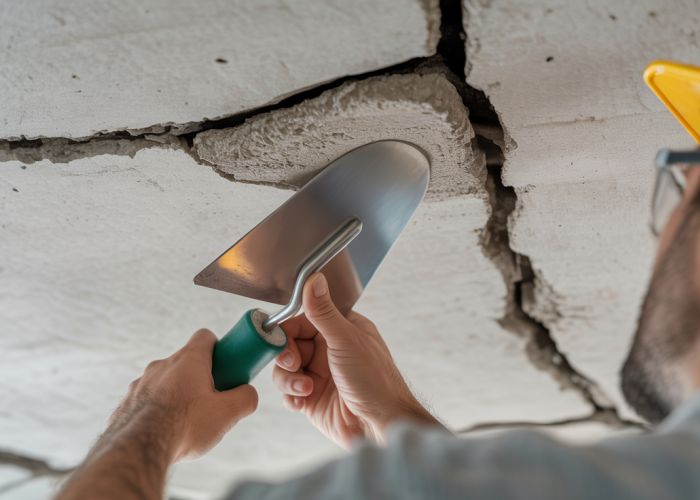
Step-by-Step Guide: Performing Cement Ceiling Repair
- Clean the affected area: Use a wire brush to remove loose debris, dust, and flaking paint. A clean surface is crucial for proper adhesion.
- Prepare the patching compound: Follow the manufacturer’s instructions for mixing the patching compound with water. Aim for a smooth, workable consistency.
- Apply the patching compound: Use a trowel or pointing tool to fill the cracks with the patching compound. Ensure the compound is pressed firmly into the cracks. Overfill slightly to allow for sanding.
- Allow the compound to dry: Refer to the manufacturer’s drying time recommendations.
- Sand the patched area: Once dry, use sandpaper to smooth the patched area, blending it seamlessly with the surrounding ceiling. Start with a coarser grit sandpaper and gradually move to finer grits.
- Apply primer (optional): Apply a coat of cement primer to the patched area to improve paint adhesion and ensure a uniform finish.
- Paint the repaired area: Apply paint that matches the existing ceiling color. You may need to apply multiple coats for complete coverage.
Preventing Future Cracks: Proactive Measures
- Control Moisture: Address any leaks promptly. Proper ventilation is also vital.
- Proper Construction Techniques: During construction, ensure proper curing of the cement to prevent future issues. (This is more relevant for new constructions or significant renovations.)
- Regular Inspections: Regularly inspect the ceiling for signs of new cracks or existing cracks worsening. Address minor issues promptly to prevent them from escalating.
- Address Underlying Structural Issues: If structural problems are contributing to the cracking, have them assessed and repaired by a qualified professional.
Cost-Saving Tips for Cement Ceiling Repair
- DIY vs. Professional: Weigh the costs and benefits of doing the repair yourself versus hiring a professional. Smaller repairs are often easily handled by homeowners.
- Shop around for materials: Compare prices from different suppliers to find the best deals on patching compound, paint, and other materials.
- Buy only what you need: Avoid overbuying materials, as they can be expensive and may not be used.
- Use online resources: Leverage online tutorials and forums for guidance and tips on cement ceiling repair.
When to Call a Professional: Recognizing the Limits of DIY
- Large or complex cracks: Cracks that are wide, deep, or structurally significant should be assessed by a professional.
- Evidence of water damage: If there is evidence of water damage or mold growth, a professional can identify and address the source of the problem.
- Uncertainty or lack of experience: If you are unsure about any aspect of the repair process, it is best to consult with a professional to avoid making costly mistakes.
- Suspected asbestos: If the ceiling is old and there is a possibility of asbestos content, DO NOT attempt repairs yourself. Call a professional for asbestos testing and abatement.
Cement Ceiling Repair: Frequently Asked Questions
This FAQ addresses common questions about repairing cracks in cement ceilings, helping you understand the process and save money.
How do I know if a crack in my cement ceiling is serious?
Hairline cracks are often cosmetic and may not require immediate attention. However, cracks that are wider than 1/8 inch, actively growing, or accompanied by sagging could indicate a structural issue. Consult a professional for cement ceiling repair if you’re unsure.
Can I DIY cement ceiling repair, or do I need a professional?
Small, non-structural cracks can often be repaired DIY using patching compound designed for concrete. For larger or structural issues, hiring a professional is recommended to ensure the integrity of the cement ceiling. They possess the expertise to diagnose and address the root cause of the problem.
What type of patching compound is best for cement ceiling repair?
Use a concrete patching compound specifically formulated for ceilings. These compounds are typically lighter and easier to apply overhead. Ensure the product is suitable for both interior and exterior use if applicable and carefully follow the manufacturer’s instructions.
How do I prevent cracks from reappearing after cement ceiling repair?
Addressing the underlying cause of the cracking is crucial. This might involve improving drainage, stabilizing the foundation, or addressing humidity issues. Consider applying a flexible sealant to help accommodate future movement and prevent new cracks.
So, there you have it – the lowdown on cement ceiling repair! Hopefully, you’re feeling confident enough to tackle those cracks and save some serious cash. Good luck with your project!