Ensuring structural integrity is paramount for home safety, and ceiling joist bracing plays a crucial role. Effective bracing methods, often implemented using techniques recommended by the American Wood Council, can significantly enhance the performance of your ceiling. One common problem impacting joists is excessive deflection, potentially leading to cracks and structural weakness. Regular inspections using tools such as a precision level can help identify areas where ceiling joist bracing is needed. When done correctly, you ensure your building is compliant with local building codes.
Ceiling Joist Bracing Secrets: Ensuring a Safe and Stable Home
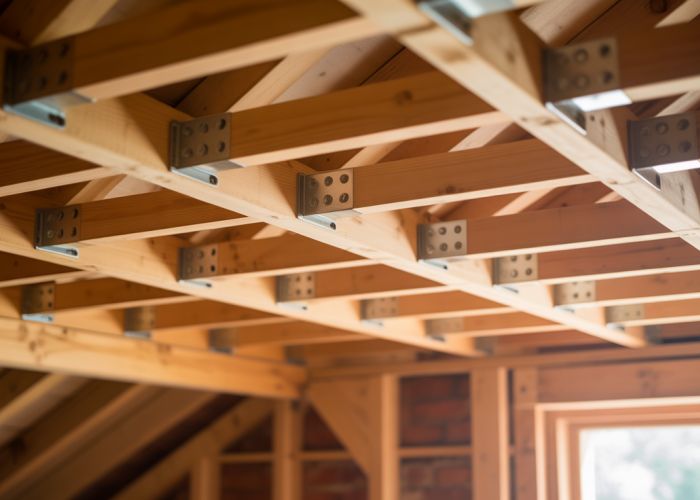
Ceiling joists are horizontal structural members that support the ceiling and often the roof above. Proper ceiling joist bracing is crucial for preventing joist buckling, spreading, and ultimately, ceiling collapse. This guide explains the importance of bracing, different bracing methods, and how to determine if your home is adequately braced.
Why is Ceiling Joist Bracing Important?
Ceiling joists, under the weight of the ceiling material and potentially roof loads (snow, wind), are subjected to compressive forces. Think of trying to compress a long, slender piece of wood. Without proper support, it will likely bend or buckle. That’s what bracing prevents.
- Preventing Buckling: Long, unsupported joists are prone to buckling, which can cause ceiling sag and even structural failure.
- Distributing Loads: Bracing helps distribute the load across multiple joists, reducing stress on any single joist.
- Maintaining Proper Spacing: It keeps joists spaced correctly, preventing them from twisting or moving out of alignment.
- Resisting Wind Uplift: In regions prone to high winds, bracing helps resist wind uplift forces on the roof.
- Enhancing Overall Structural Integrity: Proper bracing contributes significantly to the overall stability and safety of your home.
Types of Ceiling Joist Bracing
There are several different methods of bracing ceiling joists, each with its own application and effectiveness. The best choice depends on factors such as joist span, spacing, and the overall structural design of the roof.
Lateral Bracing
Lateral bracing is designed to prevent joists from buckling sideways. It’s typically run perpendicular to the joists.
- Solid Blocking: Solid wood blocks are installed tightly between the joists, usually at mid-span or thirds for longer spans. This is a very effective method.
- Installation Tips: Cut the blocking pieces accurately to fit snugly between the joists. Nailing or screwing them securely in place is essential.
- Diagonal Bracing (Cross Bracing): Diagonal braces, also called cross bracing, consist of lengths of lumber installed diagonally between the joists, forming an "X" pattern.
- Installation Tips: Ensure the diagonal braces are properly sized for the span and load. They should be securely fastened at each intersection and to the joists.
- Plywood or OSB Sheathing: Applying plywood or OSB sheathing directly to the top or bottom of the joists can provide significant lateral bracing. This is often used when the attic is being floored or the ceiling is being finished.
- Installation Tips: Ensure the sheathing is properly fastened to the joists with appropriate fasteners, following recommended spacing guidelines.
Tension Bracing
Tension bracing prevents the joists from pulling away from the walls.
- Collar Ties: Collar ties are horizontal ties that connect opposing rafters in the upper third of the roof. While technically part of the roof structure, they help prevent outward thrust on the walls and contribute to overall stability.
- Rafter Ties: Rafter ties, or ceiling joists themselves when adequately connected to the wall, are tension members that run from the base of one rafter to the base of the opposing rafter. They are essential in preventing wall spreading.
Webbing
Webbing is more common with trussed roof systems, but can also be applied to traditionally framed joists for additional support and load distribution.
- Metal Webbing: This involves using pre-fabricated metal webbing that’s designed to be installed between joists, providing lateral support.
- Wood Webbing: Similar to metal webbing, wood webbing uses pre-cut wood pieces that fit between the joists to create a web-like structure.
Identifying Potential Problems
Knowing the signs of inadequate or failing ceiling joist bracing is crucial for early detection and preventing more serious structural problems.
Signs of Inadequate Bracing:
- Ceiling Sagging: A noticeable dip or curve in the ceiling is a primary indicator.
- Cracks in the Ceiling: Cracks, especially those that run parallel to the joists, can signal excessive movement.
- Walls Bowing Outward: This indicates that the joists are pushing outward on the walls due to inadequate tension bracing.
- Joist Twisting or Leaning: If the joists are visibly twisted or leaning, it indicates a lack of lateral support.
- Loose or Missing Bracing: Obviously, if existing bracing is loose, damaged, or missing, it needs attention.
Inspection Checklist:
| Item to Inspect | What to Look For |
|---|---|
| Solid Blocking | Are blocks present at regular intervals? Are they tightly fitted and secured? |
| Diagonal Bracing | Is cross bracing present? Are the diagonals properly fastened and in good condition? |
| Plywood/OSB Sheathing | Is sheathing properly installed and fastened? |
| Collar Ties (if present) | Are the collar ties intact and securely connected? |
| Rafter Ties (Joists) | Are the joists securely connected to the walls? Is there any evidence of pulling away? |
Addressing Inadequate Bracing
If you identify potential problems with your ceiling joist bracing, it’s important to take action. In some cases, you may be able to address the issues yourself, while in others, it’s best to consult a qualified structural engineer or contractor.
Simple DIY Solutions:
- Adding Solid Blocking: Adding solid blocking between joists is often a relatively straightforward task, especially if access is good.
- Tightening Existing Bracing: Check existing bracing for loose fasteners and tighten them as needed.
- Replacing Damaged Bracing: Replace any damaged or rotted bracing with new material of the same size and type.
When to Call a Professional:
- Significant Ceiling Sagging: If the ceiling is sagging significantly, it may indicate a more serious structural problem.
- Wall Bowing: Walls bowing outward require professional assessment to determine the underlying cause and the best course of action.
- Extensive Damage: If there is extensive damage to the joists or bracing, consult a professional.
- Uncertainty: If you are unsure about how to proceed, it’s always best to err on the side of caution and seek professional advice.
Ceiling Joist Bracing: Your Safety Questions Answered
Got questions about ceiling joist bracing? We’ve got answers to help ensure your home’s structural integrity.
What exactly is ceiling joist bracing and why is it important?
Ceiling joist bracing provides essential lateral support to ceiling joists, preventing them from twisting or buckling under load. This is crucial for maintaining the stability of your roof and preventing sagging ceilings. Without proper bracing, your home’s structure could be at risk.
How can I tell if my ceiling joists are adequately braced?
Look in your attic for diagonal or lateral bracing installed between the joists. This bracing, often consisting of lumber or metal straps, should be spaced regularly along the length of the joists. Absence or inadequate bracing are red flags.
What are the common types of ceiling joist bracing?
Common methods include cross bridging (diagonal bracing), lateral bracing (running perpendicular to the joists), and solid blocking (short pieces of lumber installed between joists). The best method depends on joist span, lumber size, and local building codes.
Can I install ceiling joist bracing myself?
While some DIYers may be comfortable tackling this project, it’s generally recommended to consult with a qualified structural engineer or contractor. Incorrect installation of ceiling joist bracing can actually worsen the situation, so professional advice is crucial.
So, take what you’ve learned about ceiling joist bracing and give your home a good once-over. A little attention to detail can make a huge difference in the long run! Until next time, happy home-improving!